- Full ingestion and indexing - Data is ingested and indexed through our advanced pipeline, ensuring optimal performance and speed compared to live search.
- Entitlements enforcement - Permissions from your upstream data sources are automatically synced and enforced within the Contextual platform. Users without access to a document cannot see it in the Datastore or query against it.
- Auto and manual syncing - Data updates are synced every 3 hours, while permissions are refreshed every hour to maintain freshness. You can also trigger a manual sync at any time to capture changes.
- Folder-level selection - Sync only the folders you need.
Supported Data Sources
Contextual AI currently supports the following data sources:- Google Drive: Google Docs, Google Slides, PDF files, Word documents, plain text files, PowerPoint presentations
- Sharepoint: PDF files, Word documents, plain text files, PowerPoint presentations
- OneDrive: PDF files, Word documents, plain text files, PowerPoint presentations
- Box: PDF files, Word documents, plain text files, PowerPoint presentations
Coming Soon: Support for Dropbox, Confluence, and Salesforce
Please email [email protected] for connector-related questions or feedback.
Please email [email protected] for connector-related questions or feedback.
Connecting Google Drive
Log in through the UI and follow these steps to configure Google Drive as a data source.Set Data Source Name & Type
- Click Datastores in the left-hand pane, followed by the Create button in the top right.
- Give your datastore a unique name, then select Third-Party Connection as the method for adding content to your datastore. Click the Next button.
- On the Connection Setup page, you can set up auto top-off to automatically add credits when low, or click Skip for now to bypass this step.
Note: Auto top-off is recommended in On Demand mode to prevent ingestions from failing halfway if you use up your balance.

Review Access Levels & Set Account Type
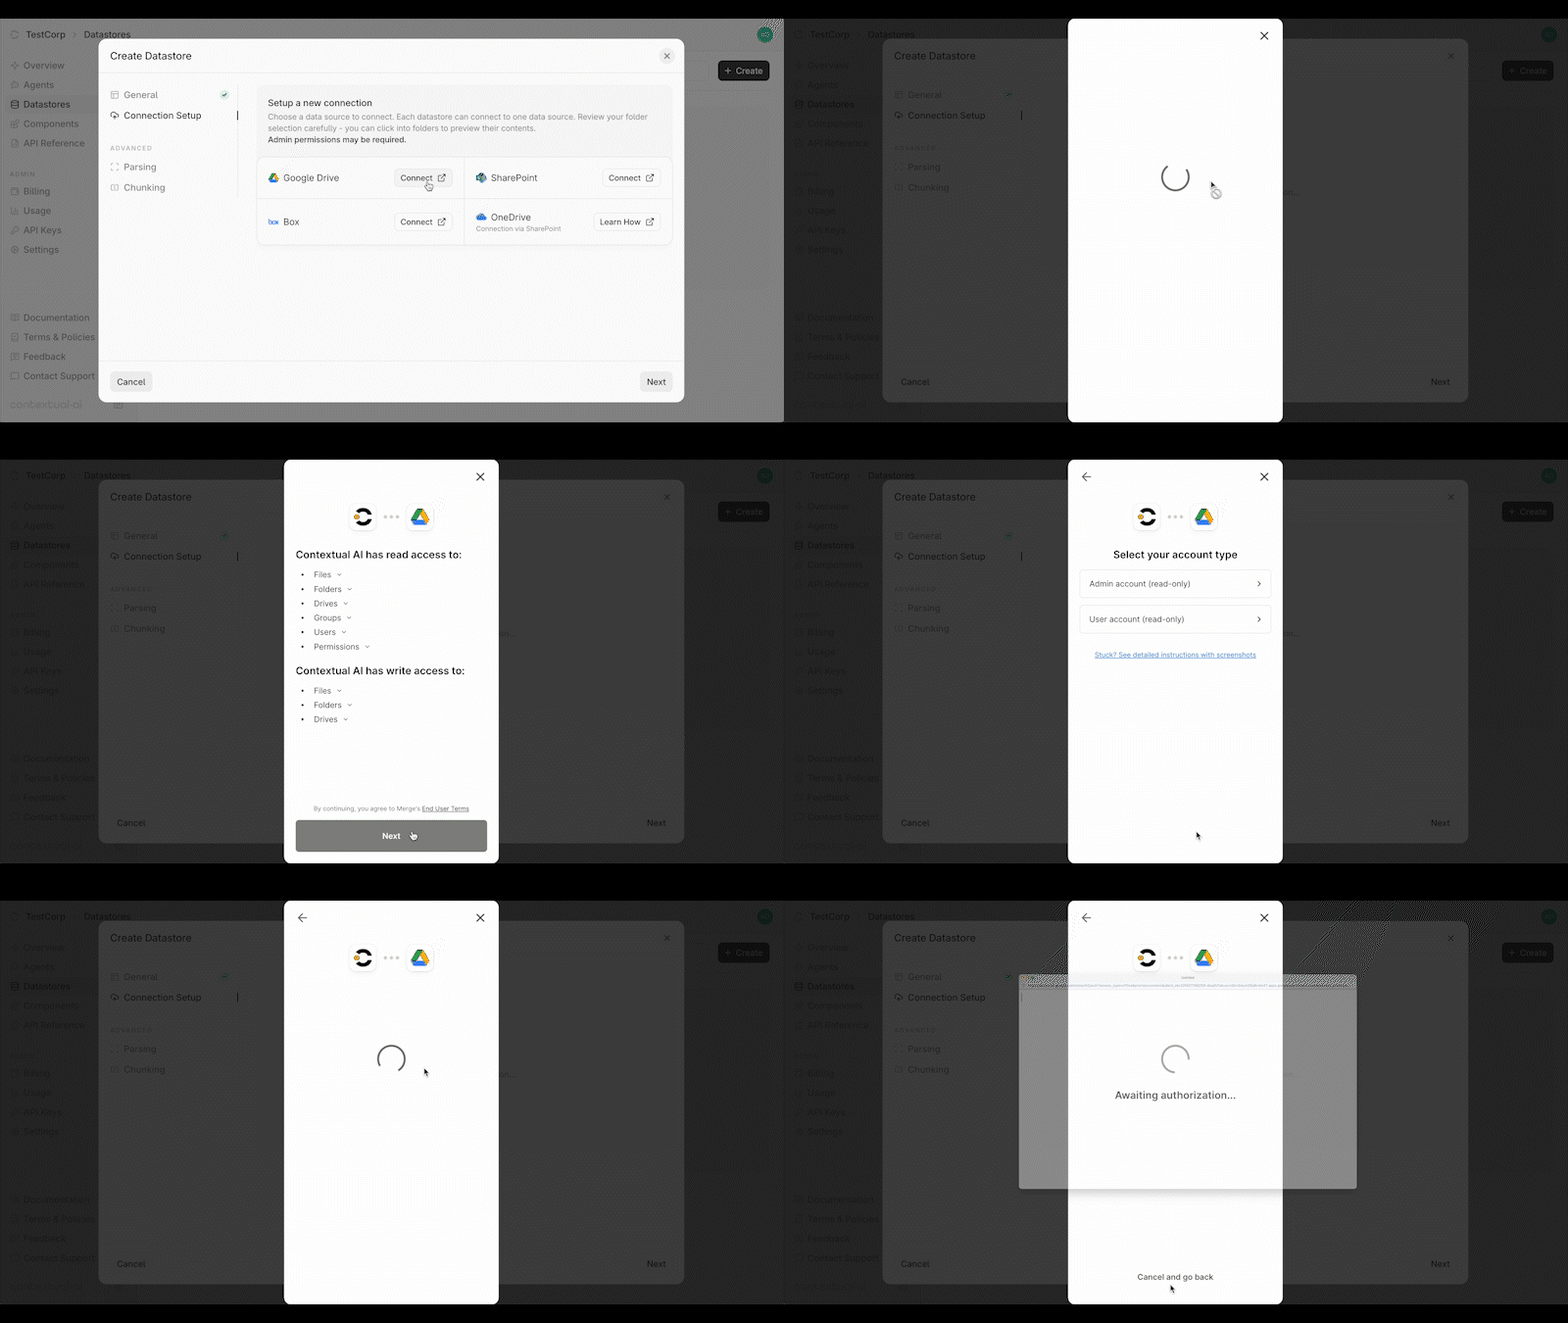
- Click the Connect button next to Google Drive.
- Confirm Contextual AI’s read/write access levels and review the end user terms. Click Next to continue.
- Select your Account Type:
- Admin account (read-only) - You are setting up a connection for your organization and have admin access to your data source.
- User account (read-only) - You are setting up a personal connection or do not have admin access to your data source.
Please refer to this link for a full list of permissions you need for admin authorization.
- Click Open window to authorize your account.
Authorize Connection & Sync Settings
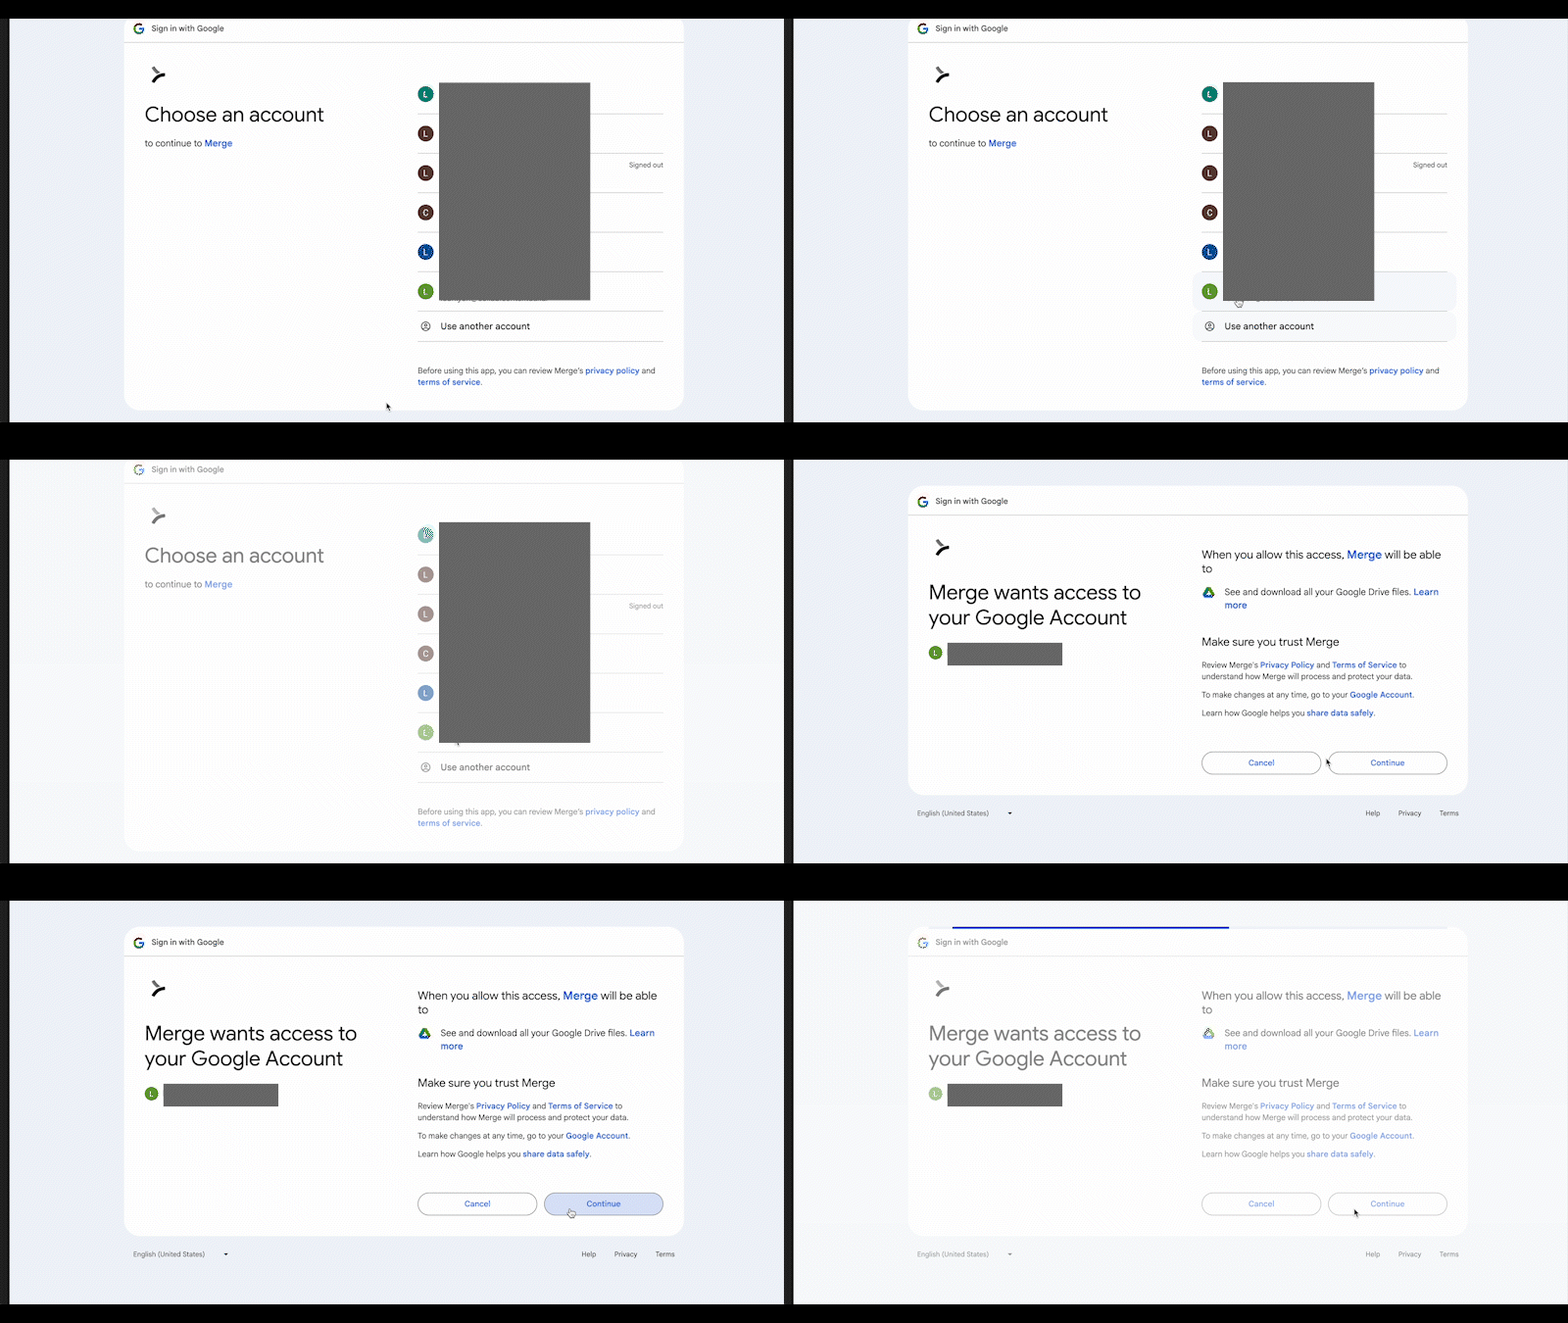
- In the pop-up window, select the account for authorizing the connection.
- Click Continue to authorize the connection.
Configure Sync Settings
Contextual AI offers two ways to sync your data. You can choose to sync all your files or only specific folders in Google Drive.Sync Options
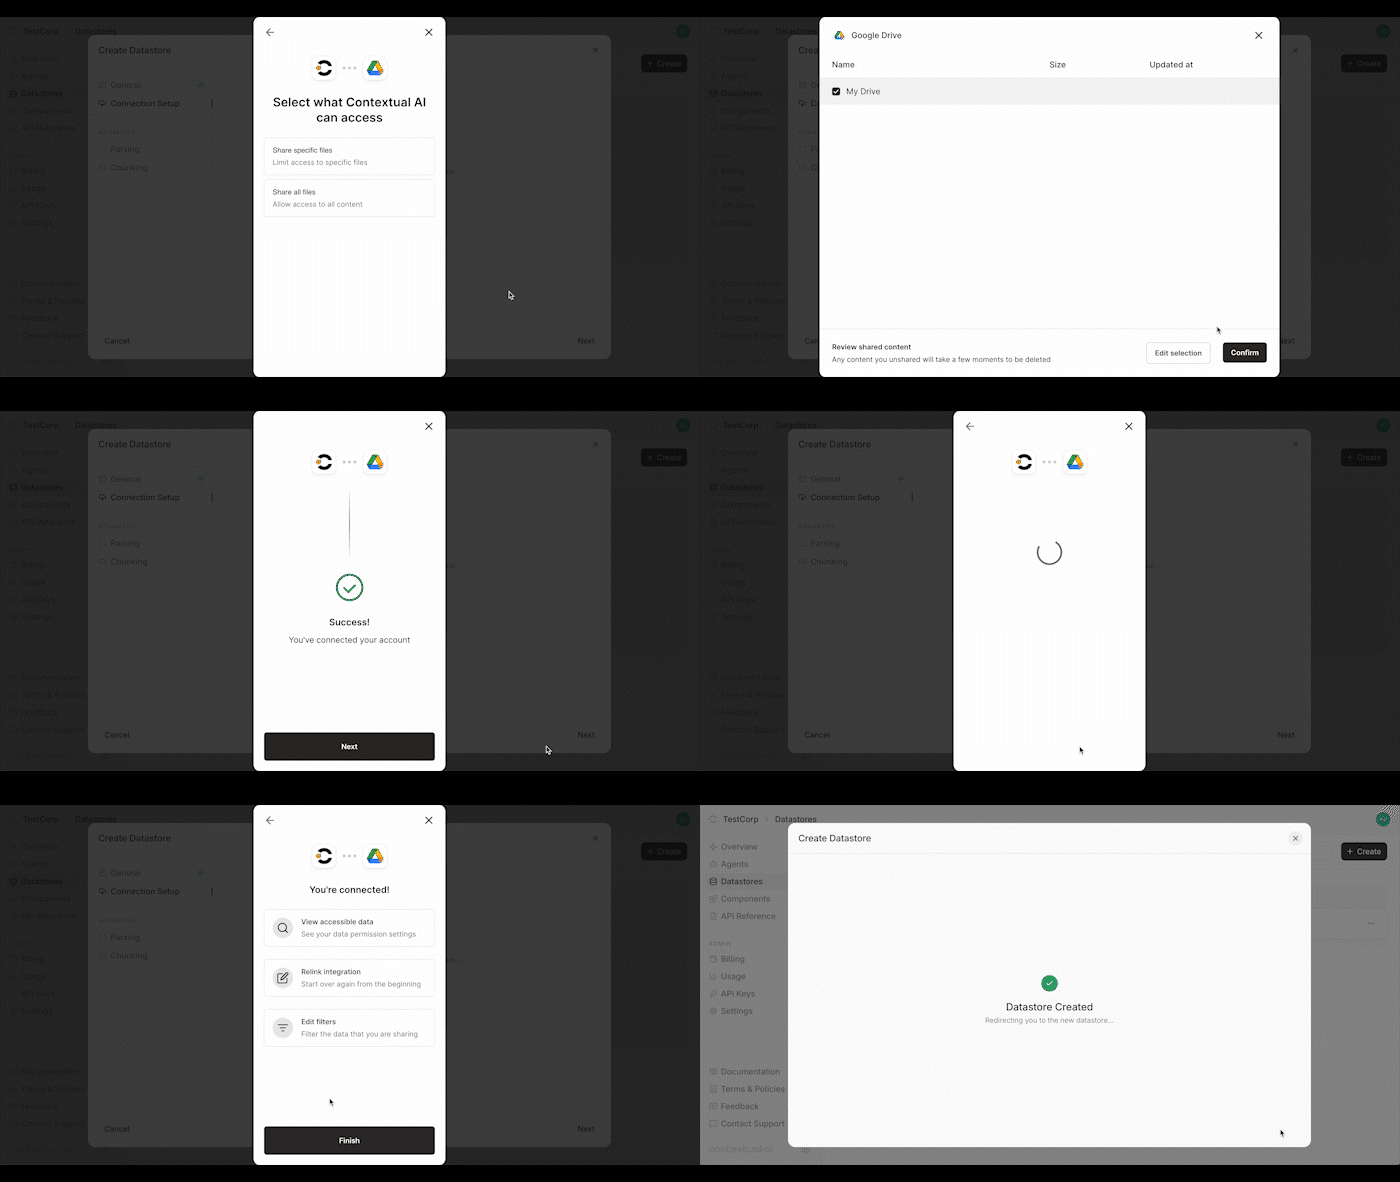
- Share all files - Grants access to all content in your Google Drive.
- Share specific folders - Restricts access to only the folders you select.
- Hover over the folder and check the box to select it.
- You can click into a folder to view its contents, but note that only folders—not individual files—can be selected.
- Select one or multiple folders as needed.
- Click Confirm to finalize your selections, then click Next once setup is complete.
Create Datastore & Start Sync
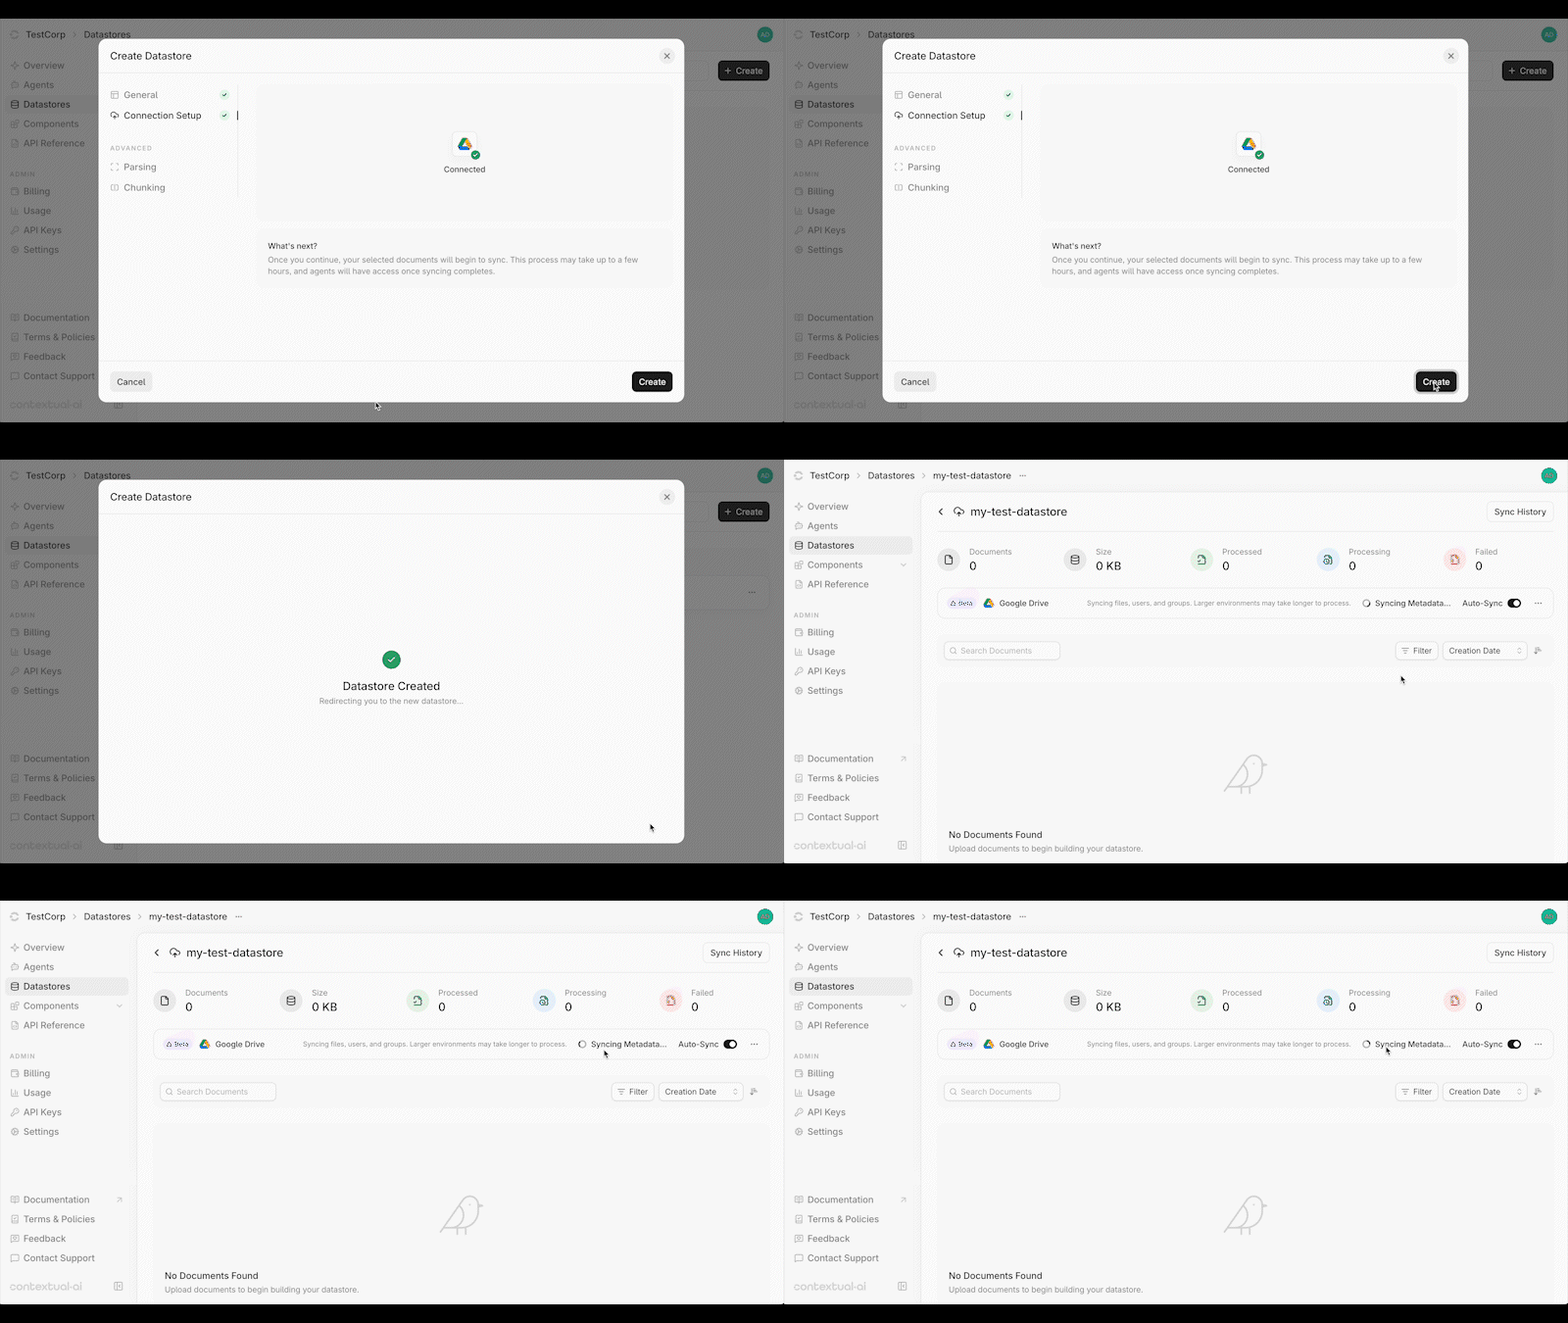
You’re now ready to start syncing your data. Click Create to initialize your connection and create your datastore. You’ll be redirected to your Datastore page, where the Syncing Metadata status will appear. During this stage, Contextual AI syncs your file metadata, users, and groups. Once metadata syncing is complete, ingestion will begin automatically and the status will update to Processing.Note: The syncing process is typically quick, but may take a few hours if you have a large number of files, users, or groups.
You can begin using your datastore while syncing continues, but you’ll only have access to the documents that have already been ingested.
You can begin using your datastore while syncing continues, but you’ll only have access to the documents that have already been ingested.
Connecting SharePoint
Log in through the UI and follow these steps to configure SharePoint as a data source.You can sync OneDrive data via the SharePoint connector. For detailed instructions, please see Connecting to OneDrive via Sharepoint
Set Data Source Name & Type
- Click Datastores in the left-hand pane, followed by the Create button in the top right.
- Give your datastore a unique name, then select Third-Party Connection as the method for adding content to your datastore. Click the Next button.
- On the Connection Setup page, you can set up auto top-off to automatically add credits when low, or click Skip for now to bypass this step.
Note: Auto top-off is recommended in On Demand mode to prevent ingestions from failing halfway if you use up your balance.

Review Access Levels & Set Account Type
- Click the Connect button next to SharePoint.
- Confirm Contextual AI’s read/write access levels and review the end user terms. Click Next to continue.
- Select your Account Type:
- Admin account (read-only) - You are setting up a connection for your organization and have admin access to your data source.
- User account (read-only) - You are setting up a personal connection or do not have admin access to your data source.
Please refer to this link for a full list of permissions you need for admin authorization.
- Click Open window to authorize your account.

Configure Sync Settings
Contextual AI offers two ways to sync your data. You can choose to sync all your files or only specific folders in Sharepoint.Sync Options
- Share all files - Grants access to all content in Sharepoint.
- Share specific folders - Restricts access to only the folders you select.
- Hover over the folder and check the box to select it.
- You can click into a folder to view its contents, but note that only folders—not individual files—can be selected.
- Select one or multiple folders as needed.
- Click Confirm to finalize your selections, then click Next once setup is complete.

Note: The syncing process is typically quick, but may take a few hours if you have a large number of files, users, or groups.
You can begin using your datastore while syncing continues, but you’ll only have access to the documents that have already been ingested.
You can begin using your datastore while syncing continues, but you’ll only have access to the documents that have already been ingested.
Connecting OneDrive
Contextual AI allows you to sync OneDrive data via the SharePoint connector.Note: Before getting started, ensure that you are a Super Admin. Follow this guide to configure Super Admin permissions in SharePoint.
Set Data Source Name & Type
- Click Datastores in the left-hand pane, followed by the Create button in the top right.
- Give your datastore a unique name, then select Third-Party Connection as the method for adding content to your datastore. Click the Next button.
- On the Connection Setup page, you can set up auto top-off to automatically add credits when low, or click Skip for now to bypass this step.
Note: Auto top-off is recommended in On Demand mode to prevent ingestions from failing halfway if you use up your balance.

Review Access Levels & Set Account Type
- Click the Connect button next to SharePoint.
- Confirm Contextual AI’s read/write access levels and review the end user terms. Click Next to continue.
- Select your Account Type:
- Admin account (read-only) - You are setting up a connection for your organization and have admin access to your data source.
- User account (read-only) - You are setting up a personal connection or do not have admin access to your data source.
Please refer to this link for a full list of permissions you need for admin authorization.
- Click Open window to authorize your account.

Configure Sync Settings
Contextual AI offers two ways to sync your data. You can choose to sync all your files or only specific folders.Sync Options
- Share all files - Grants access to all content. This includes OneDrive folders within SharePoint sites and an individual user’s OneDrive folders.
- Share specific folders - Restricts access to only the folders you select. You can pick specific OneDrive folders within SharePoint sites, but not an individual user’s OneDrive folders.

Note: The syncing process is typically quick, but may take a few hours if you have a large number of files, users, or groups.
You can begin using your datastore while syncing continues, but you’ll only have access to the documents that have already been ingested.
You can begin using your datastore while syncing continues, but you’ll only have access to the documents that have already been ingested.
Connecting Box
Log in through the UI and follow these steps to configure Box as a data source.Set Data Source Name & Type
- Click Datastores in the left-hand pane, followed by the Create button in the top right.
- Give your datastore a unique name, then select Third-Party Connection as the method for adding content to your datastore. Click the Next button.
- On the Connection Setup page, you can set up auto top-off to automatically add credits when low, or click Skip for now to bypass this step.
Note: Auto top-off is recommended in On Demand mode to prevent ingestions from failing halfway if you use up your balance.

Review Access Levels & Set Account Type
- Click the Connect button next to Box.
- Confirm Contextual AI’s read/write access levels and review the end user terms. Click Next to continue.
- Select your Account Type:
- Admin account (read-only) - You are setting up a connection for your organization and have admin access to your data source.
- User account (read-only) - You are setting up a personal connection or do not have admin access to your data source.
Please refer to this link for a full list of permissions you need for admin authorization.
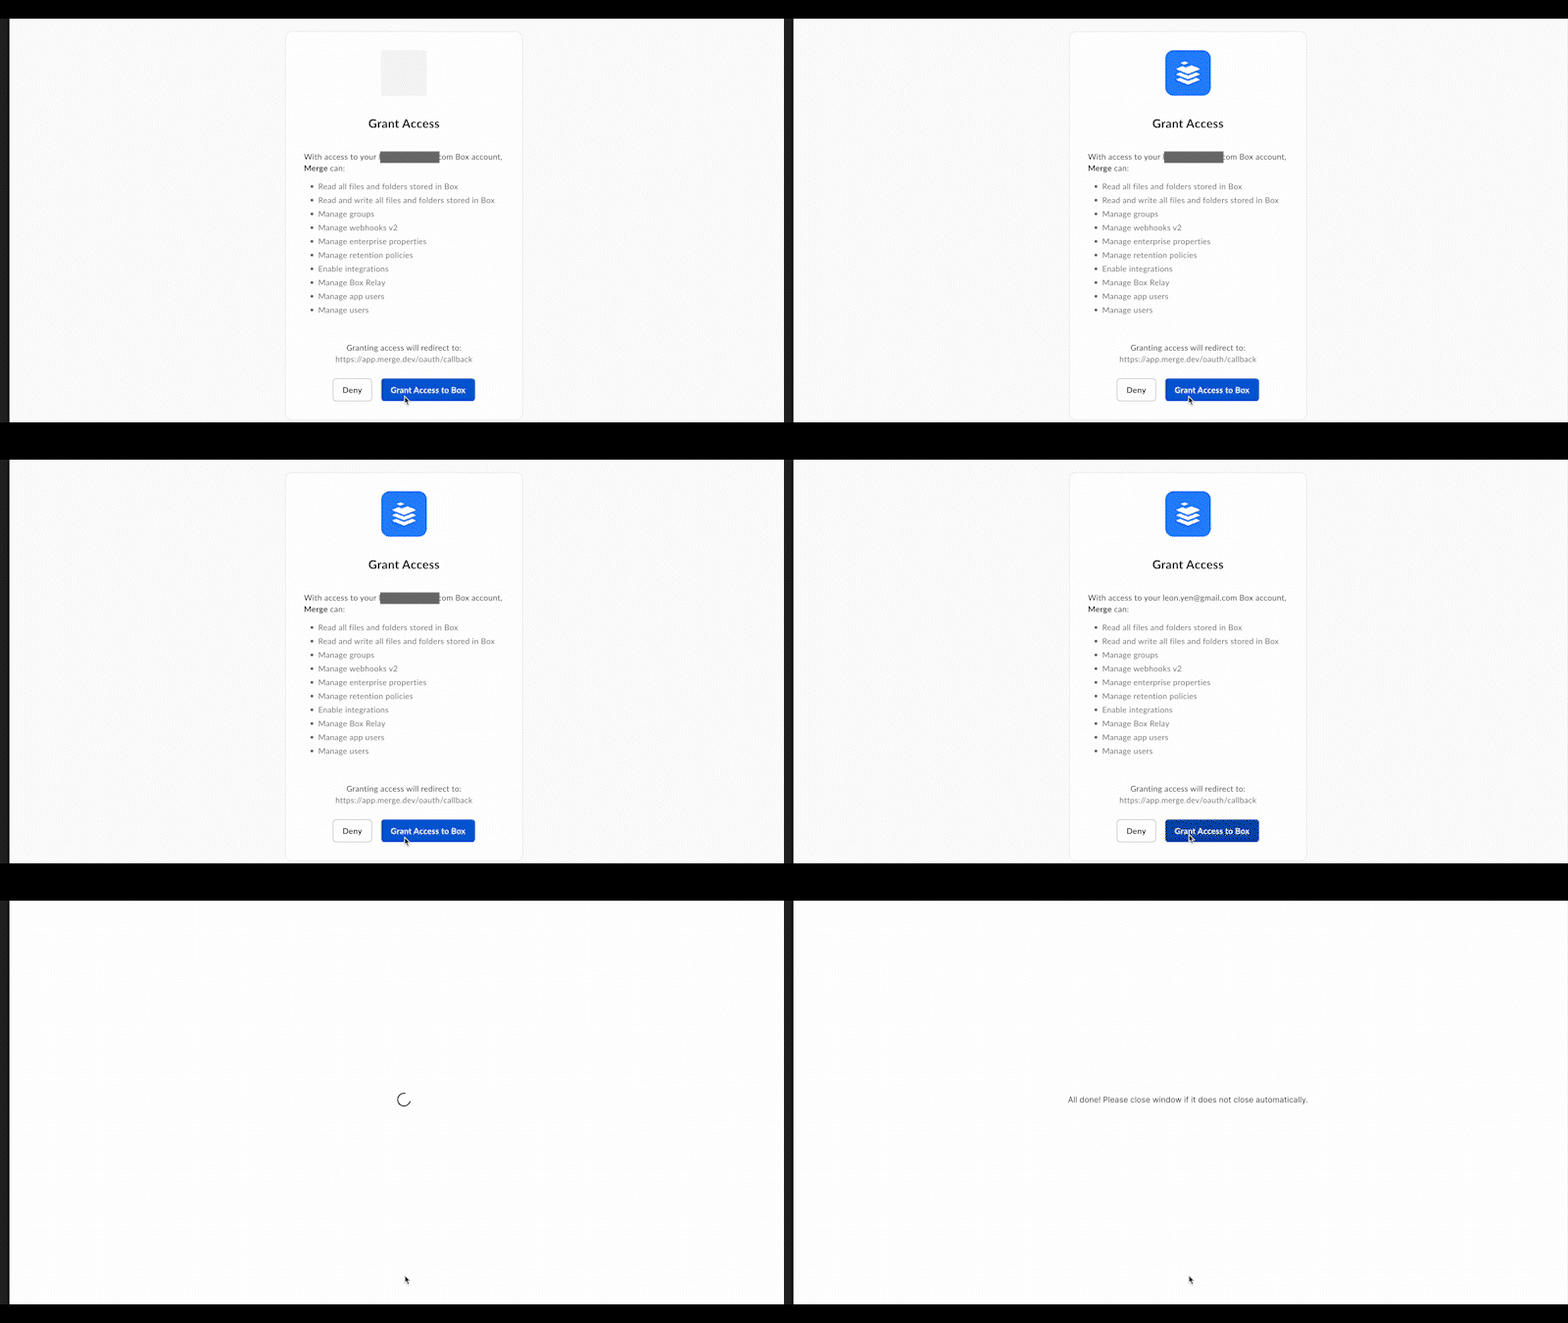
- Click Open window to grant access to your Box account.
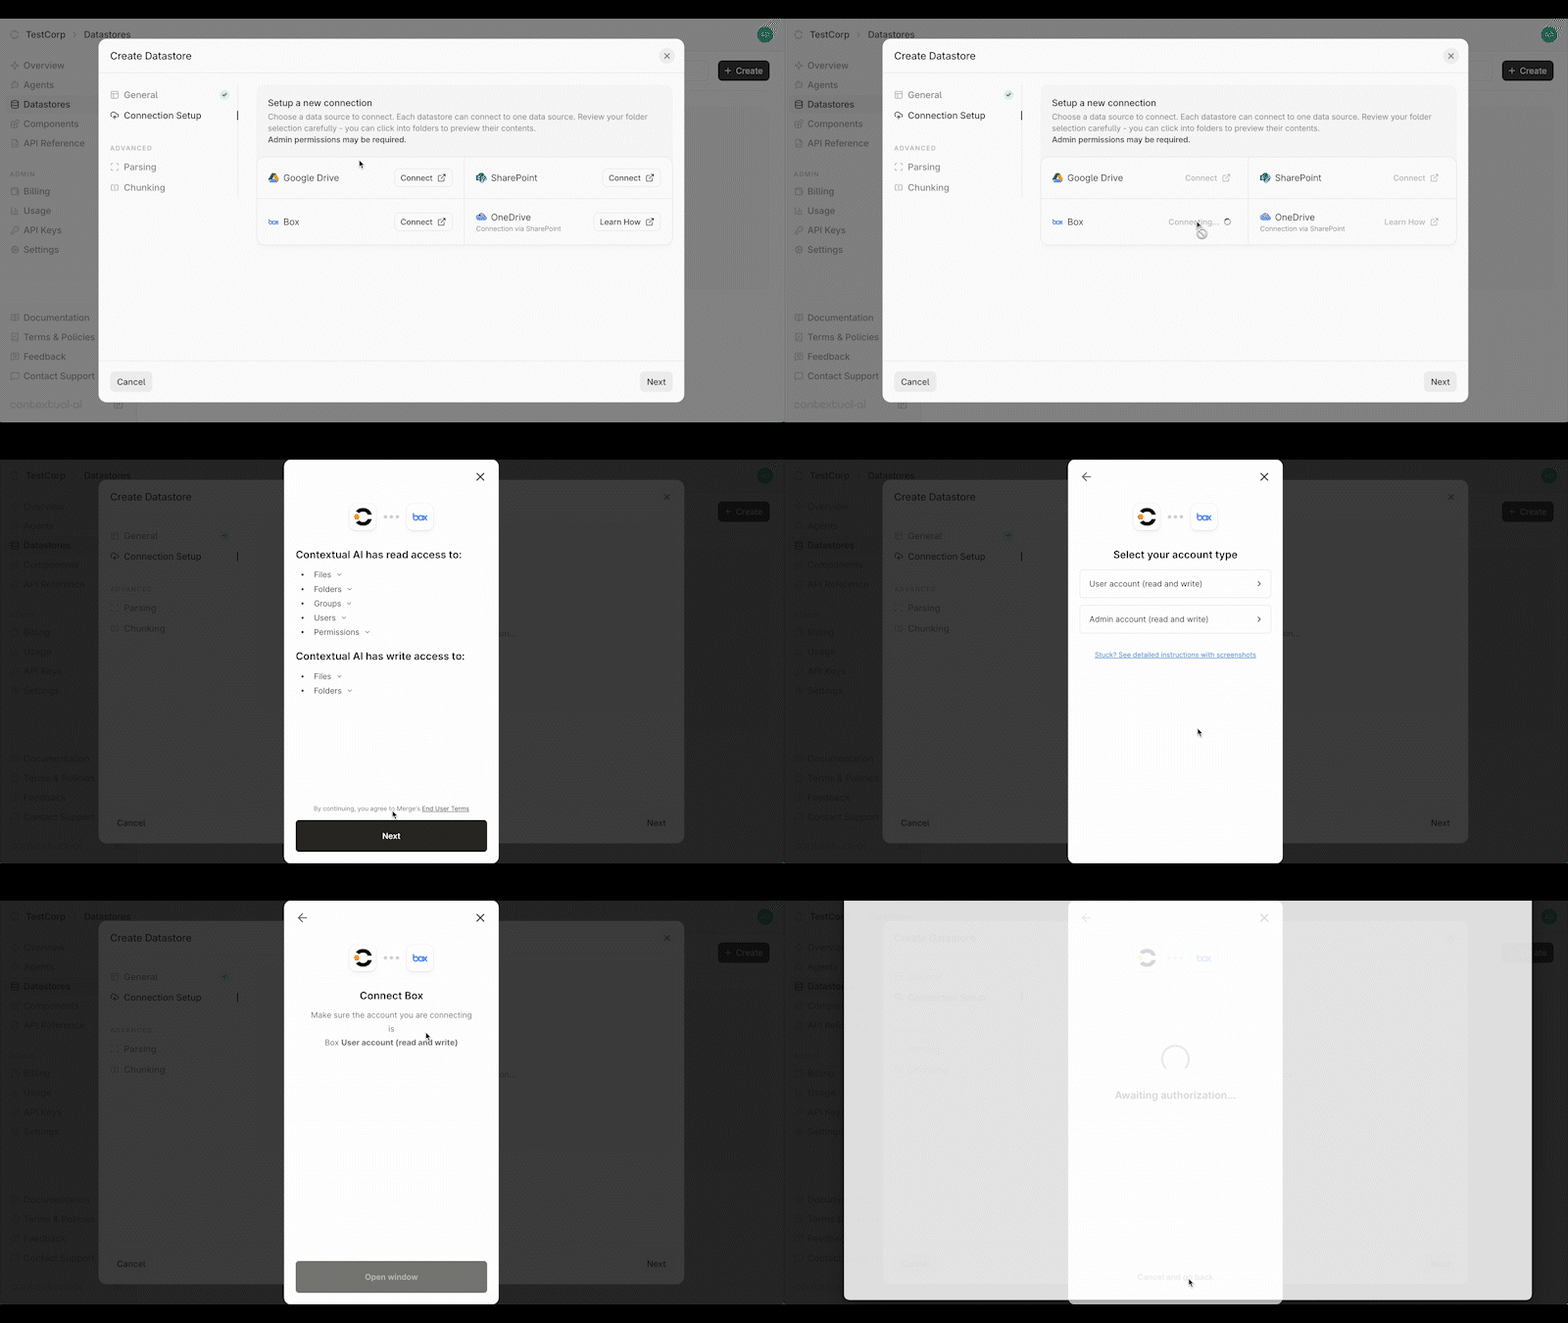
Grant Access & Sync Settings
- Review the access permissions that will be granted from your Box account.
- Click Grant Access to Box to continue.
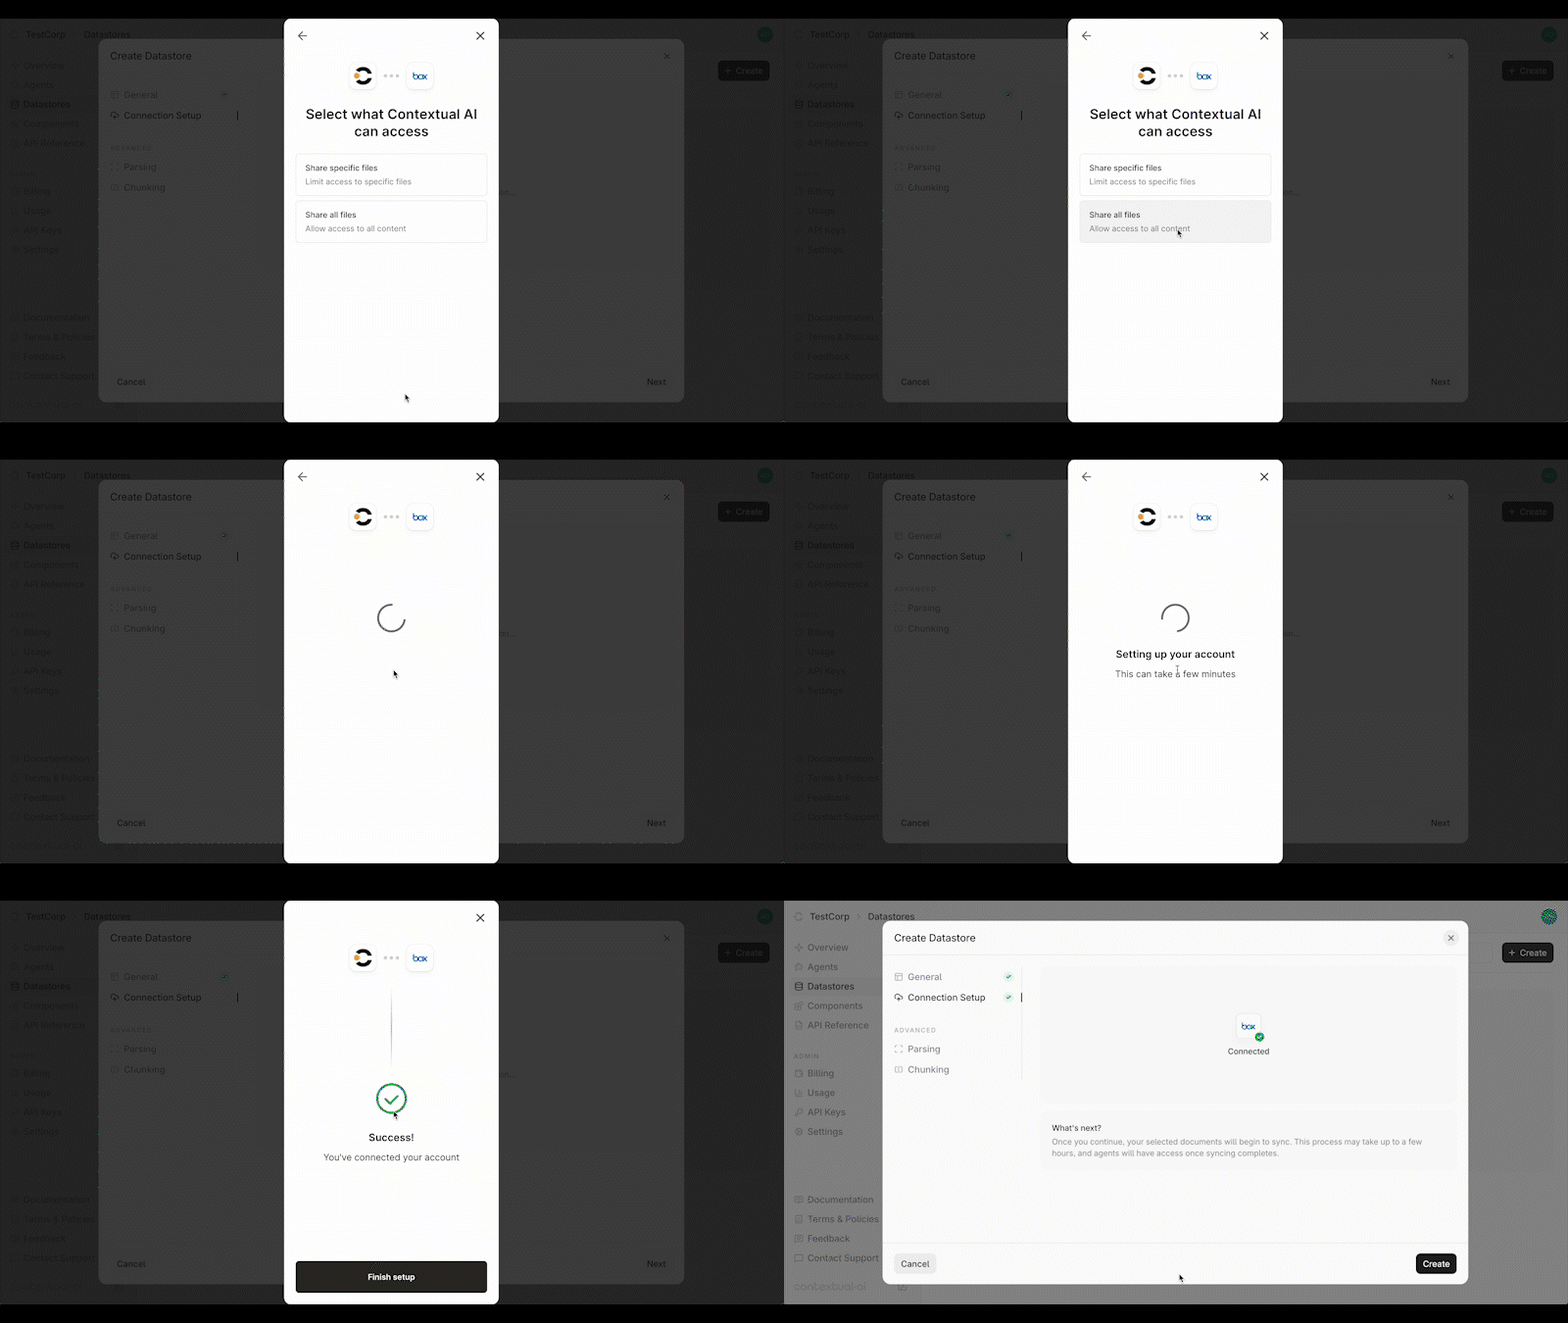
Configure Sync Settings
Contextual AI offers two ways to sync your data. You can choose to sync all your files or only specific folders in Box.Sync Options
- Share all files - Grants access to all your content in Box.
- Share specific files - Restricts access to only the folders you select.
- Hover over the folder and check the box to select it.
- You can click into a folder to view its contents, but note that only folders—not individual files—can be selected.
- Select one or multiple folders as needed.
- Click Confirm to finalize your selections, then click Next once setup is complete.
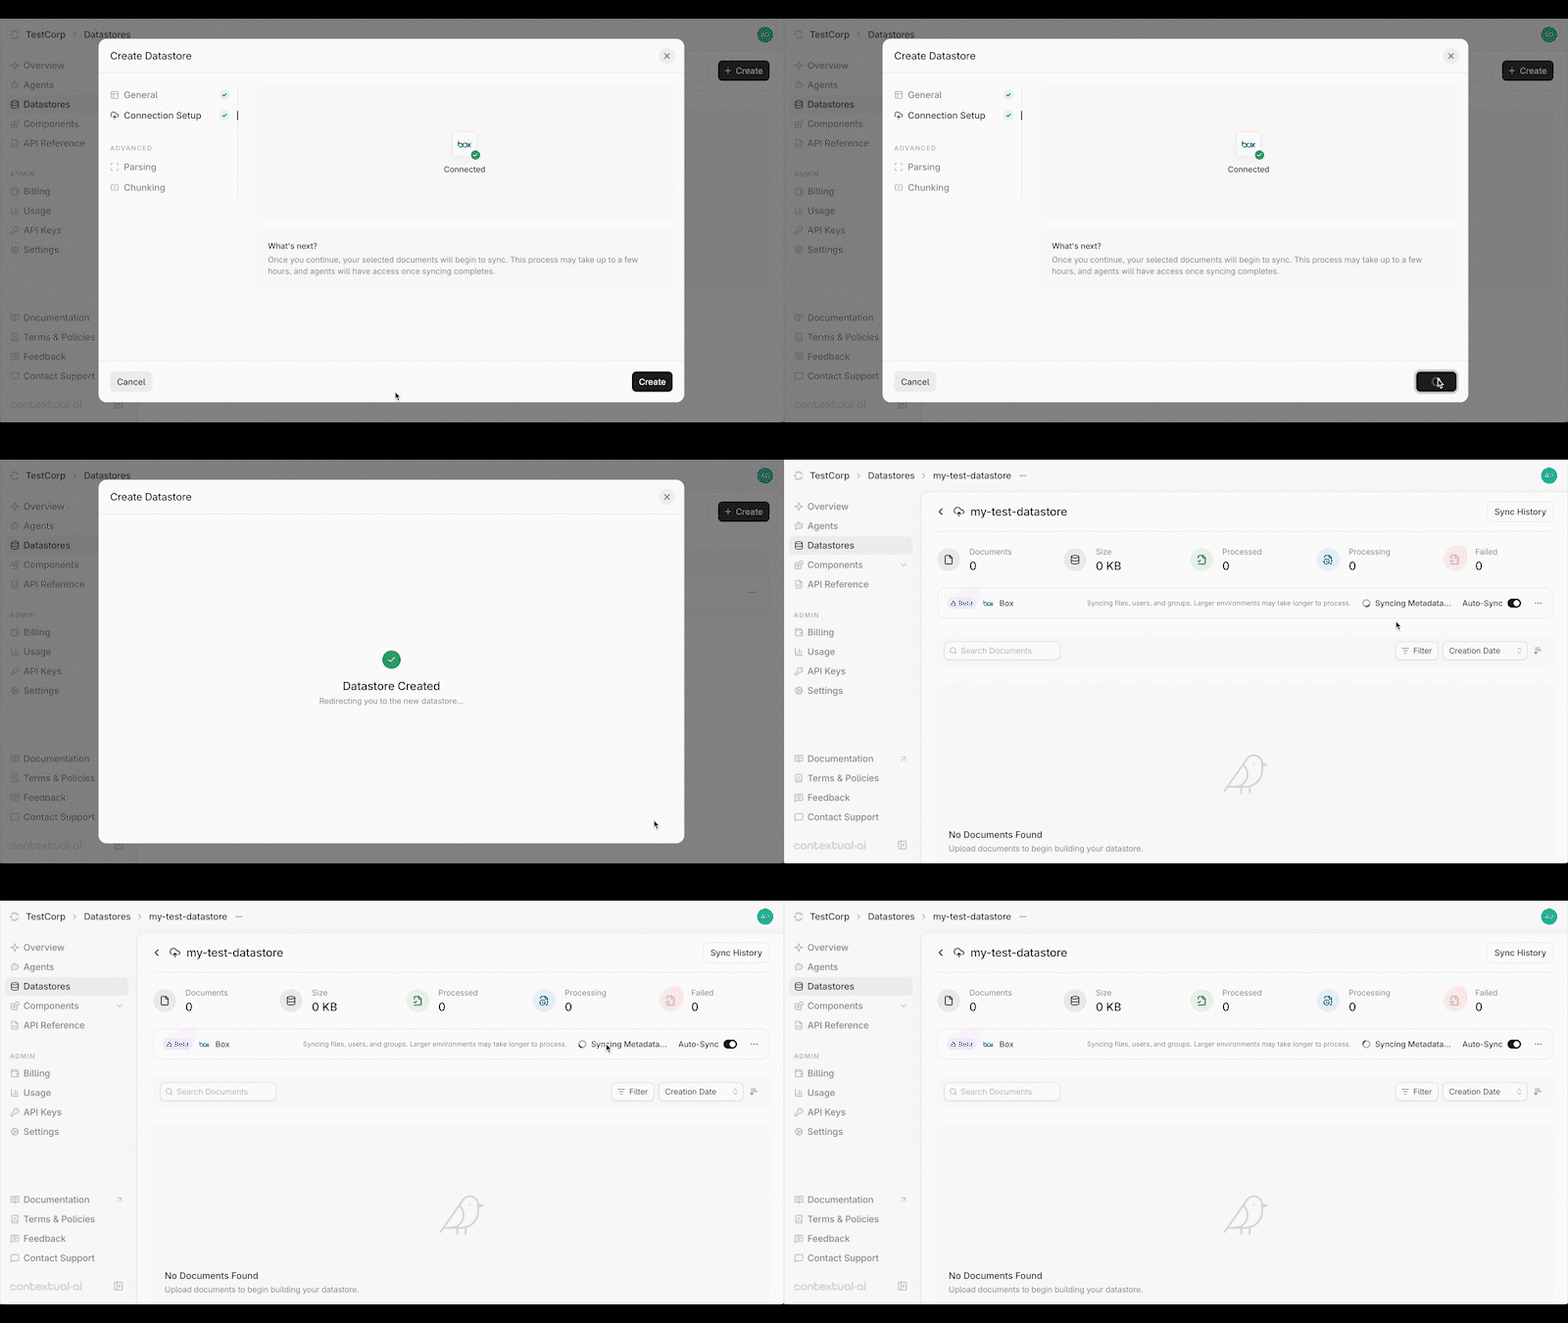
Create Datastore & Start Sync
You’re now ready to start syncing your data. Click Create to initialize your connection and create your datastore. You’ll be redirected to your Datastore page, where the Syncing Metadata status will appear. During this stage, Contextual AI syncs your file metadata, users, and groups. This process is typically quick but may take a few hours if you have a large number of files, users, or groups. Once metadata syncing is complete, ingestion will begin automatically and the status will update to Processing.Note: You can begin using your datastore while syncing continues, but you’ll only have access to the documents that have already been ingested.
Using your Connector with Entitlements Enforcement
To use your connected Datastore, simply link it to an Agent and start querying. All original data source entitlements are automatically enforced. If you do not have access to a document in the source system, two restrictions will apply:- The document will not be used to generate a response to the your query.
-
On the Datastore page, the document will be displayed as Private Document. You’ll only be able to view documents that you have access to.

Auto & Manual Syncing
You can enable or disable auto-syncing at the top of your Datastore. When enabled, data changes are synced every 3 hours and permission updates every hour.Note: Box connectors automatically sync every 24 hours due to rate limits in the Box API. Please contact [email protected] if you need faster syncing.
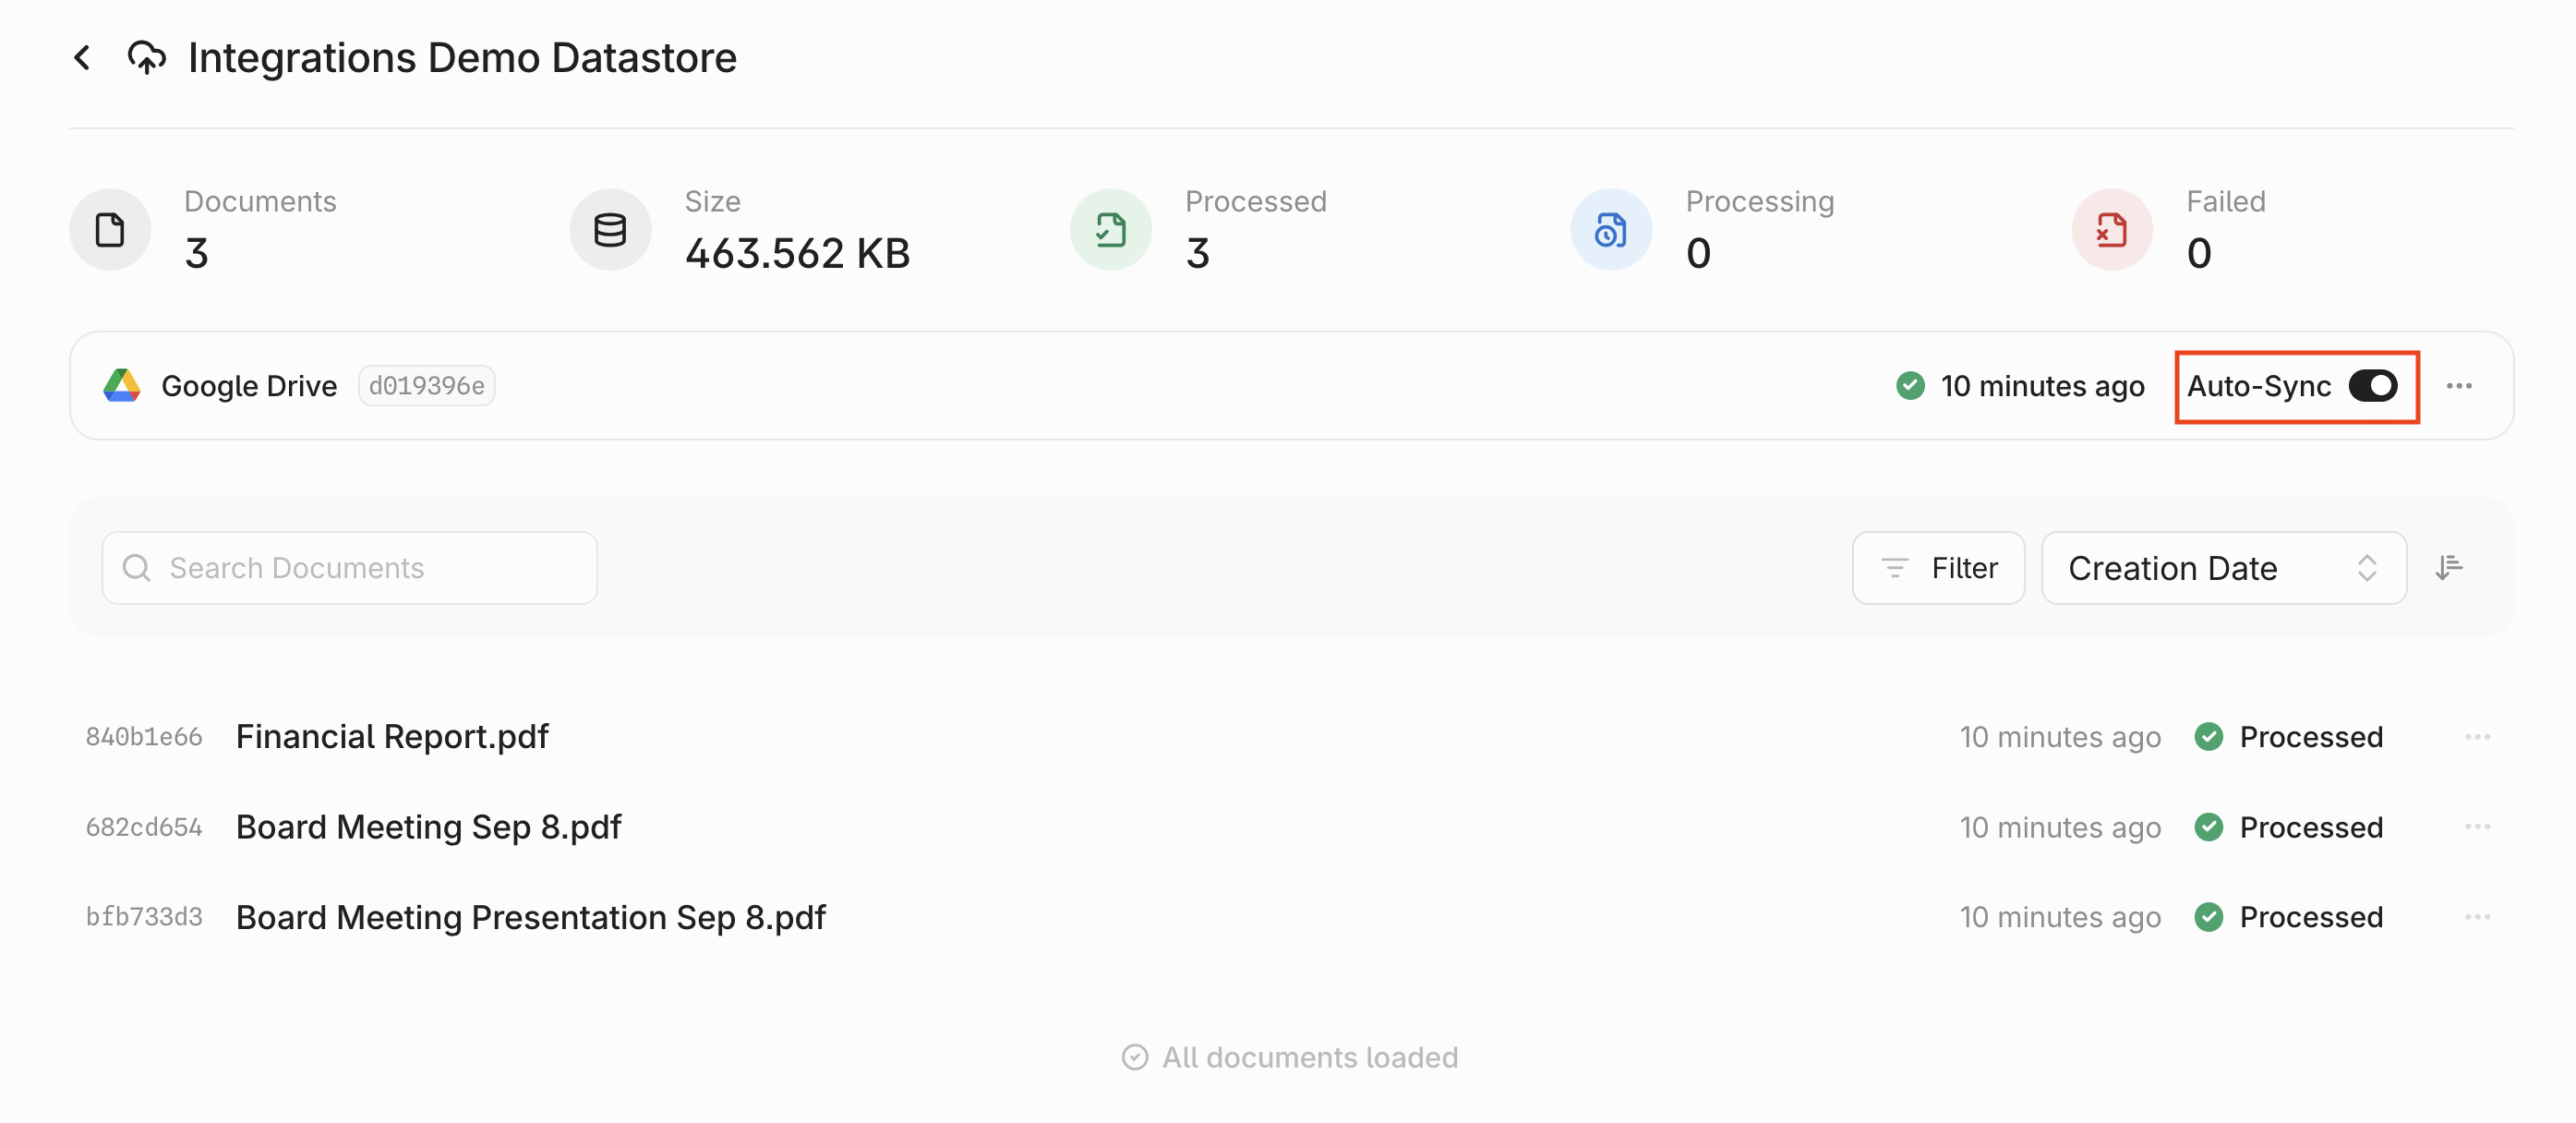
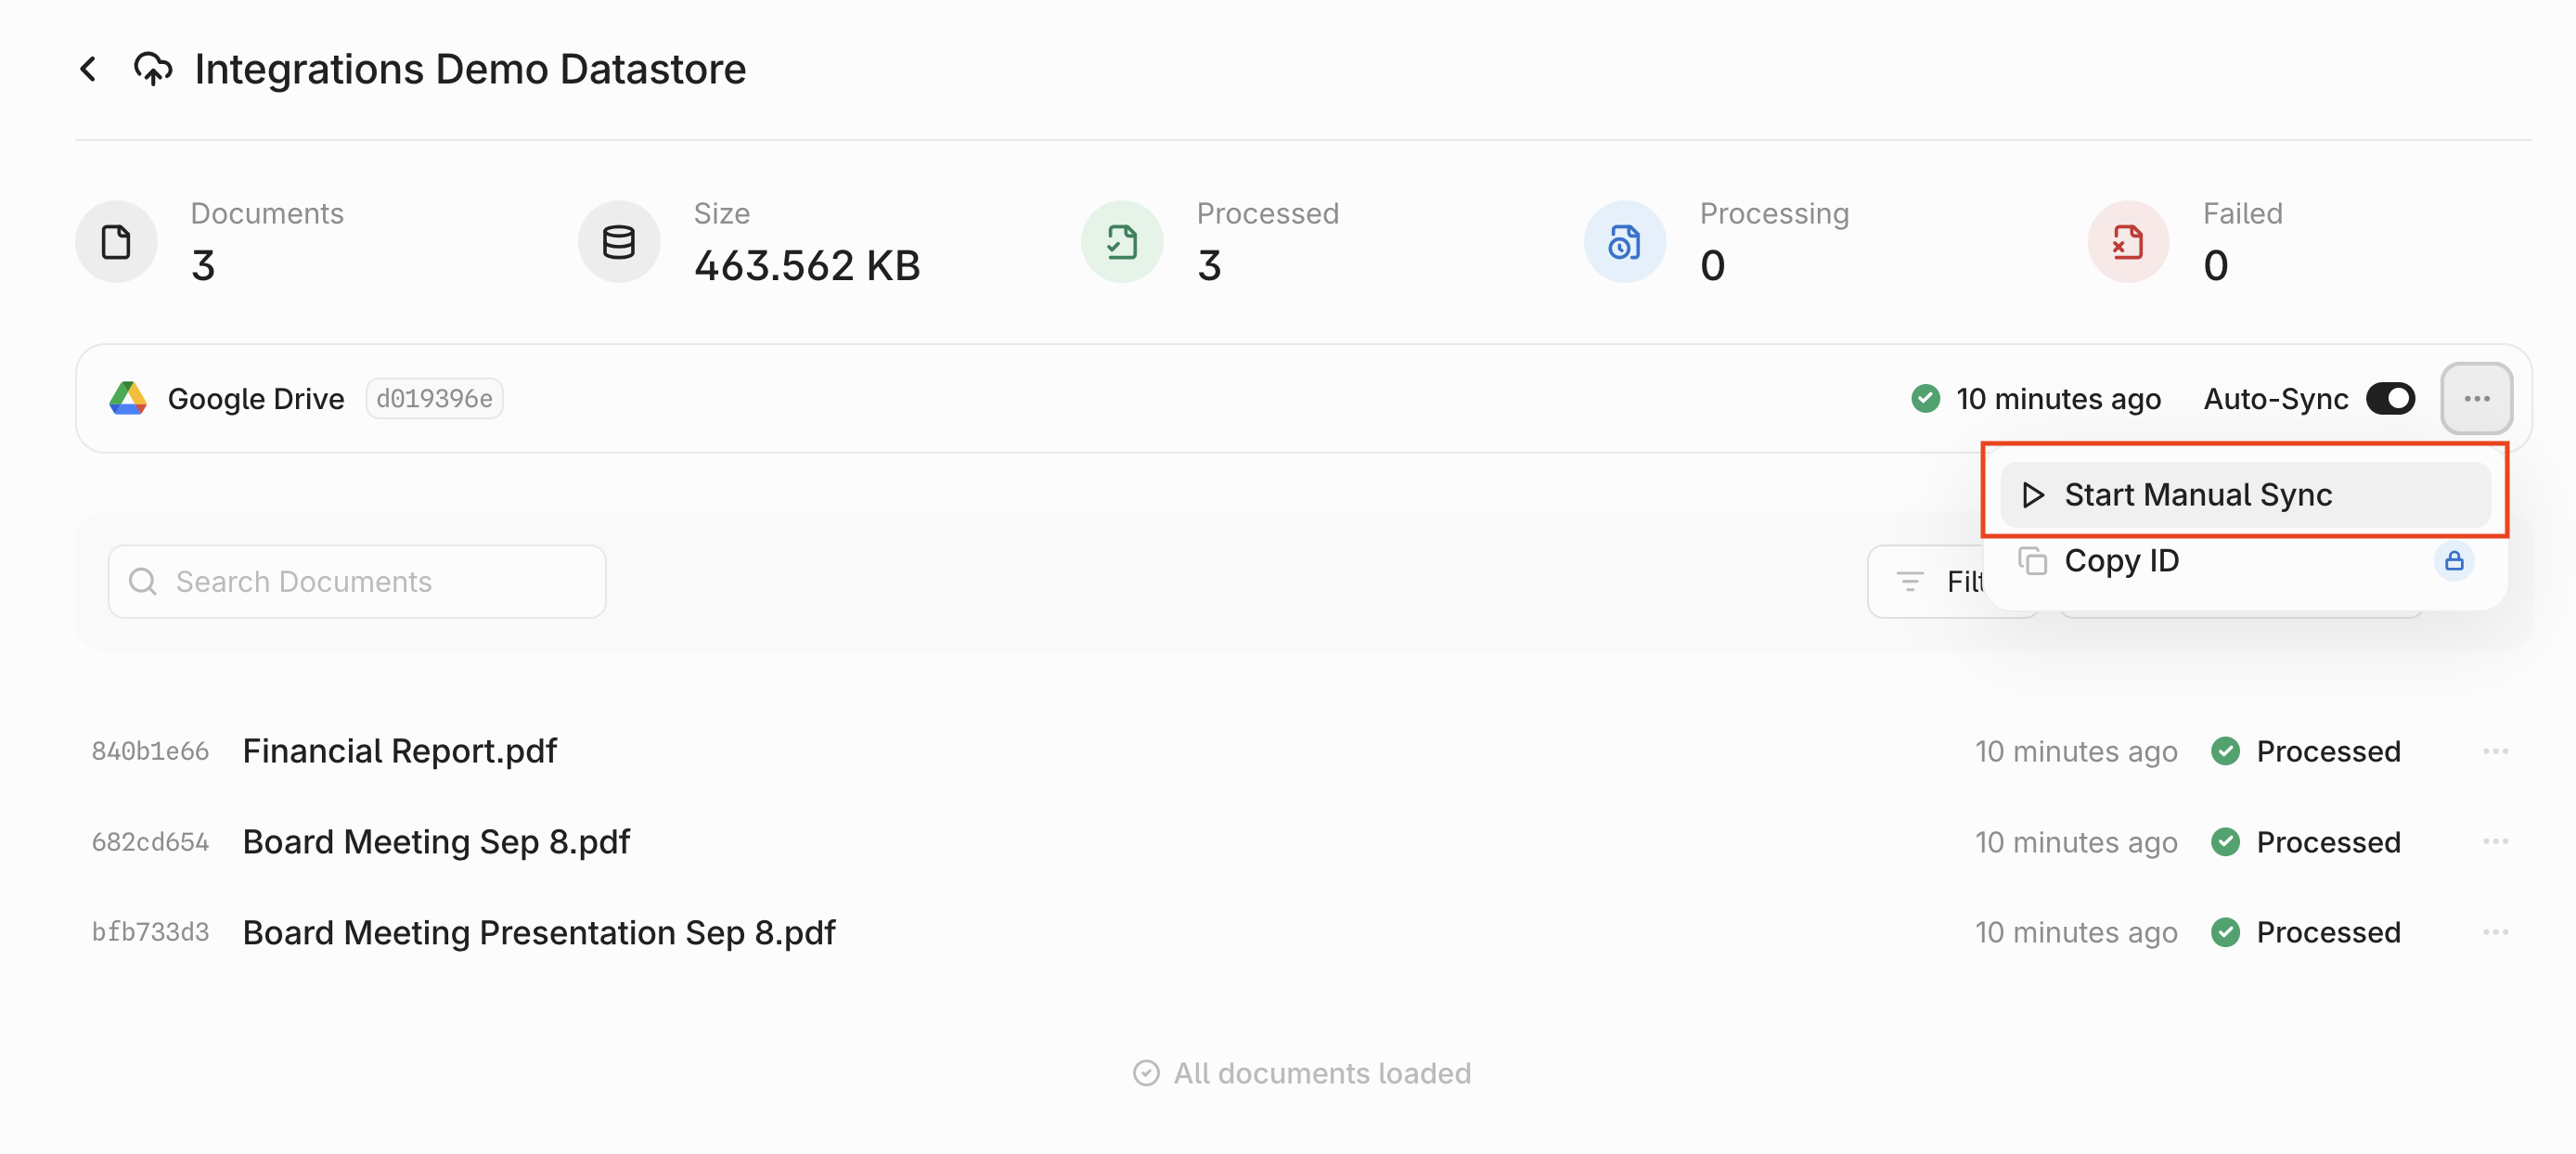
- Syncing metadata: We are syncing file metadata, users, and groups. We will need to sync metadata before we can begin ingestion.
- Processing: We are ingesting any document or metadata changes.
- Synced / Green checkmark: The sync has completed successfully.
- Partially Synced: Some documents failed in the sync. To correct this issue, wait for 10-15 minutes and retrigger a manual sync. The failed documents will be retried.
- Failed: All documents failed in the sync. Make sure that you have sufficient credits and retry with a manual sync after waiting for 10-15 minutes.
If your sync still fails, please contact [email protected] for further assistance.