- Parse and ingest documents into fully-managed vector stores
- Create specialized agents that can answer questions and complete tasks by fetching relevant knowledge from your datastores
- Best-in-class parsing capabilities and powerful chunking options that make wrangling unstructured data for RAG a breeze
- Seamless orchestration of powerful RAG components and primitives, allowing you to build RAG agents that have exceptional accuracy and scalability
- State-of-the-art capabilities and models, like our:
- Instruction following reranker that tops benchmarks like BIER
- Grounded Language Models that are the best in the world at being grounded and factual
- LMUnit model that provides fine and coarse-grained evaluations of LLM output using natural language unit tests
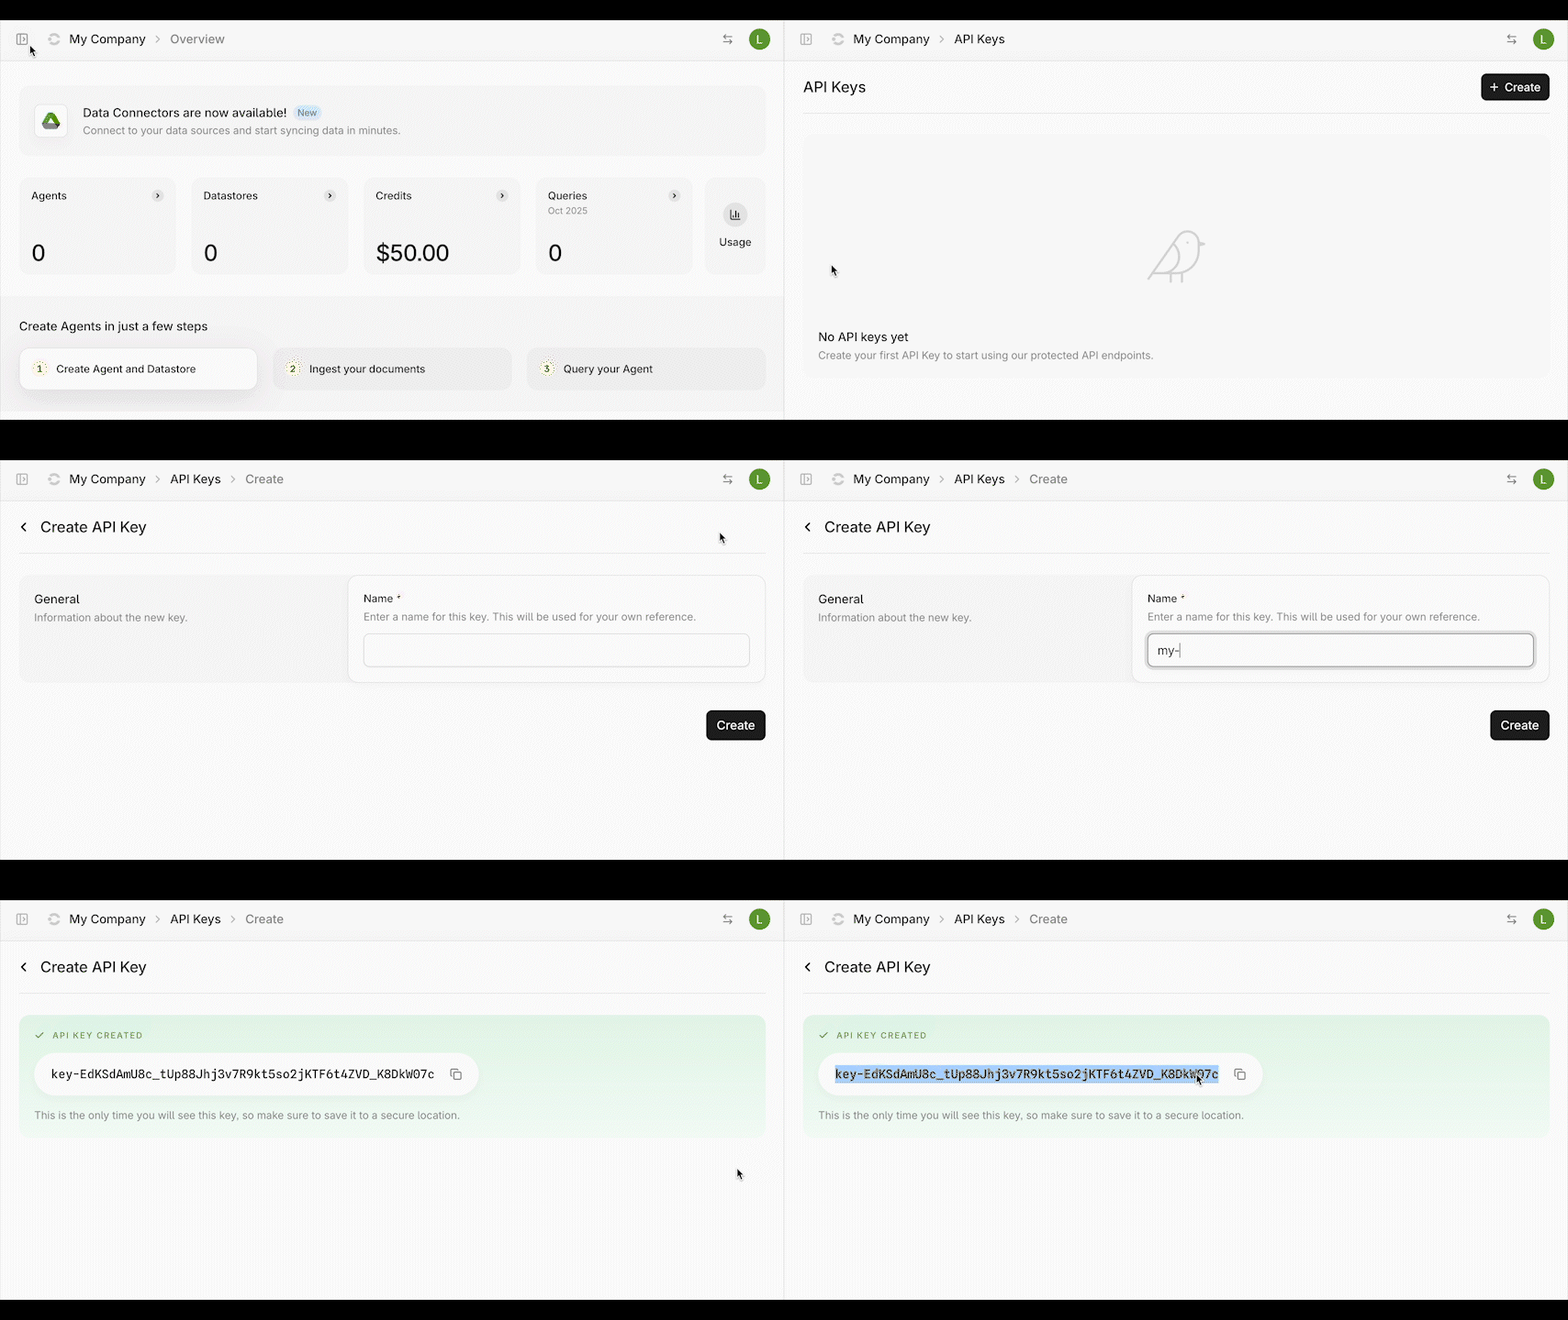
Get your API Key
Contextual AI uses API keys to authenticate requests. Only Contextual AI workspace admins can create API keys.Sign up here if you don’t have a Contextual AI account yet. You’ll get $25 in free credits to trial the platform, or $50 in free credits if you sign up with a work email address.
- Expand the sidebar and click on API Keys
- Click the Create API Key button in the upper right and follow the instructions
- Save the generated key in a secure location

Create and query your first agent
Step 0: Install Python SDK
Run the following command in your terminal or shell:Step 1: Create a datastore
Datastores contain the files that your agent(s) can access. Each agent must be associated with at least one datastore. Run the following code to create a datastore using the/datastores endpoint:
Remember to replace
$API_KEY with your key. You can rename the datastore if
you want.id of the newly created datastore. Be sure to save this id as you will need it later.
Step 2: Add documents into your datastore
Now that you’ve created a datastore, you can add documents to it. Contextual AI securely stores your documents and parses them in formats optimized for RAG pipelines and agents.For best results:
- Use renderable PDFs and documents with text that can be copied and pasted.
- Don’t have your own documents ready? Use these sample documents.
Remember to:
- Replace
{datastore_id}in the url path with the datastore id from the previous step - Replace
$API_KEYwith your API key - Replace
{file_path}with the path to the document on your machine
id of the uploaded document will be returned to you. The time required to upload documents depends partly on their length and features. Some documents may require a few minutes to fully process after upload.
Step 3: View your document upload status
Use this code to check the status of documents uploaded into the datastore:Remember to:
- Replace
{datastore_id}in the url path with theidfrom the previous step - Replace
$API_KEYwith your API key
ingestion_job_status.
Step 4: Create an agent
Now that you have a datastore with some files, you can use the/agents endpoint to create your first agent.
Run the following code:
Remember to:
- Replace
$API_KEYwith your API key - Populate the
datastore_idslist field with the datastoreidfrom above
agent_id of the newly created agent will be returned to you. You’ll need this to query your agent in the next step.
Step 5: Query your agent
With your agent configured and documents uploaded, use the/query endpoint to send messages:
Remember to:
- Replace
{agent_id}in the url path with the agent_id from the previous step - Replace
$API_KEYwith your API key - Replace the
contentfield with a question that is relevant to the document(s) you uploaded
- The body of the response
- The sources retrieved from the datastore that are relevant to the response
- Attributions/citations of sources to specific text spans in the response
Note: You can query your agent only after at least one document in the datastore has been fully processed. See Step 3 for instructions on verifying your document’s upload status.