> ## Documentation Index
> Fetch the complete documentation index at: https://docs.contextual.ai/llms.txt
> Use this file to discover all available pages before exploring further.
# Contextual AI MCP Server
> Integrate Contextual MCP server with compatible AI clients
Our AI's Model Context Protocol (MCP) server provides RAG capabilities using Contextual AI. This guide walks through integrating Contextual AI’s MCP Server in both local and remote configurations for:
* [OpenAI GUI](#openai-gui)
* [Cursor IDE](#cursor-ide)
* [Local Installation](#local-mcp-server-installation)
## Overview
The Contextual AI MCP server acts as a bridge between AI interfaces and a specialized Contextual AI agent. It enables:
* **Query Processing**: Direct your domain specific questions to a dedicated Contextual AI agent
* **Intelligent Retrieval**: Searches through comprehensive information in your knowledge base
* **Context-Aware Responses**: Generates answers that are grounded in source documentation and include citations and attributions.
***
## Remote MCP server
The Remote MCP server enables direct access to hosted MCP services, no local installation required. Just provide the following:
* Server URL: `https://mcp.app.contextual.ai/mcp`
* Contextual API key for authentication.
* Contextual Agent ID. You can create your agent by following the [**Getting Started Guide**](getting-started).
### OpenAI GUI
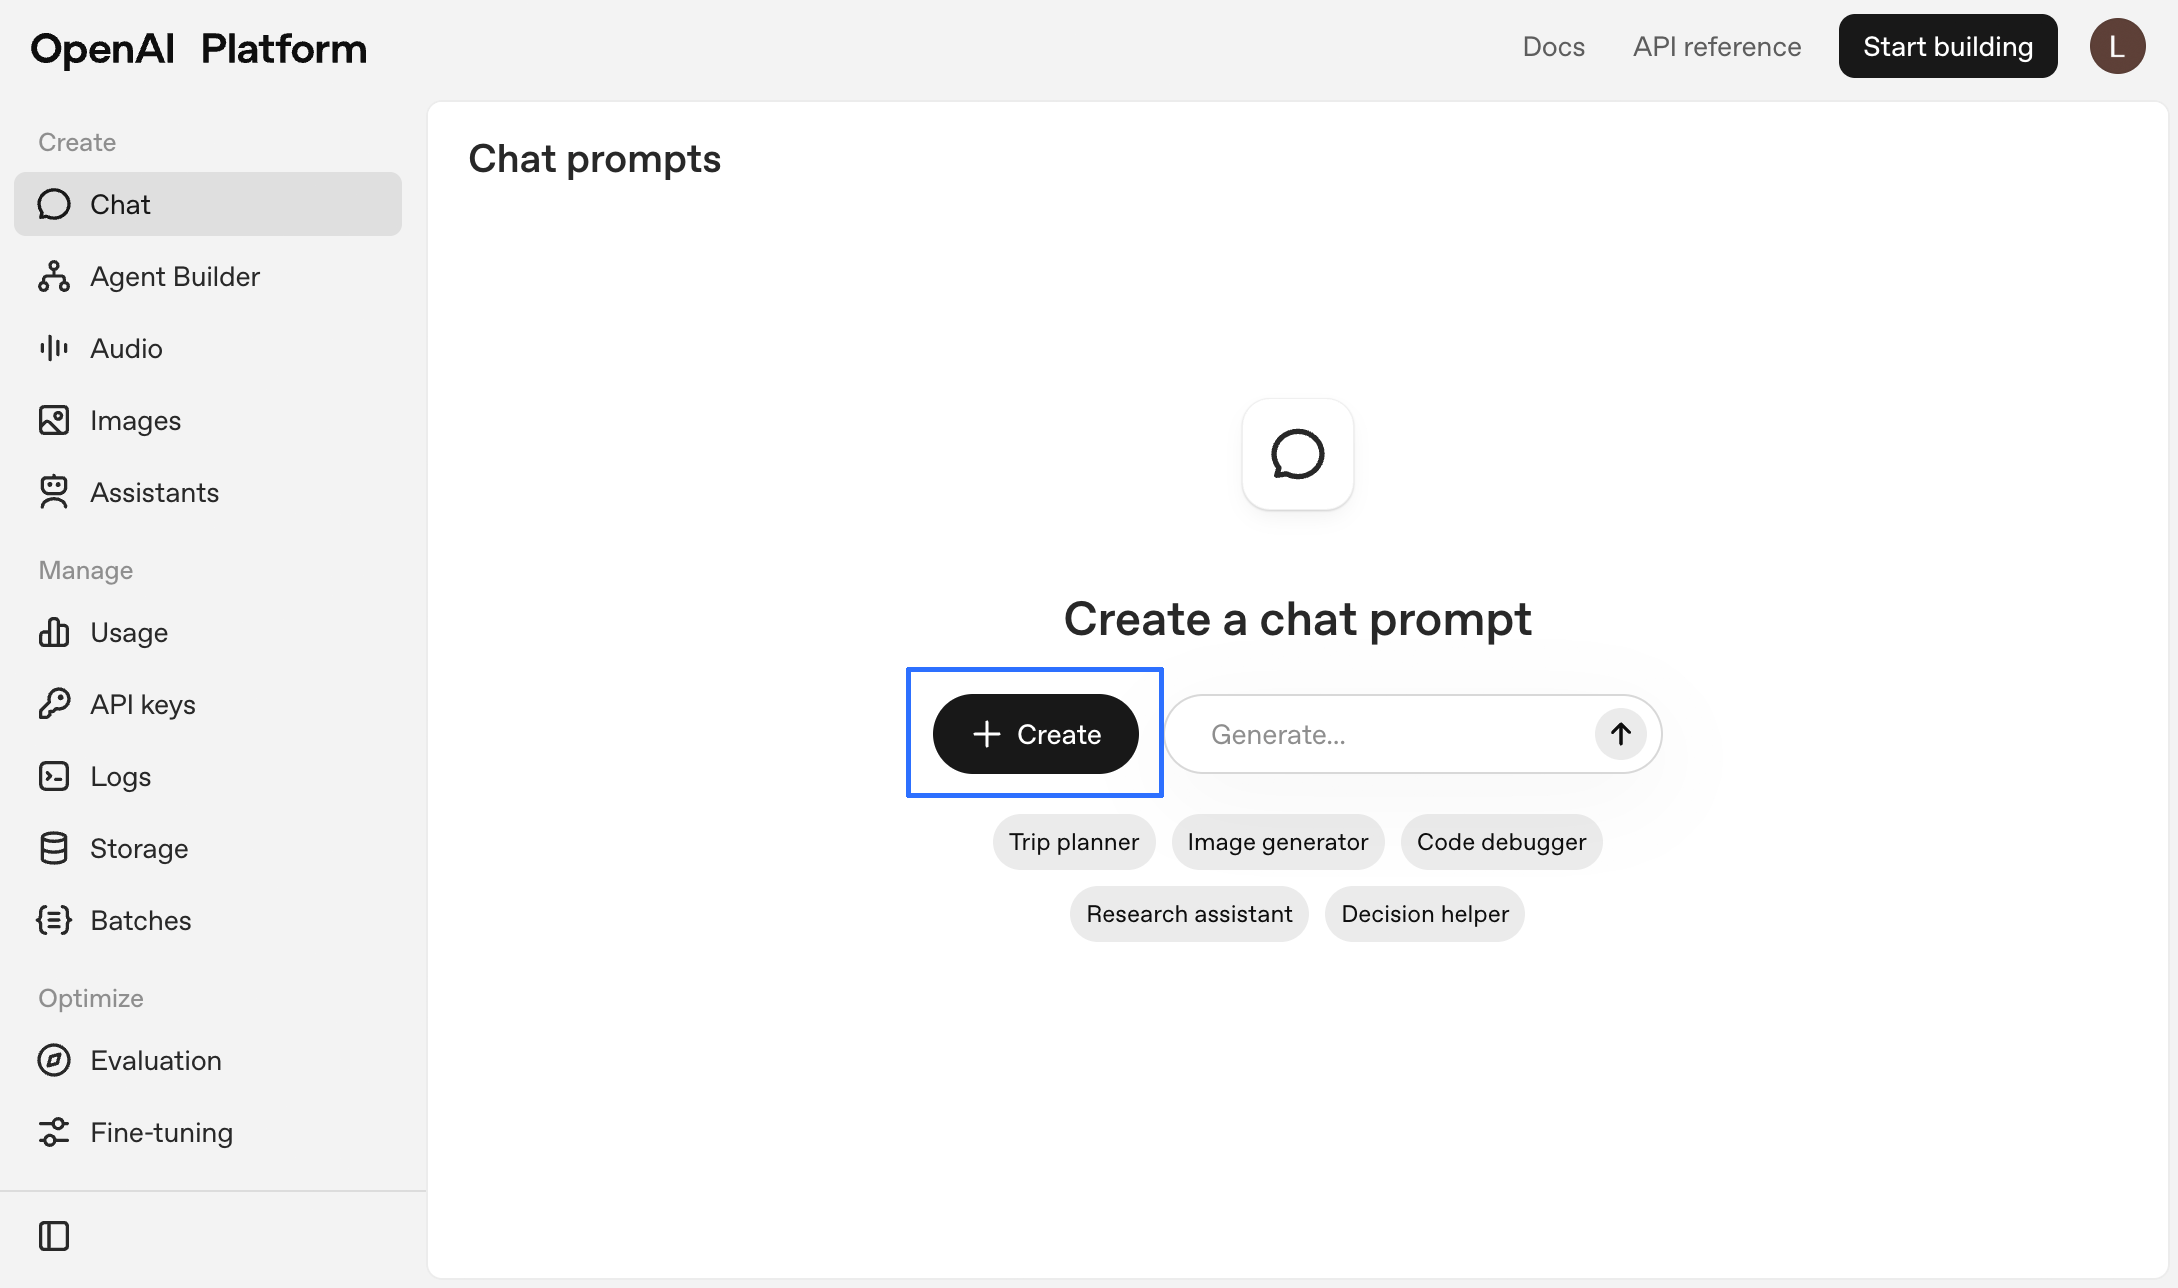
1. Go to [platform.openai.com/chat](https://platform.openai.com/chat/) and click `+ Create`.
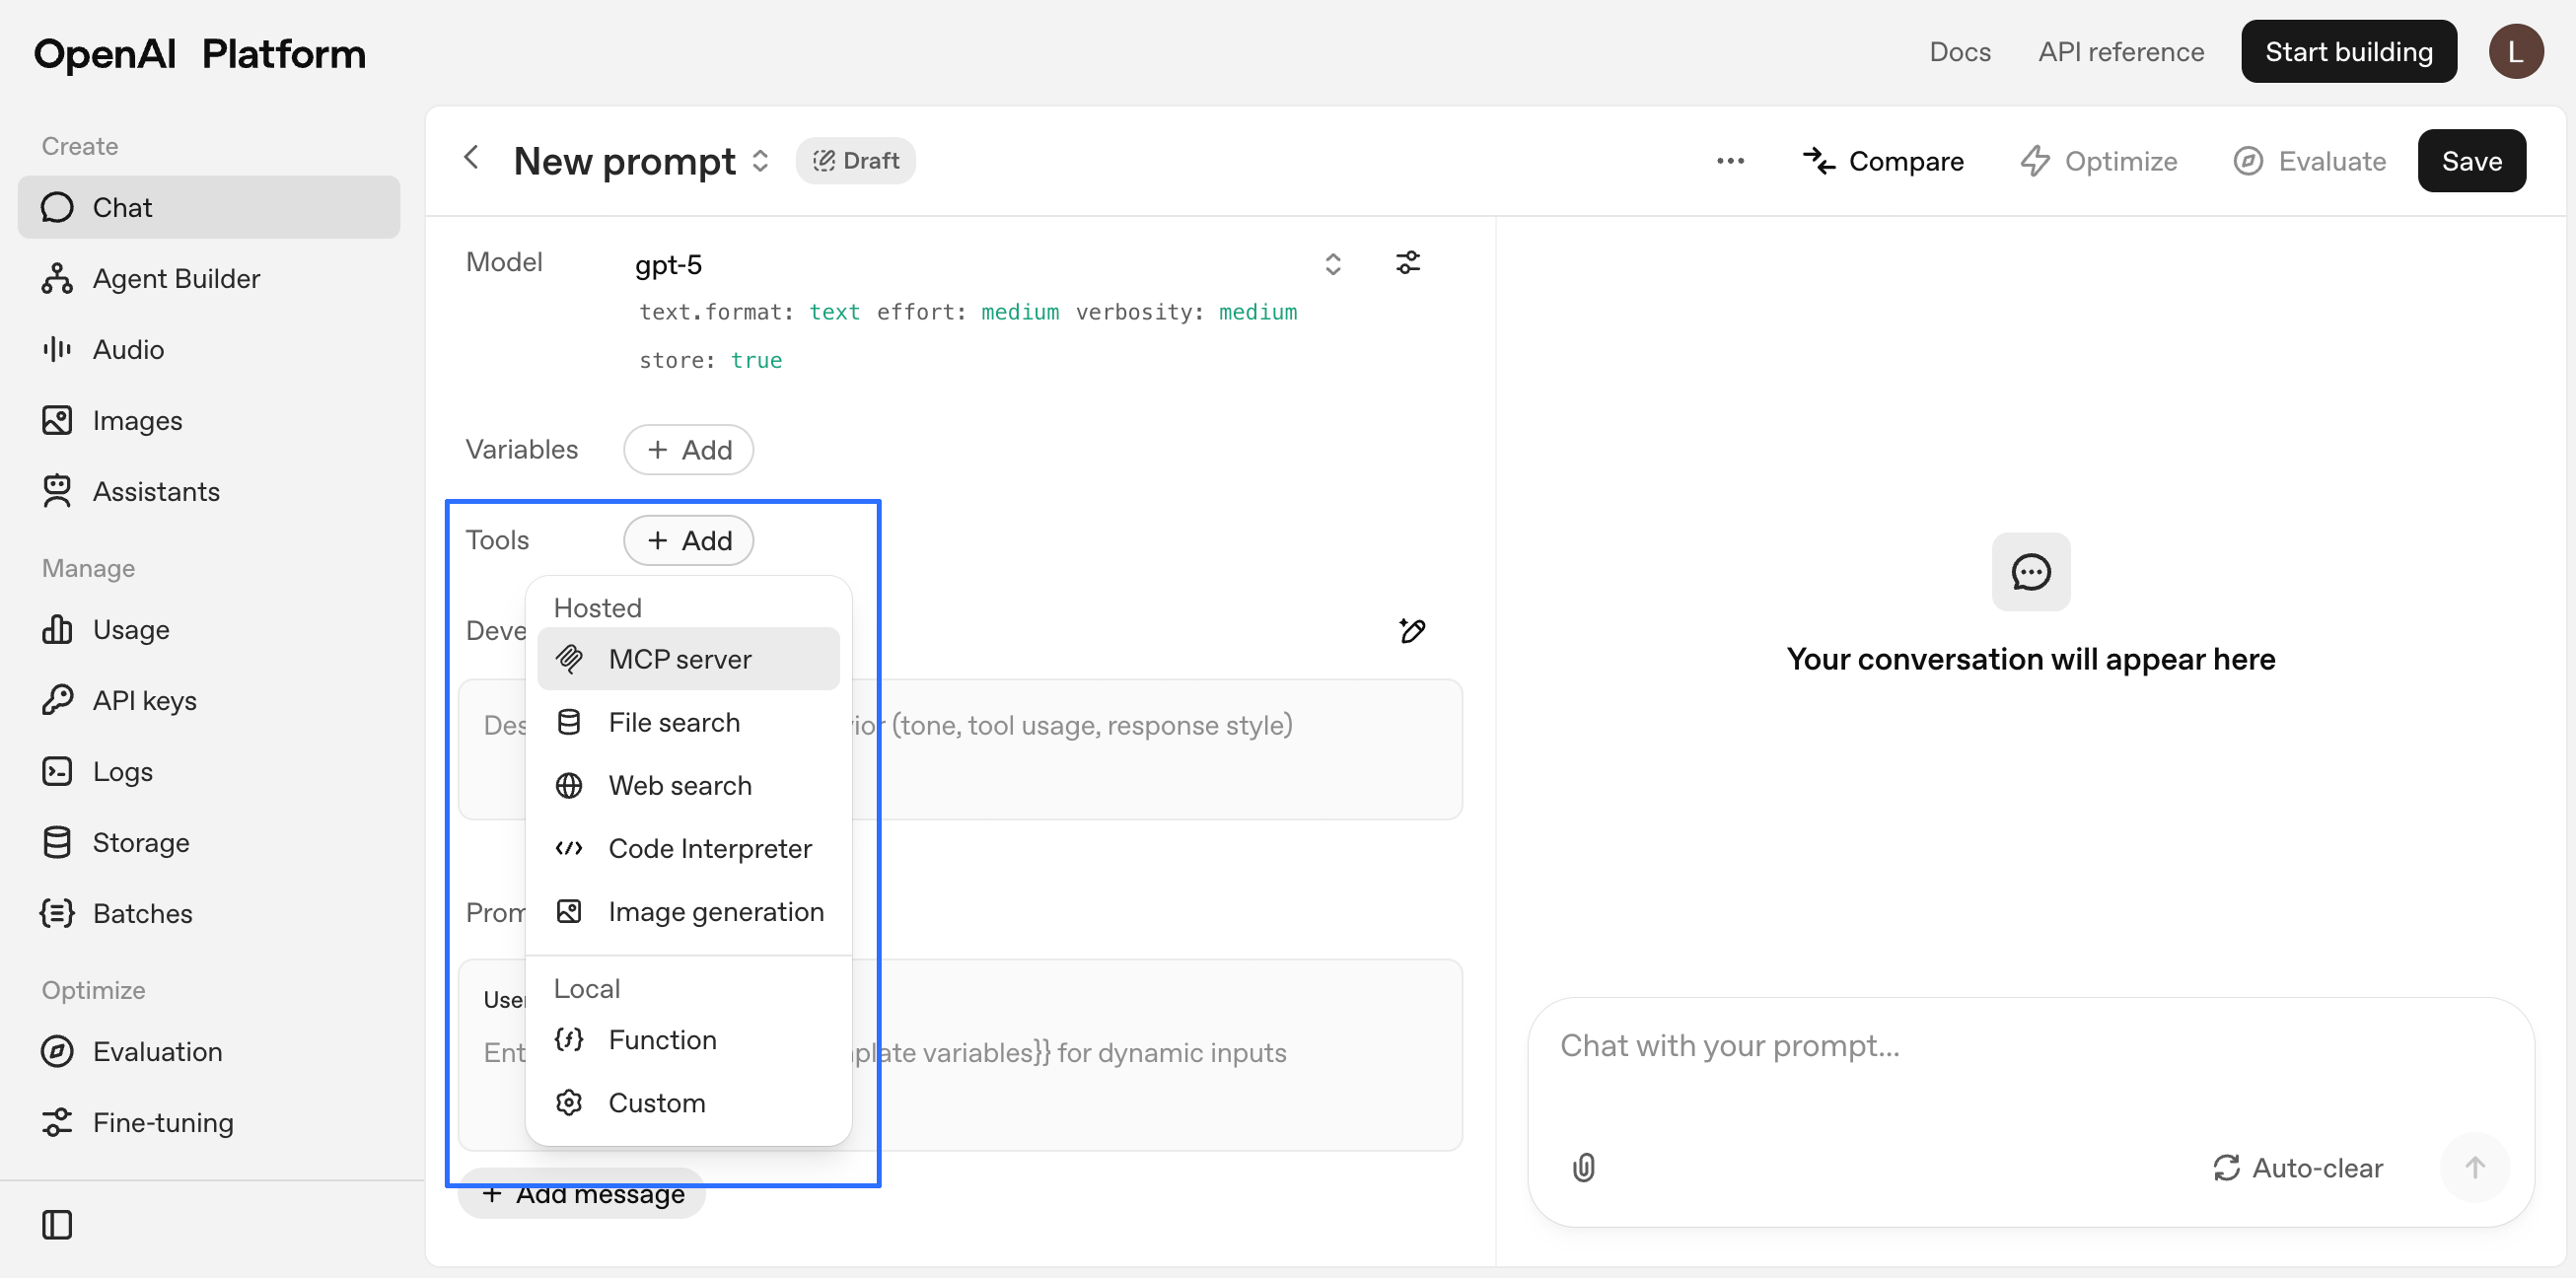
 2. Under **Tools**, click `+ Add` followed by `MCP server` in the drop-down menu.
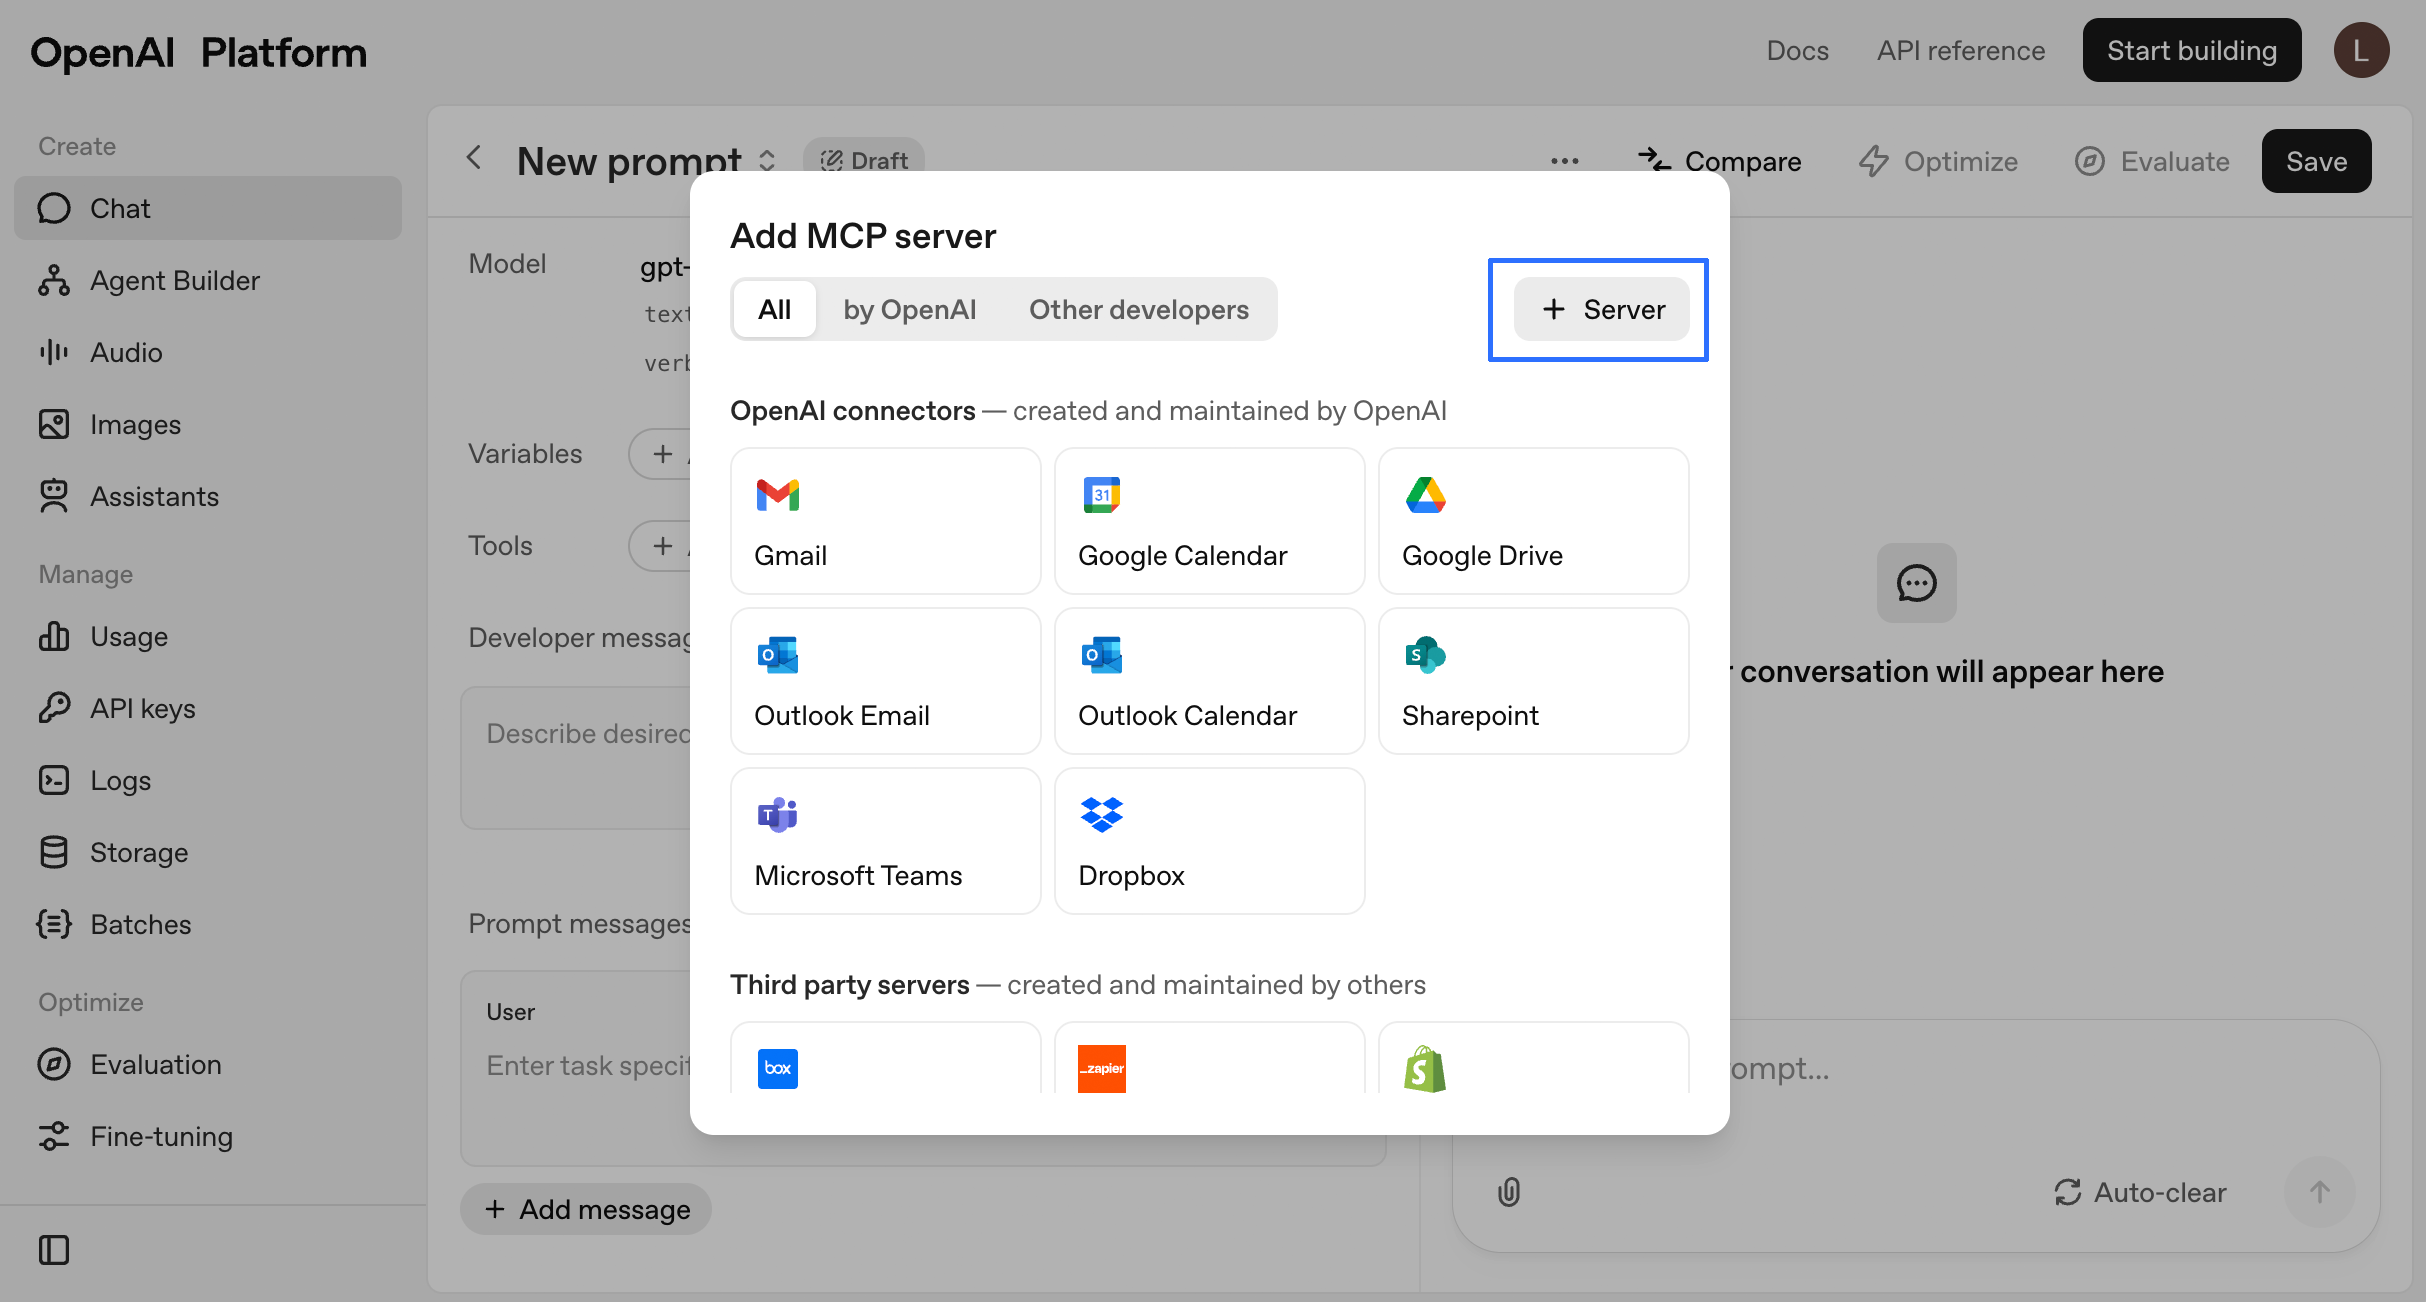
 3. Click `+ Server` in the **Add MCP server** window.
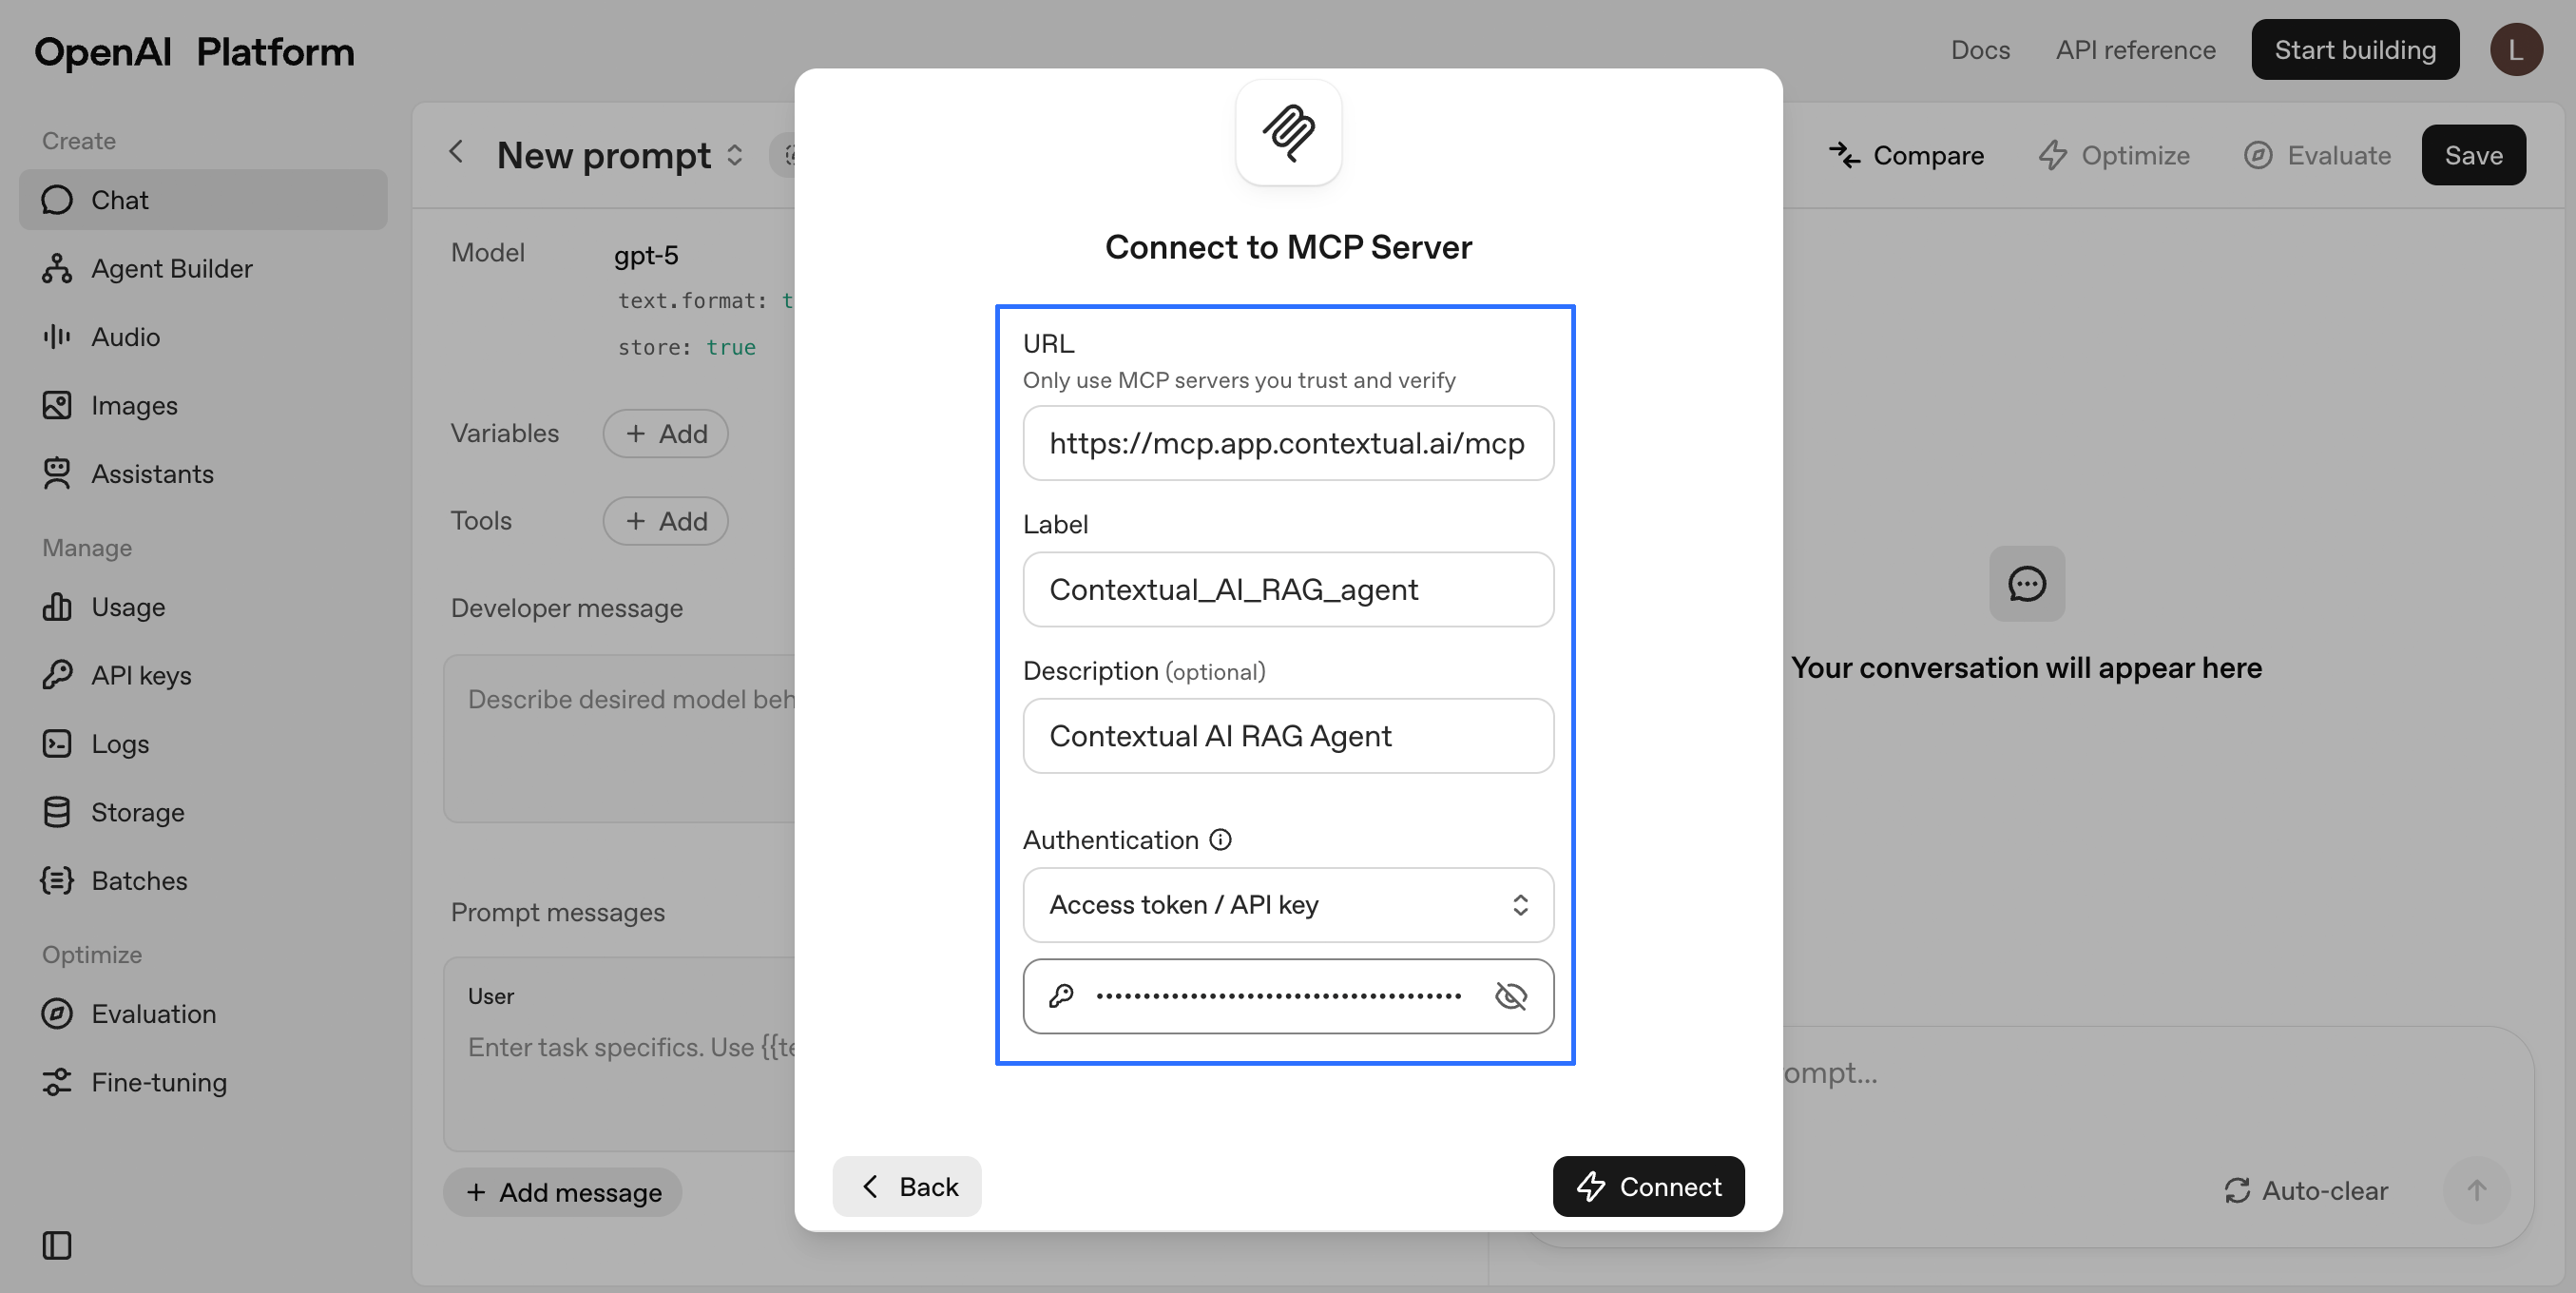
 4. Enter the following information:
* **URL:** `https://mcp.app.contextual.ai/mcp`
* **Label:** `Contextual_AI_RAG_agent`
* **Authentication:** `Access token / API key`
Copy/paste your Contextual AI API key and click `Connect`.
4. Enter the following information:
* **URL:** `https://mcp.app.contextual.ai/mcp`
* **Label:** `Contextual_AI_RAG_agent`
* **Authentication:** `Access token / API key`
Copy/paste your Contextual AI API key and click `Connect`.
 5. Verify your settings and click `Add`.
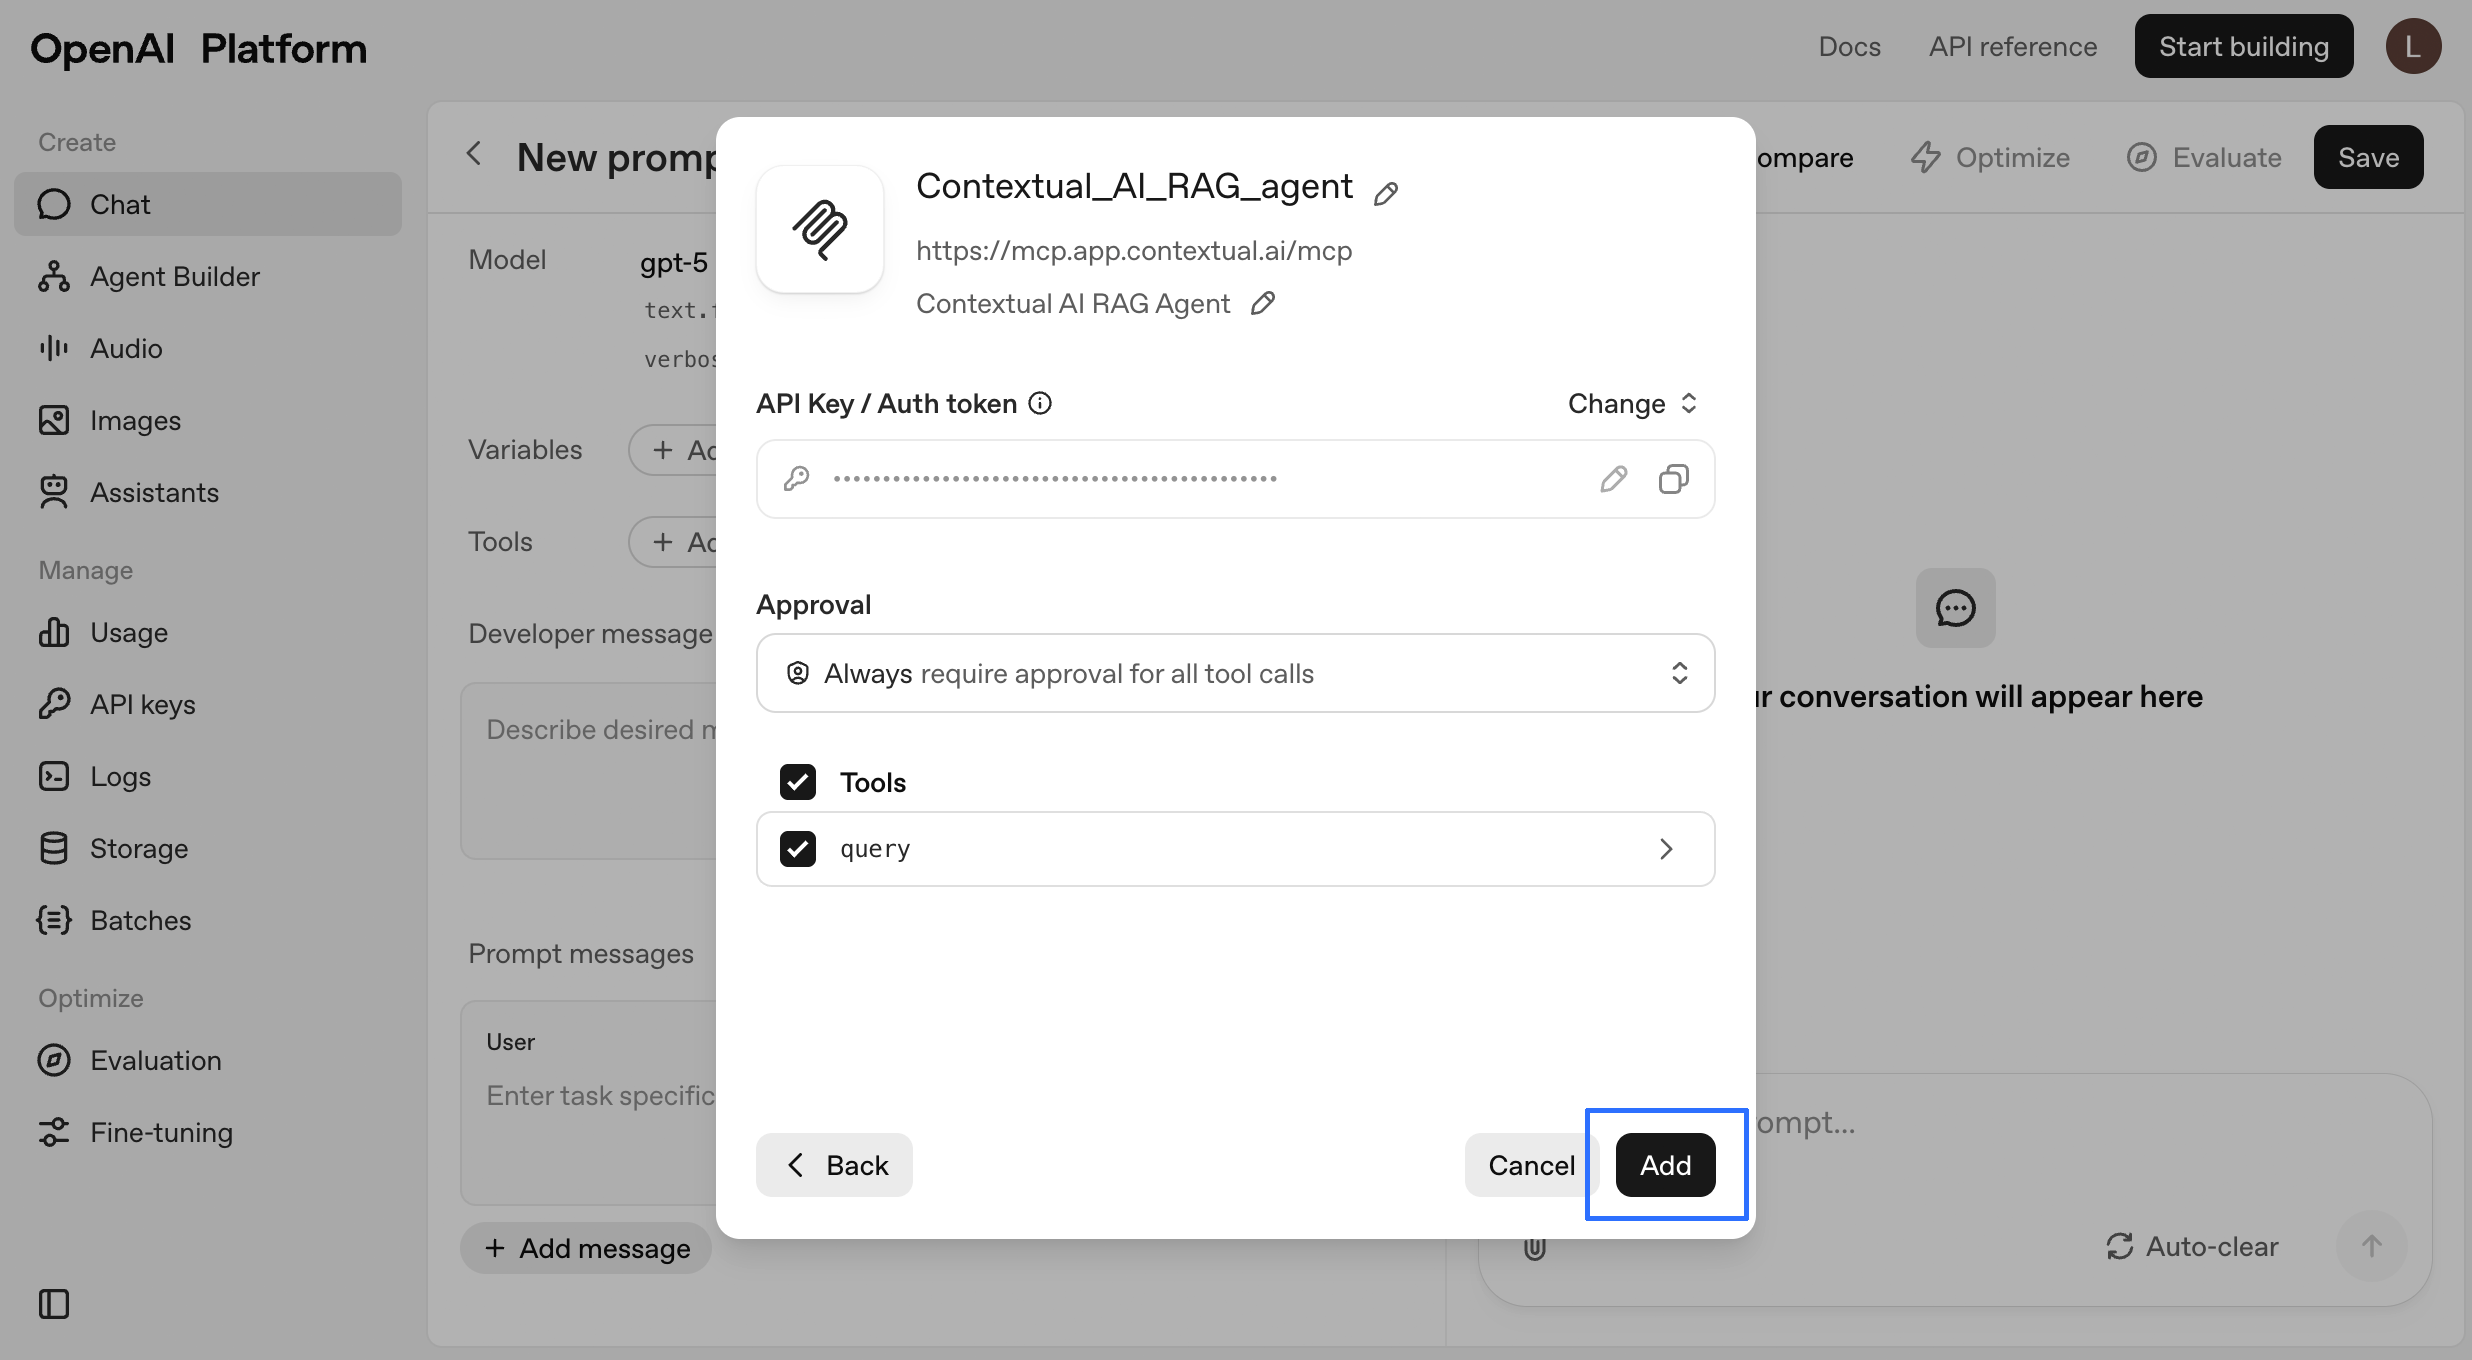 6. Your new MCP server should appear next to **Tools**.
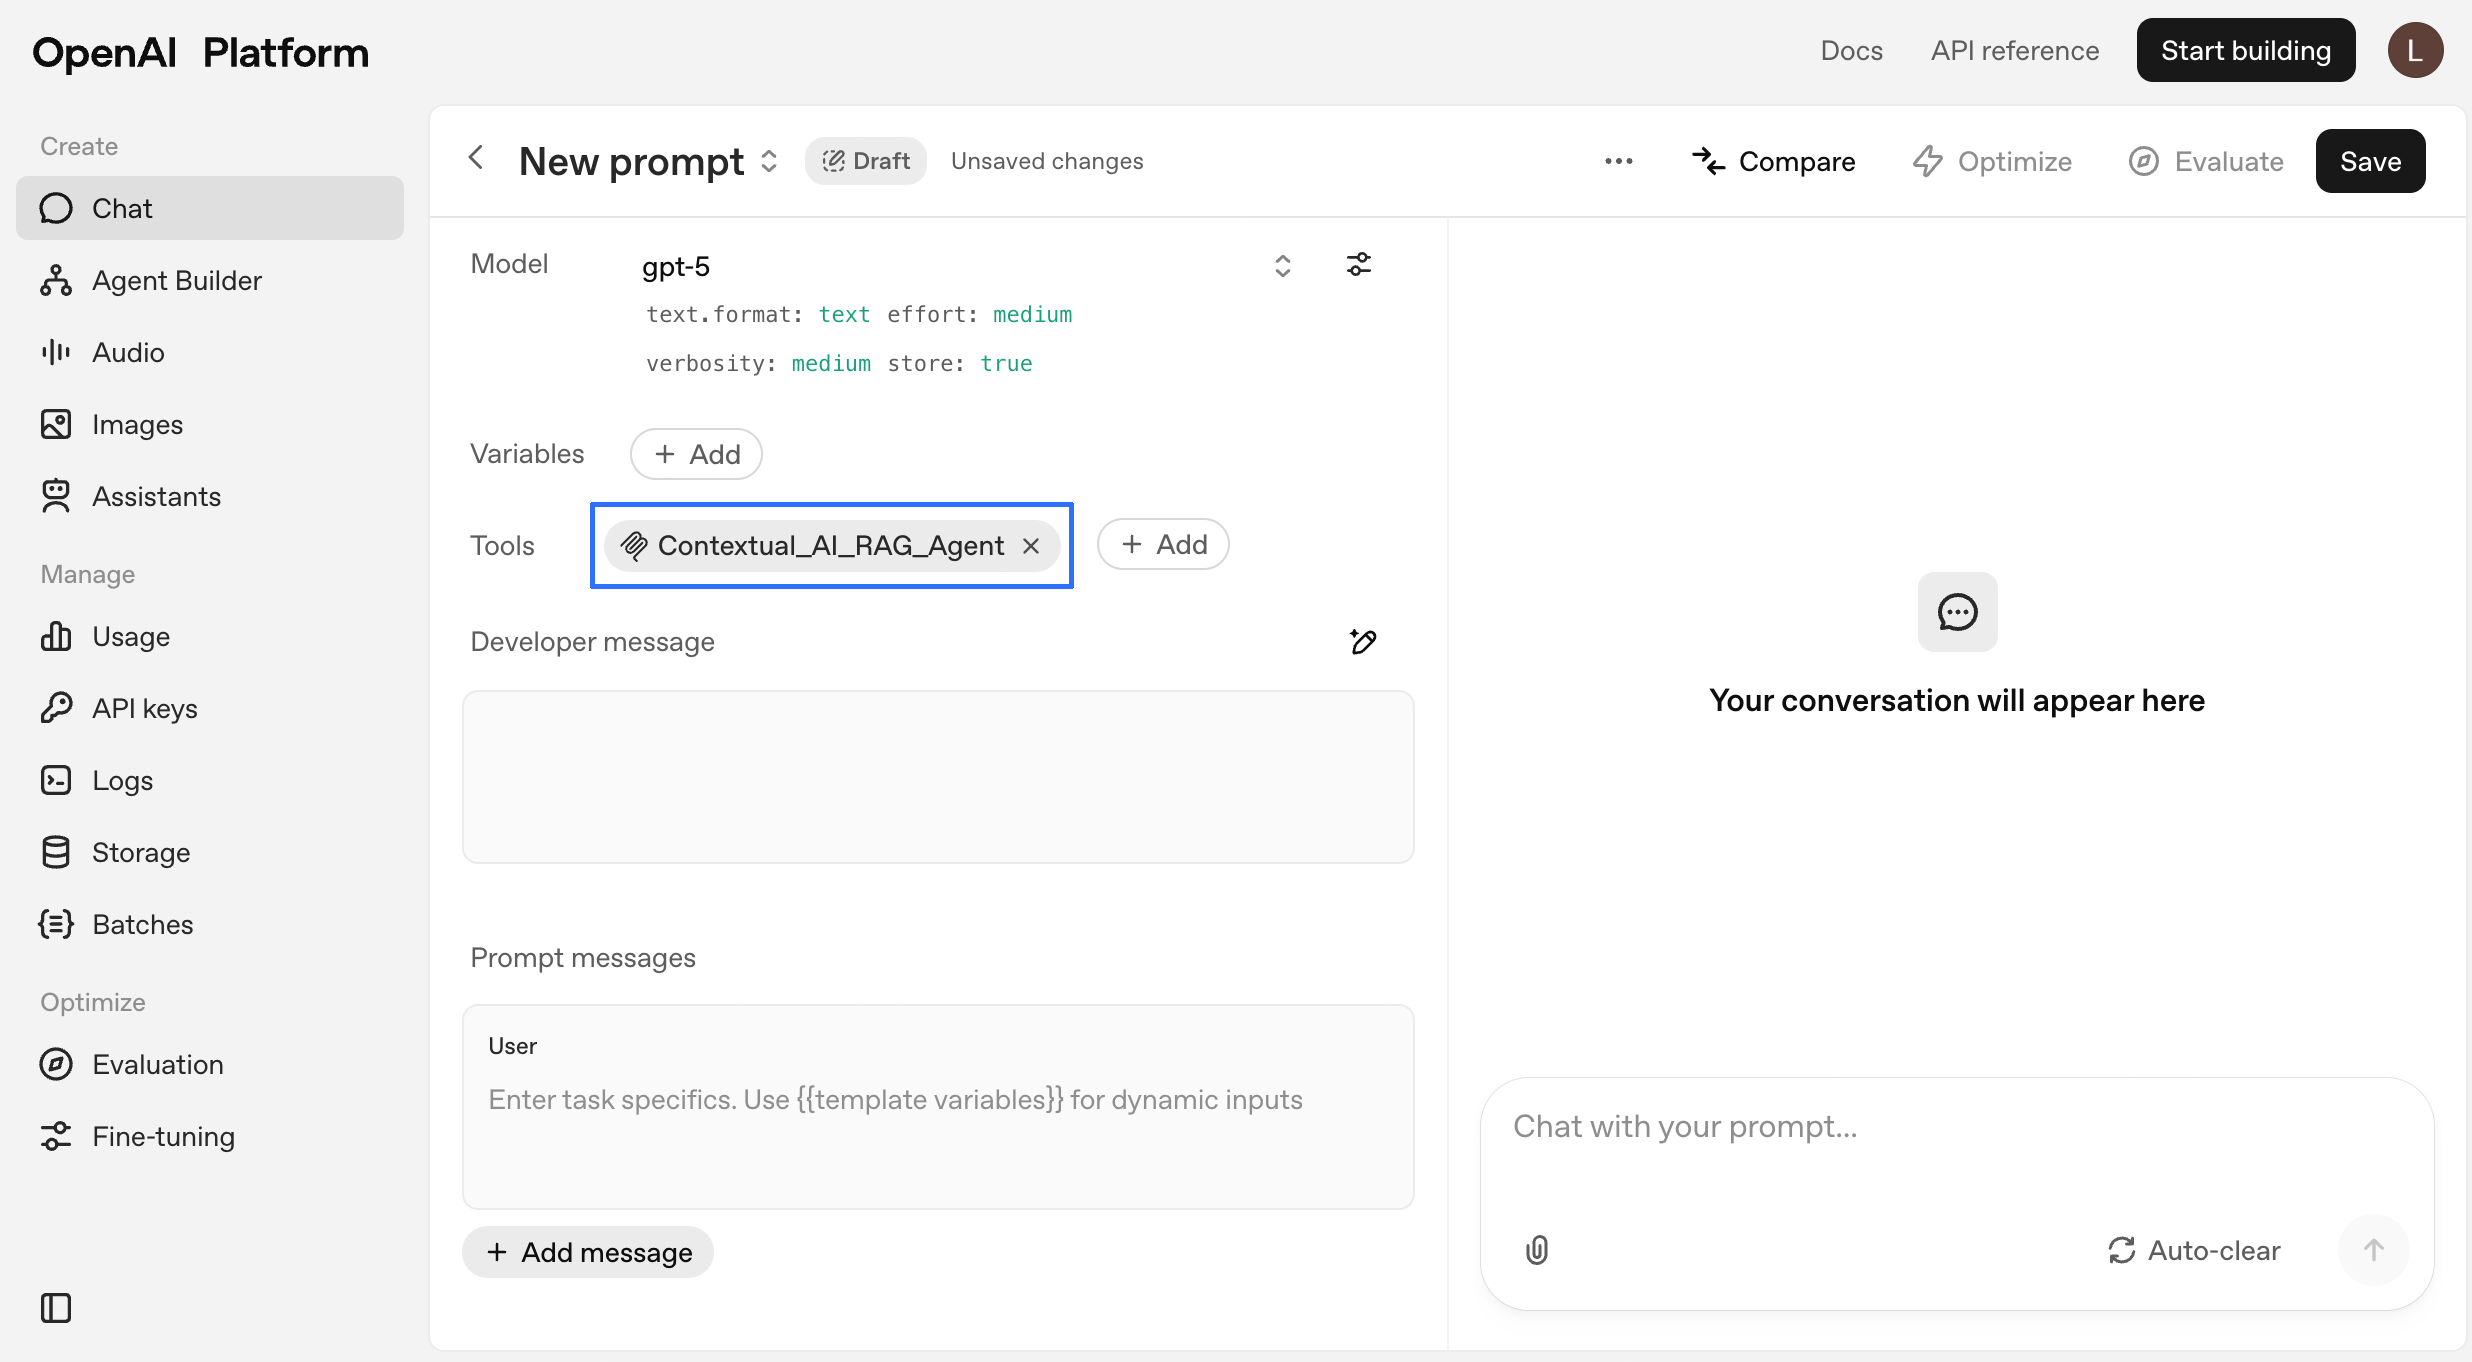 Under **Developer message**, enter a message like this:
```
Use RAG platform with agent_id {YOUR_AGENT_ID} to answer {RELEVANT_QUERY}.
```
Under **Developer message**, enter a message like this:
```
Use RAG platform with agent_id {YOUR_AGENT_ID} to answer {RELEVANT_QUERY}.
```
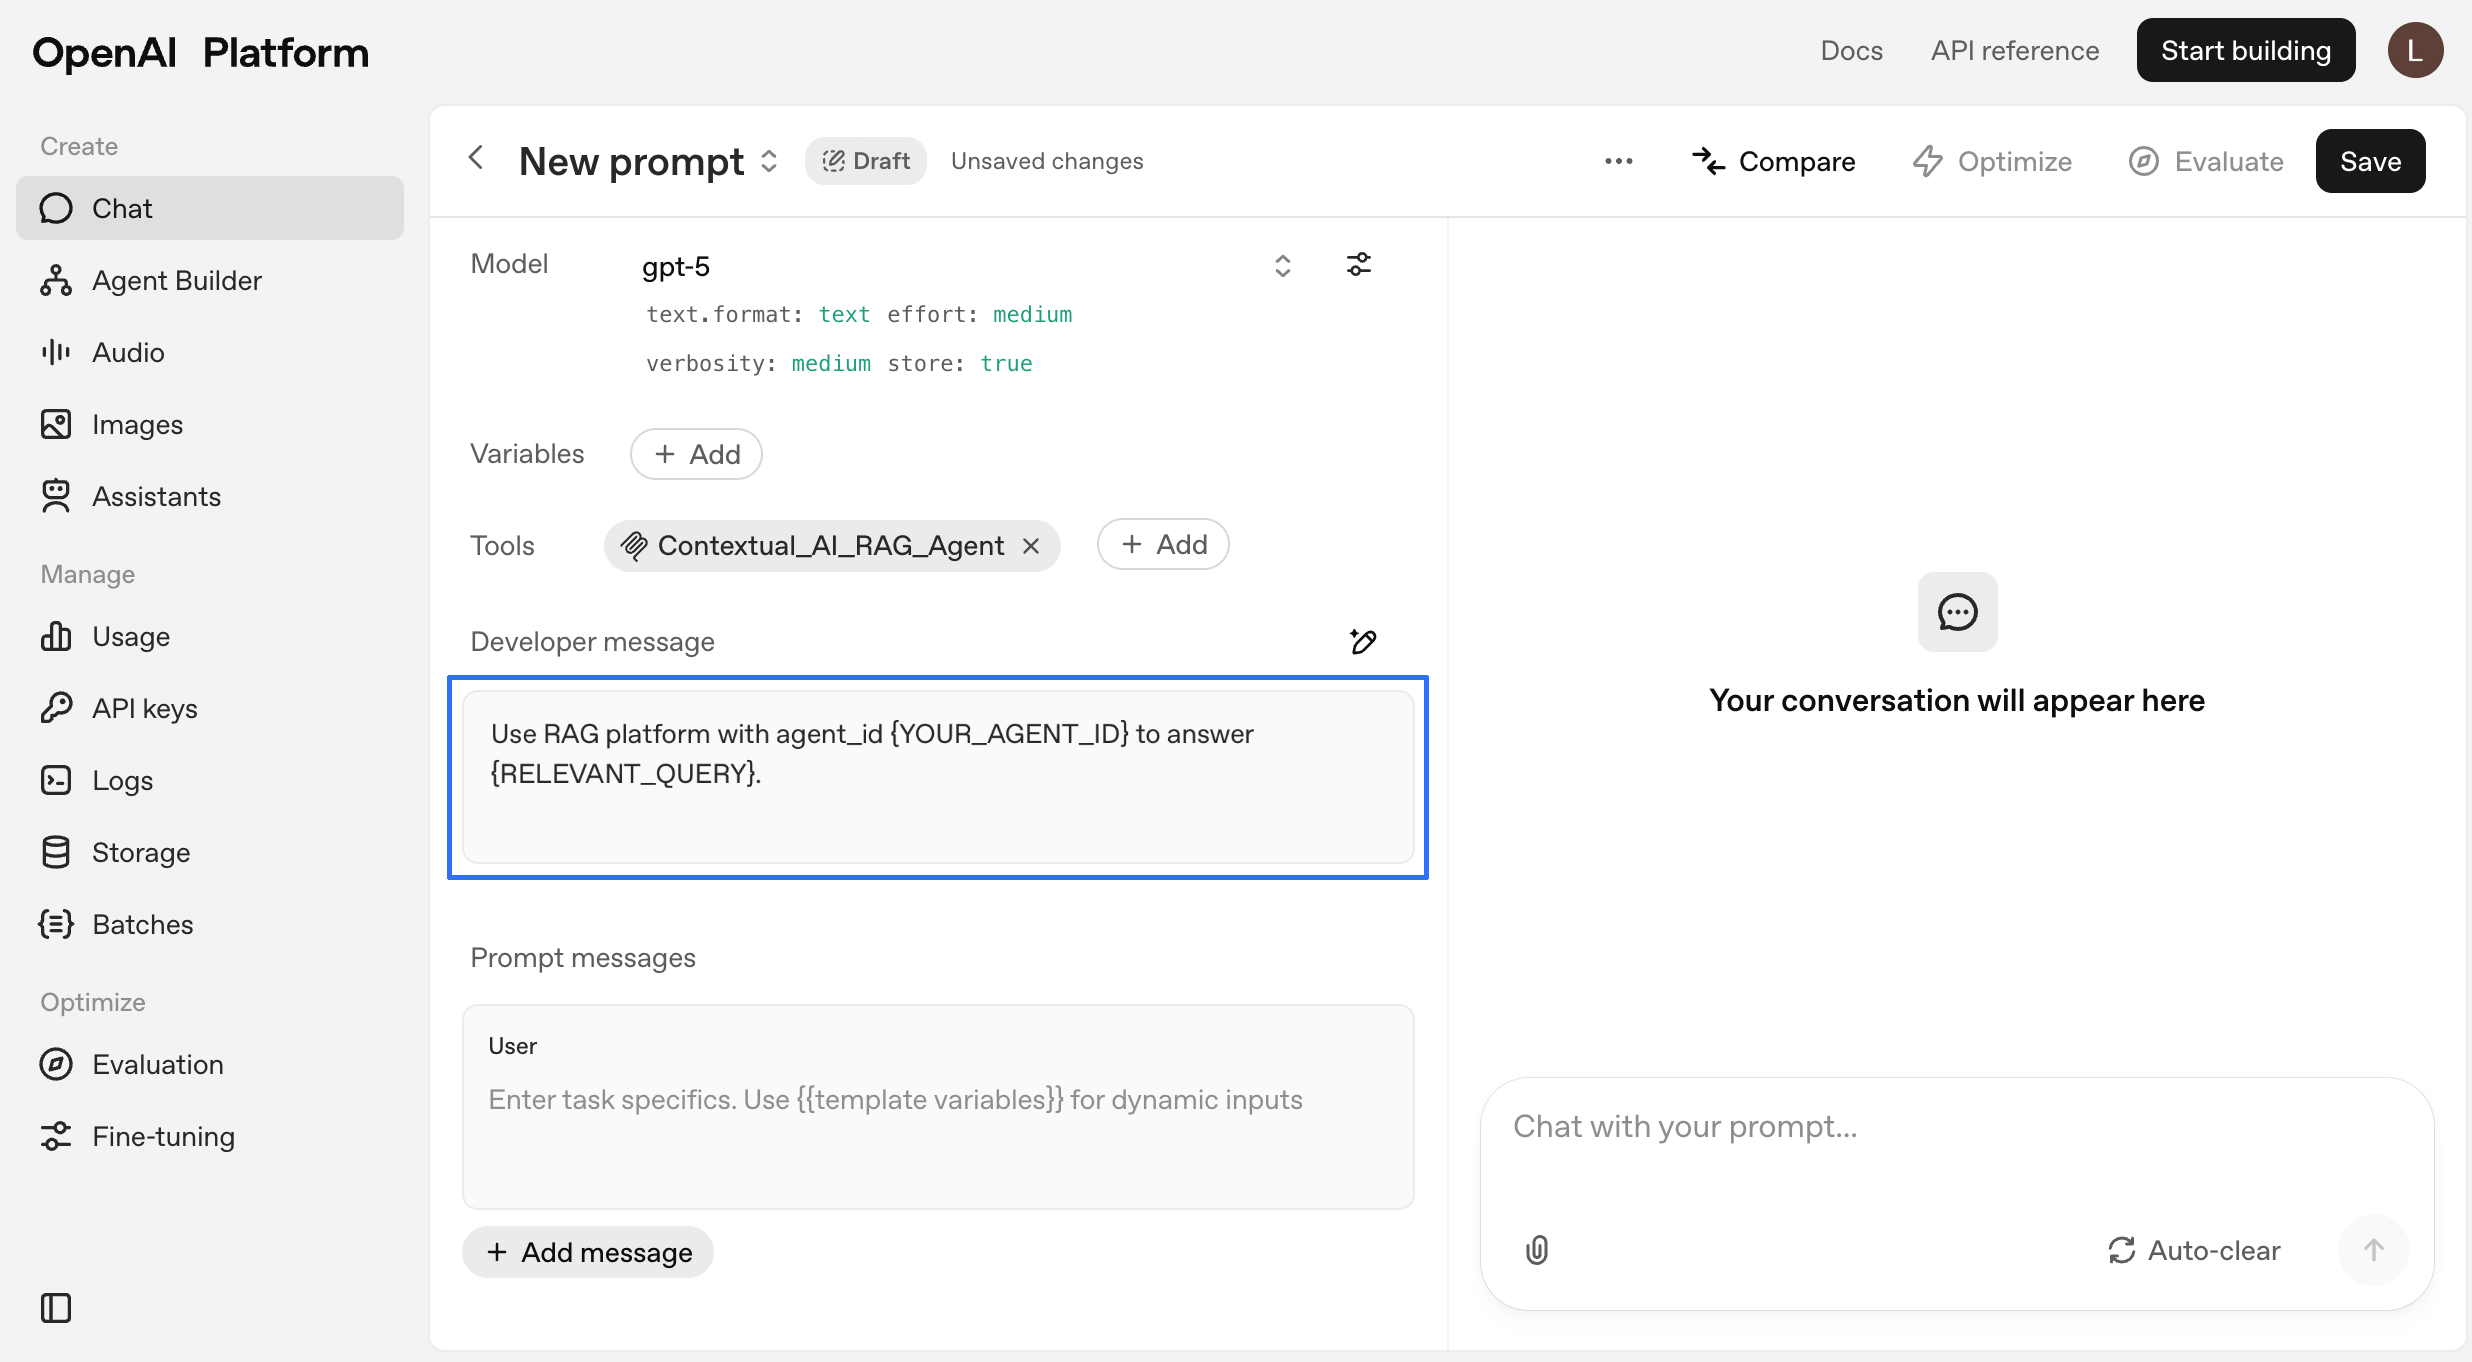 5. In settings under [Data controls -> Hosted tools](https://platform.openai.com/settings/organization/data-controls/hosted-tools), verify that **MCP tool usage** is enabled for your project.
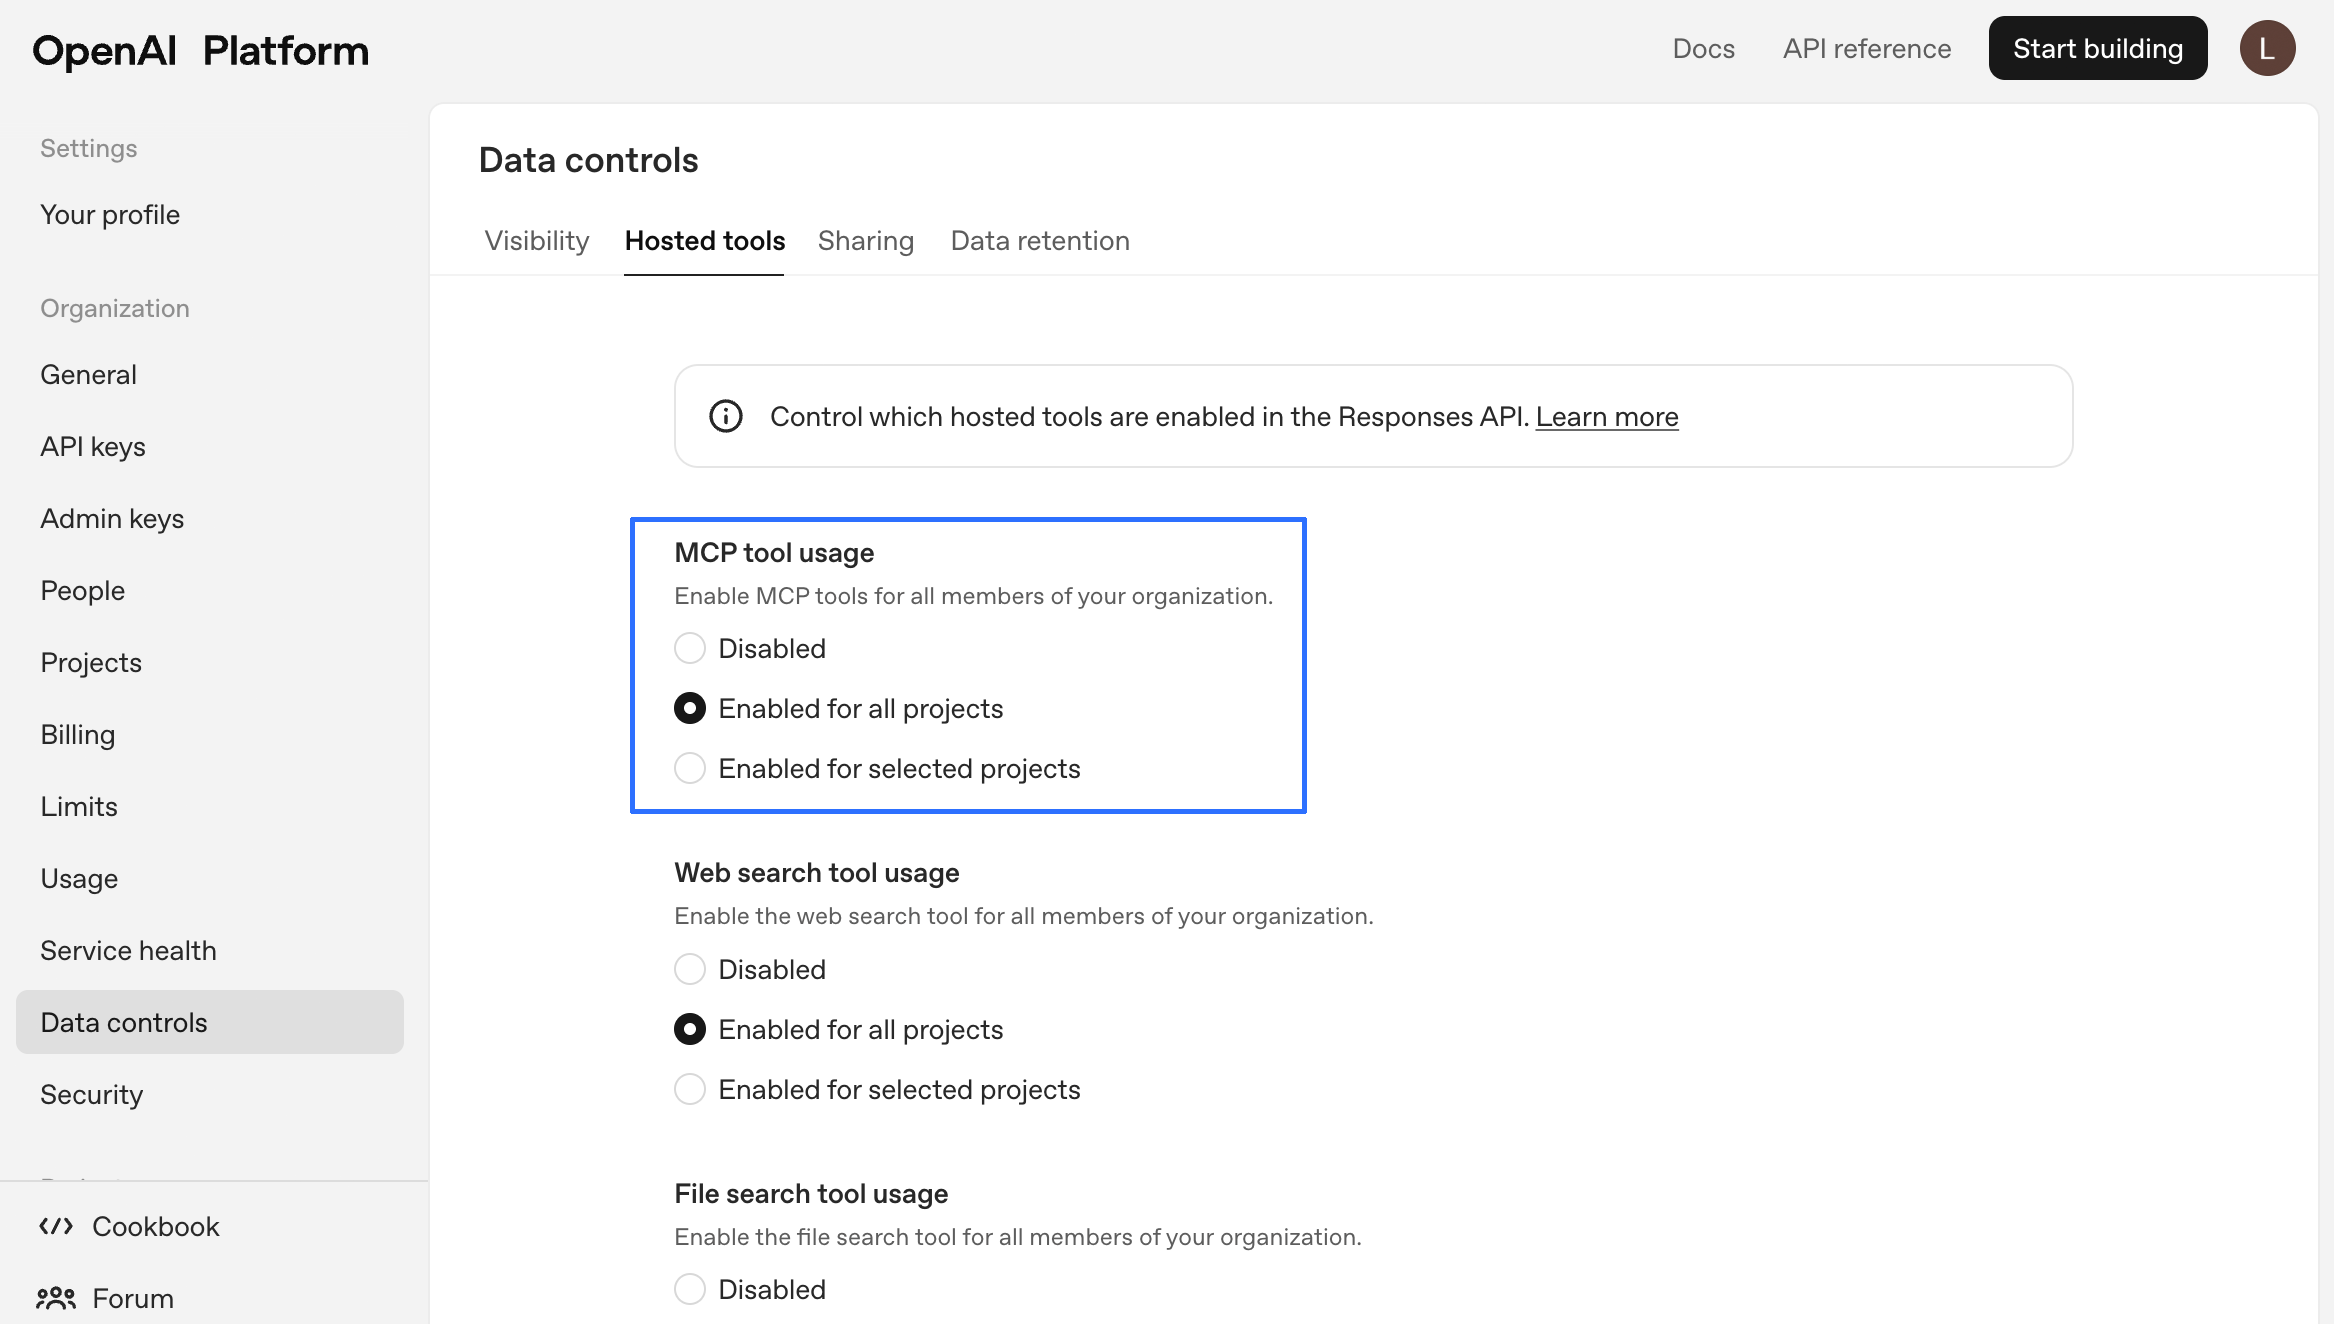 You’re now ready to chat!
> ⚠️ **Note:** If you’re using one or more MCP servers, they’ll stop working after you save your prompt or reopen the chat. To reconfigure:
>
> 1. Open the MCP server settings in your AI client (e.g., OpenAI, Cursor IDE).
> 2. For each MCP server, verify the server URL, API key, and Agent ID are correct.
> 3. Re-enter or update any missing information, then save the configuration.
> 4. Wait up to 30 seconds for the servers to reconnect and become available.
> This process ensures your MCP servers are restored and ready for use.
### Cursor IDE
1. Create the MCP configuration file. For Cursor, you can use one of these locations:
* Project-specific - `.cursor/mcp.json` in your project directory
* Global - `~/.cursor/mcp.json` for system-wide access
2. Add the configuration:
```
{
"mcpServers": {
"ContextualAI": {
"url": "https://mcp.app.contextual.ai/mcp/",
}
}
}
```
3. Restart Cursor IDE
Now, you can use your Contextual MCP server with Cursor in several ways.
1. Cursor IDE chat
In Cursor's chat interface, you might ask:
```
Use RAG platform with api_key key-YOUR_API_KEY and agent_id YOUR_AGENT_ID, show me RELEVANT_QUERY.
```
The MCP client will route the query to your Contextual AI agent and generate a response to Cursor.
2. Test script to check for connectivity
You may also run a short test script to verify the connection in Cursor:
```
#!/usr/bin/env python3
"""
Quick test script for ContextualAI HTTP MCP Server
Replace the following placeholders with your actual values:
- YOUR_API_KEY: Your Contextual AI API key
- YOUR_AGENT_ID: Your Contextual AI agent ID
- YOUR_QUERY: Your test question for the agent
"""
import asyncio
from fastmcp import Client
# Server configuration
SERVER_URL = "https://mcp.app.contextual.ai/mcp/"
API_KEY = "key-YOUR_API_KEY"
def extract_result(result):
"""Extract text from FastMCP result format"""
if isinstance(result, list) and len(result) > 0:
return result[0].text
return str(result)
async def quick_test():
"""Quick test of essential functionality"""
print("=== Quick ContextualAI HTTP MCP Test ===\n")
try:
# Use Streamable HTTP transport (the working one!)
from fastmcp.client.transports import StreamableHttpTransport
transport = StreamableHttpTransport(
url=SERVER_URL,
headers={
"Authorization": f"Bearer {API_KEY}",
"Content-Type": "application/json"
}
)
async with Client(transport) as client:
# Test 1: Server connection
print("🔌 Testing server connection...")
await client.ping()
print("✅ Server is reachable")
# Test 2: List tools
tools = await client.list_tools()
print(f"✅ Available tools: {[tool.name for tool in tools]}")
# Test 3: Your query
print("\n🔍 Testing query:")
print("Query: 'YOUR_QUERY'")
result = await client.call_tool("query", {
"prompt": "YOUR_QUERY",
"agent_id": "YOUR_AGENT_ID",
"api_key": API_KEY
})
response = extract_result(result)
print(f"Response: {response}")
print("\n" + "="*80 + "\n")
print("🎉 All tests completed successfully!")
except Exception as e:
print(f"❌ Test failed: {e}")
print("Please check:")
print("- Server URL is correct")
print("- API key is valid")
print("- Network connectivity")
print("- FastMCP is installed: pip install fastmcp")
if __name__ == "__main__":
asyncio.run(quick_test())
```
To run the test:
1. Install FastMCP: `pip install fastmcp`
2. Replace placeholders with your actual values
3. Run: `python test_script.py`
***
## Local MCP Server Installation
### Prerequisites
* Python 3.10 or higher
* Cursor IDE and/or Claude Desktop
* Contextual AI API key
* MCP-compatible environment
### Installation
1. Clone the repository:
```bash theme={null}
git clone https://github.com/ContextualAI/contextual-mcp-server.git
cd contextual-mcp-server
```
2. Create and activate a virtual environment:
```bash theme={null}
python -m venv .venv
source .venv/bin/activate # On Windows, use `.venv\Scripts\activate`
```
3. Install dependencies:
```bash theme={null}
pip install -e .
```
### Configuration
#### Configure MCP Server
The server requires modifications of settings or use. For example, the single use server should be customized with an appropriate docstring for your RAG Agent.
The docstring for your query tool is critical as it helps the MCP client understand when to route questions to your RAG agent. Make it specific to your knowledge domain. Here is an example:
```
A research tool focused on financial data on the largest US firms
```
or
```
A research tool focused on technical documents for Omaha semiconductors
```
The server also requires the following settings from your RAG Agent:
* `API_KEY`: Your Contextual AI API key
* `AGENT_ID`: Your Contextual AI agent ID
If you'd like to store these files in `.env` file you can specify them like so:
```bash theme={null}
cat > .env << EOF
API_KEY=key...
AGENT_ID=...
EOF
```
#### AI Interface Integration
This MCP server can be integrated with a variety of clients. To use with either Cursor IDE or Claude Desktop create or modify the MCP configuration file in the appropriate location:
1. First, find the path to your `uv` installation:
```bash theme={null}
UV_PATH=$(which uv)
echo $UV_PATH
# Example output: /Users/username/miniconda3/bin/uv
```
2. Create the configuration file using the full path from step 1:
```bash theme={null}
cat > mcp.json << EOF
{
"mcpServers": {
"ContextualAI-TechDocs": {
"command": "$UV_PATH", # make sure this is set properly
"args": [
"--directory",
"\${workspaceFolder}", # Will be replaced with your project path
"run",
"multi-agent/server.py"
]
}
}
}
EOF
```
3. Move to the correct folder location, see below for options:
```bash theme={null}
mkdir -p .cursor/
mv mcp.json .cursor/
```
Configuration locations:
* For Cursor:
* Project-specific: `.cursor/mcp.json` in your project directory
* Global: `~/.cursor/mcp.json` for system-wide access
* For Claude Desktop:
* Use the same configuration file format in the appropriate Claude Desktop configuration directory
#### Environment Setup
This project uses `uv` for dependency management, which provides faster and more reliable Python package installation.
### Usage
\
The current server focuses on using the query command from the Contextual AI python SDK, however you could extend this to support other features such as listing all the agents, updating retrieval settings, updating prompts, extracting retrievals, or downloading metrics.
For example, in Cursor, you might ask:
```
Show me the code for initiating the RF345 microchip?
```
The MCP client will
1. Determine if this should be routed to the MCP Server
Then the MCP server will
1. Route the query to the Contextual AI agent
2. Retrieve relevant documentation
3. Generate a response with specific citations
4. Return the formatted answer to Cursor
## Additional Resources
* [Contextual AI MCP Server on GitHub](https://github.com/ContextualAI/contextual-mcp-server)
* [Contextual AI MCP Server How-to Guide](/how-to-guides/mcp-server-user-guide)
You’re now ready to chat!
> ⚠️ **Note:** If you’re using one or more MCP servers, they’ll stop working after you save your prompt or reopen the chat. To reconfigure:
>
> 1. Open the MCP server settings in your AI client (e.g., OpenAI, Cursor IDE).
> 2. For each MCP server, verify the server URL, API key, and Agent ID are correct.
> 3. Re-enter or update any missing information, then save the configuration.
> 4. Wait up to 30 seconds for the servers to reconnect and become available.
> This process ensures your MCP servers are restored and ready for use.
### Cursor IDE
1. Create the MCP configuration file. For Cursor, you can use one of these locations:
* Project-specific - `.cursor/mcp.json` in your project directory
* Global - `~/.cursor/mcp.json` for system-wide access
2. Add the configuration:
```
{
"mcpServers": {
"ContextualAI": {
"url": "https://mcp.app.contextual.ai/mcp/",
}
}
}
```
3. Restart Cursor IDE
Now, you can use your Contextual MCP server with Cursor in several ways.
1. Cursor IDE chat
In Cursor's chat interface, you might ask:
```
Use RAG platform with api_key key-YOUR_API_KEY and agent_id YOUR_AGENT_ID, show me RELEVANT_QUERY.
```
The MCP client will route the query to your Contextual AI agent and generate a response to Cursor.
2. Test script to check for connectivity
You may also run a short test script to verify the connection in Cursor:
```
#!/usr/bin/env python3
"""
Quick test script for ContextualAI HTTP MCP Server
Replace the following placeholders with your actual values:
- YOUR_API_KEY: Your Contextual AI API key
- YOUR_AGENT_ID: Your Contextual AI agent ID
- YOUR_QUERY: Your test question for the agent
"""
import asyncio
from fastmcp import Client
# Server configuration
SERVER_URL = "https://mcp.app.contextual.ai/mcp/"
API_KEY = "key-YOUR_API_KEY"
def extract_result(result):
"""Extract text from FastMCP result format"""
if isinstance(result, list) and len(result) > 0:
return result[0].text
return str(result)
async def quick_test():
"""Quick test of essential functionality"""
print("=== Quick ContextualAI HTTP MCP Test ===\n")
try:
# Use Streamable HTTP transport (the working one!)
from fastmcp.client.transports import StreamableHttpTransport
transport = StreamableHttpTransport(
url=SERVER_URL,
headers={
"Authorization": f"Bearer {API_KEY}",
"Content-Type": "application/json"
}
)
async with Client(transport) as client:
# Test 1: Server connection
print("🔌 Testing server connection...")
await client.ping()
print("✅ Server is reachable")
# Test 2: List tools
tools = await client.list_tools()
print(f"✅ Available tools: {[tool.name for tool in tools]}")
# Test 3: Your query
print("\n🔍 Testing query:")
print("Query: 'YOUR_QUERY'")
result = await client.call_tool("query", {
"prompt": "YOUR_QUERY",
"agent_id": "YOUR_AGENT_ID",
"api_key": API_KEY
})
response = extract_result(result)
print(f"Response: {response}")
print("\n" + "="*80 + "\n")
print("🎉 All tests completed successfully!")
except Exception as e:
print(f"❌ Test failed: {e}")
print("Please check:")
print("- Server URL is correct")
print("- API key is valid")
print("- Network connectivity")
print("- FastMCP is installed: pip install fastmcp")
if __name__ == "__main__":
asyncio.run(quick_test())
```
To run the test:
1. Install FastMCP: `pip install fastmcp`
2. Replace placeholders with your actual values
3. Run: `python test_script.py`
***
## Local MCP Server Installation
### Prerequisites
* Python 3.10 or higher
* Cursor IDE and/or Claude Desktop
* Contextual AI API key
* MCP-compatible environment
### Installation
1. Clone the repository:
```bash theme={null}
git clone https://github.com/ContextualAI/contextual-mcp-server.git
cd contextual-mcp-server
```
2. Create and activate a virtual environment:
```bash theme={null}
python -m venv .venv
source .venv/bin/activate # On Windows, use `.venv\Scripts\activate`
```
3. Install dependencies:
```bash theme={null}
pip install -e .
```
### Configuration
#### Configure MCP Server
The server requires modifications of settings or use. For example, the single use server should be customized with an appropriate docstring for your RAG Agent.
The docstring for your query tool is critical as it helps the MCP client understand when to route questions to your RAG agent. Make it specific to your knowledge domain. Here is an example:
```
A research tool focused on financial data on the largest US firms
```
or
```
A research tool focused on technical documents for Omaha semiconductors
```
The server also requires the following settings from your RAG Agent:
* `API_KEY`: Your Contextual AI API key
* `AGENT_ID`: Your Contextual AI agent ID
If you'd like to store these files in `.env` file you can specify them like so:
```bash theme={null}
cat > .env << EOF
API_KEY=key...
AGENT_ID=...
EOF
```
#### AI Interface Integration
This MCP server can be integrated with a variety of clients. To use with either Cursor IDE or Claude Desktop create or modify the MCP configuration file in the appropriate location:
1. First, find the path to your `uv` installation:
```bash theme={null}
UV_PATH=$(which uv)
echo $UV_PATH
# Example output: /Users/username/miniconda3/bin/uv
```
2. Create the configuration file using the full path from step 1:
```bash theme={null}
cat > mcp.json << EOF
{
"mcpServers": {
"ContextualAI-TechDocs": {
"command": "$UV_PATH", # make sure this is set properly
"args": [
"--directory",
"\${workspaceFolder}", # Will be replaced with your project path
"run",
"multi-agent/server.py"
]
}
}
}
EOF
```
3. Move to the correct folder location, see below for options:
```bash theme={null}
mkdir -p .cursor/
mv mcp.json .cursor/
```
Configuration locations:
* For Cursor:
* Project-specific: `.cursor/mcp.json` in your project directory
* Global: `~/.cursor/mcp.json` for system-wide access
* For Claude Desktop:
* Use the same configuration file format in the appropriate Claude Desktop configuration directory
#### Environment Setup
This project uses `uv` for dependency management, which provides faster and more reliable Python package installation.
### Usage
\
The current server focuses on using the query command from the Contextual AI python SDK, however you could extend this to support other features such as listing all the agents, updating retrieval settings, updating prompts, extracting retrievals, or downloading metrics.
For example, in Cursor, you might ask:
```
Show me the code for initiating the RF345 microchip?
```
The MCP client will
1. Determine if this should be routed to the MCP Server
Then the MCP server will
1. Route the query to the Contextual AI agent
2. Retrieve relevant documentation
3. Generate a response with specific citations
4. Return the formatted answer to Cursor
## Additional Resources
* [Contextual AI MCP Server on GitHub](https://github.com/ContextualAI/contextual-mcp-server)
* [Contextual AI MCP Server How-to Guide](/how-to-guides/mcp-server-user-guide)