> ## Documentation Index
> Fetch the complete documentation index at: https://docs.contextual.ai/llms.txt
> Use this file to discover all available pages before exploring further.
# Agent Composer GUI
> Using the Agent Composer GUI to visually build workflows
The Agent Composer GUI is available in public preview. Template agents (Basic Search and Agentic Search) are available for self-serve users, but using the visual workflow builder for custom workflows requires enterprise access. For more information or to request access, please contact your Contextual AI representative.
## Overview
The Agent Composer GUI provides a visual way to build agent workflows in Contextual AI, replacing manual YAML with an intuitive, drag-and-drop canvas.
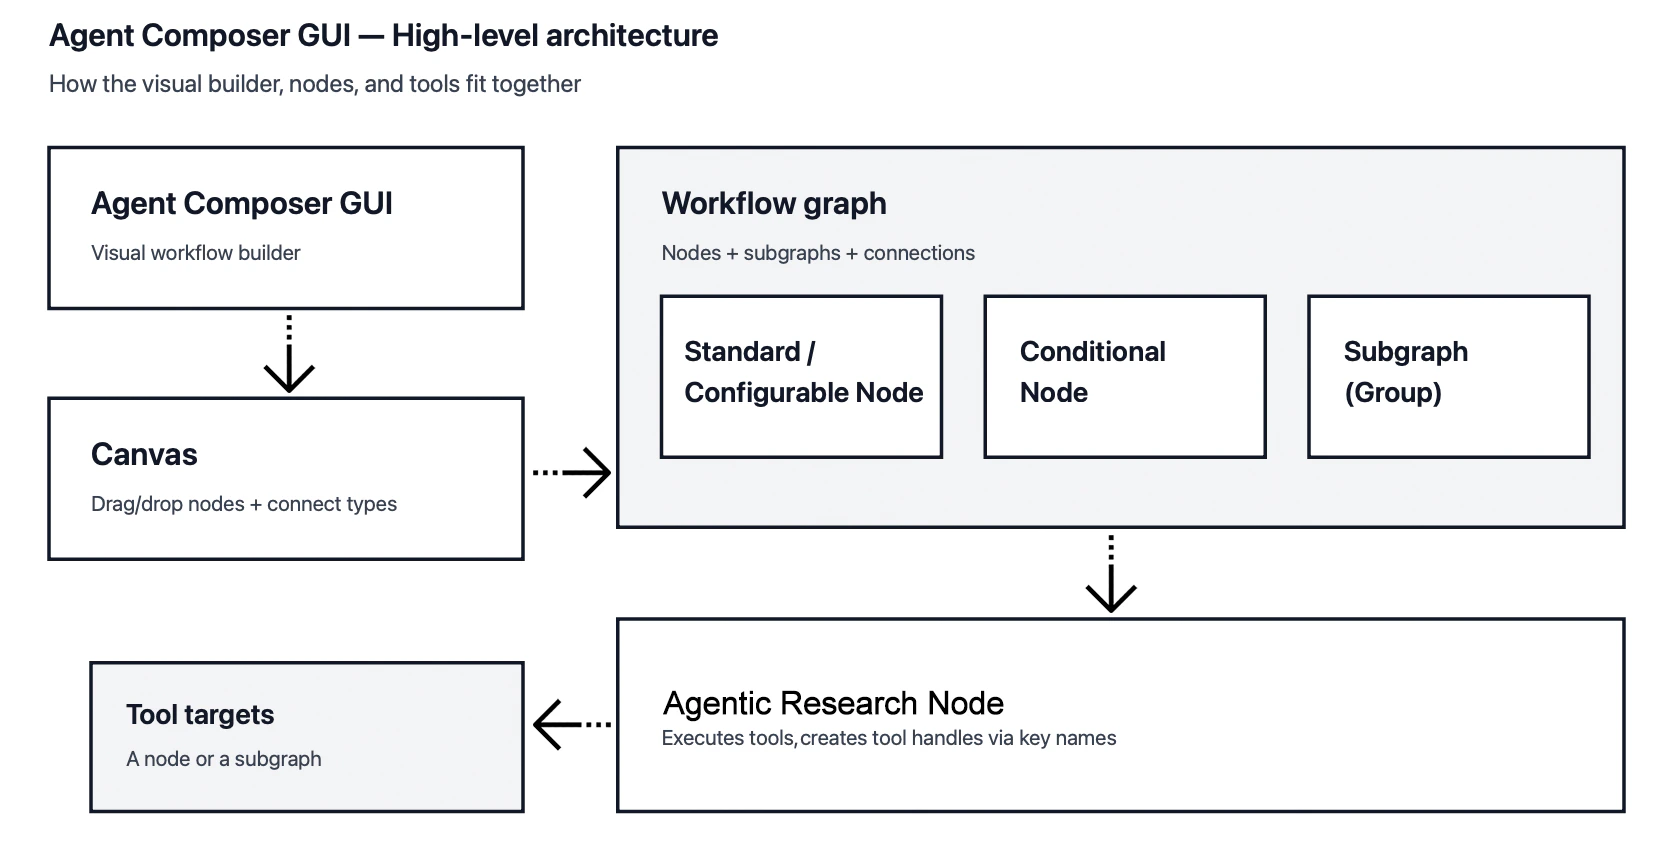 | Component | Description | Function |
| ------------------ | ----------------------------------------- | --------------------------- |
| Agent Composer GUI | Visual builder for agent workflows | Replaces hand-written YAML |
| Canvas | Area where nodes are placed and connected | Supports drag, drop, select |
| Node Drawer | Right-side panel for adding nodes | Drag onto canvas |
Together, these components ensure workflows are type-safe, executable, and quick to move from concept to a working agent.
***
## Building an Agent Workflow
To create an agent workflow, open the Workflow Builder and add nodes from the drawer to define each step of the process. As the workflow grows, group related nodes into subgraphs to keep the graph organized and reusable, then connect nodes with type-safe connections to define how data flows between components.
| Component | Description | Function |
| ------------------ | ----------------------------------------- | --------------------------- |
| Agent Composer GUI | Visual builder for agent workflows | Replaces hand-written YAML |
| Canvas | Area where nodes are placed and connected | Supports drag, drop, select |
| Node Drawer | Right-side panel for adding nodes | Drag onto canvas |
Together, these components ensure workflows are type-safe, executable, and quick to move from concept to a working agent.
***
## Building an Agent Workflow
To create an agent workflow, open the Workflow Builder and add nodes from the drawer to define each step of the process. As the workflow grows, group related nodes into subgraphs to keep the graph organized and reusable, then connect nodes with type-safe connections to define how data flows between components.
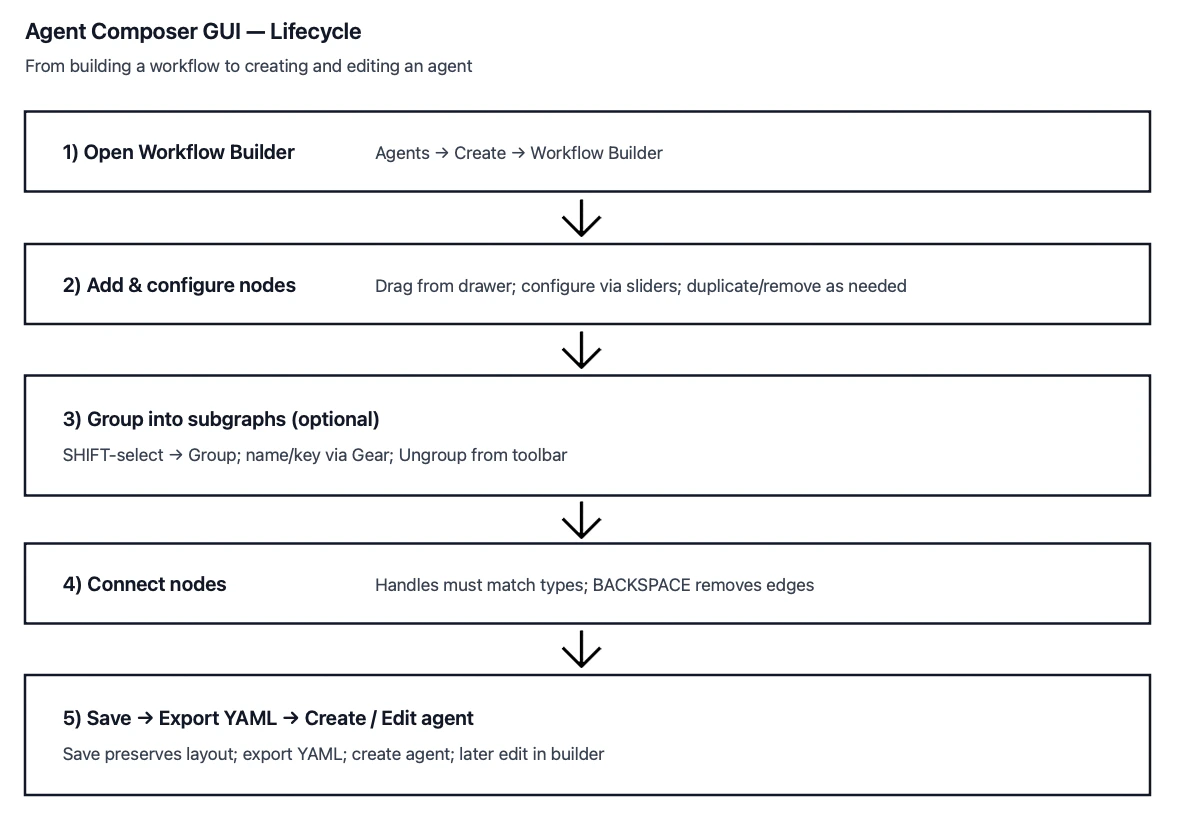 When the workflow is complete, save your progress, optionally export the graph as YAML, and create or update an agent. This allows you to iterate and refine the workflow over time.
***
## Nodes
Agent Composer workflows are built from a set of node types, each designed to serve a specific role within an agent’s execution graph. Some nodes perform straightforward processing, while others introduce configuration, branching logic, or dynamic behavior at runtime.
### Adding Nodes
Nodes can be added from the right-side drawer by dragging and dropping them onto the canvas.
### Removing Nodes
Remove a node by clicking to select it, then either press `BACKSPACE` or click the trash bin icon in the node's toolbar.
### Duplicating Nodes
Any node can be duplicated for reusability. This will include configuration, connections.
* **Single node:** Select the node and click the **Duplicate** button in the top-left corner of the canvas.
* **Multiple nodes:** Hold `SHIFT`, click and drag on the canvas to create a selection box around the nodes you want to duplicate, then click the **Duplicate** button.
***
## Node Types
By understanding the different node types, you can assemble workflows more intentionally, reuse logic where it makes sense, and build agentic systems that remain flexible and easy to maintain over time.
| Node Type | Description | Configuration | Dynamic Connections | Special Behavior |
| ----------------------- | --------------------------------------------------------------------------- | -------------------- | ------------------- | --------------------------------------------------------- |
| Standard Node | Basic workflow node | Optional | ❌ | Fixed inputs and outputs |
| Configurable Node | Node with required or optional settings | Required or optional | ❌ | Shows validation warnings |
| Dynamic Connection Node | Node with user-defined inputs and outputs | Optional | ✅ | Inputs and outputs are editable |
| Conditional Node | Branching logic node | Optional | ❌ | Executes subgraphs based on evaluated conditions |
| Agentic Research Node | Executes an internal agent loop with tool access for planning and retrieval | Required | ✅ (tools) | Plans and invokes tools to gather information iteratively |
| Subgraph | Grouped nodes representing reusable workflows | Optional | Depends | Reusable and can be embedded or exposed as a tool |
### Nodes with Dynamic Connections
Some nodes allow their connections to be dynamically configured by the user. These nodes are marked with a **Wire Icon**. Depending on the node type, you can add/remove/edit:
* **Inputs** (left handle)
* **Outputs** (right handle)
* **Tools** (top handle for nodes / bottom handle for DynamicAgent)
* **Configuration Overrides** (left handle with diamond icon)
Each input and output must include a **key** and a **type**. The type determines which connections can be attached—connections are only valid if their types match.
### Configurable Nodes
Some nodes require configuration, indicated by a **Sliders Icon**. Nodes with required configuration fields will display an orange message. Other nodes may have optional configuration available. Clicking the **Sliders Icon** in the node’s toolbar will open a dialog to fill out the configuration form.
### Special Nodes
#### Conditional Nodes
Conditional nodes allow you to execute different subgraphs based on runtime conditions.
#### Agentic Research Nodes
Agentic Research nodes execute a structured agent loop that plans, retrieves information using explicitly defined tools, and iteratively gathers the context needed to answer a query.
***
## Grouping Nodes with Subgraphs
Subgraphs allow you to group multiple nodes into a single, reusable unit within a workflow. By encapsulating related logic behind a named boundary, subgraphs make complex workflows easier to understand, maintain, and reuse.
A subgraph can be configured with its own name and key, resized or ungrouped as needed, and even attached as a tool to a DynamicAgent node, enabling modular and composable agent designs.
### Creating a Subgraph
Multiple nodes can be grouped into a subgraph:
1. Hold `SHIFT`, click and drag to create a selection box around the nodes you want to group
2. Click the "Group" button in the top-left corner of the canvas
3. The subgraph can be resized by clicking and dragging its edges or corners
4. A subgraph can be ungrouped by selecting the blue box of the group, and clicking “Ungroup” from the node toolbar
### Configuring a Subgraph
To give your subgraph a custom name and key:
1. Select the blue box of the group
2. Click the **Gear Icon** (Configure)
3. Enter a name and key for the subgraph
4. Click **Submit**
***
## Connections
Connections define how data and behavior flow through an Agent Composer workflow. They determine how outputs from one node are passed to inputs on another, how configuration is overridden at runtime, and how tools are exposed to dynamic agents.
| Connection Type | Where Used | Description |
| ---------------------- | ------------- | ----------------------------------- |
| Input / Output | All nodes | Type-checked data flow |
| Tool Connection | DynamicAgent | Attaches node or subgraph as a tool |
| Configuration Override | Dynamic nodes | Overrides runtime configuration |
Because connections are type-checked and validated by the builder, they help ensure workflows are both correct at design time and reliable during execution.
### Adding Connections
Nodes can be connected via their connection handles. Connections must have matching types to successfully connect. To check a connection's type, simply hover over the handle to see its tooltip.
### Removing Connections
Remove a connection by clicking to select its edge (connection line), then press `BACKSPACE`.
### Tool Connections
Tools can be attached to an Agentic Research node to give the agent access to retrieval, processing, or other capabilities during its research loop.
1. Select your **Agentic Research** node and click the **Tool** icon labeled **Tools**.
2. Choose either an individual node or an existing subgraph from the list of available options.
3. Click **Done** to confirm the selection.
4. Provide a key name for the tool connection, which becomes the identifier the agent uses when invoking the tool.
5. The selected node or subgraph is automatically created (if needed) and connected to the Agentic Research node.
***
## Importing
Full YAML graphs can be imported into the builder. The provided YAML string will be converted into visual nodes and connections that you can edit in the interface.
## Exporting
Once you've built your graph, you can export it as a YAML file. This converts the visual graph into a YAML string that can be copied or downloaded.
***
## Saving Progress
Click the **Save** button in the top-right bar above the canvas to save your current progress. This preserves:
* Node positions
* Connections (edges)
* Viewport state
Your progress is saved to browser storage, so you can safely refresh the page or navigate away without losing your work.
***
## Creating an Agent
Once your graph is complete:
1. Click **Save & Continue** to save your progress and proceed to the Agent Creation flow
2. Enter an agent name and attach a datastore
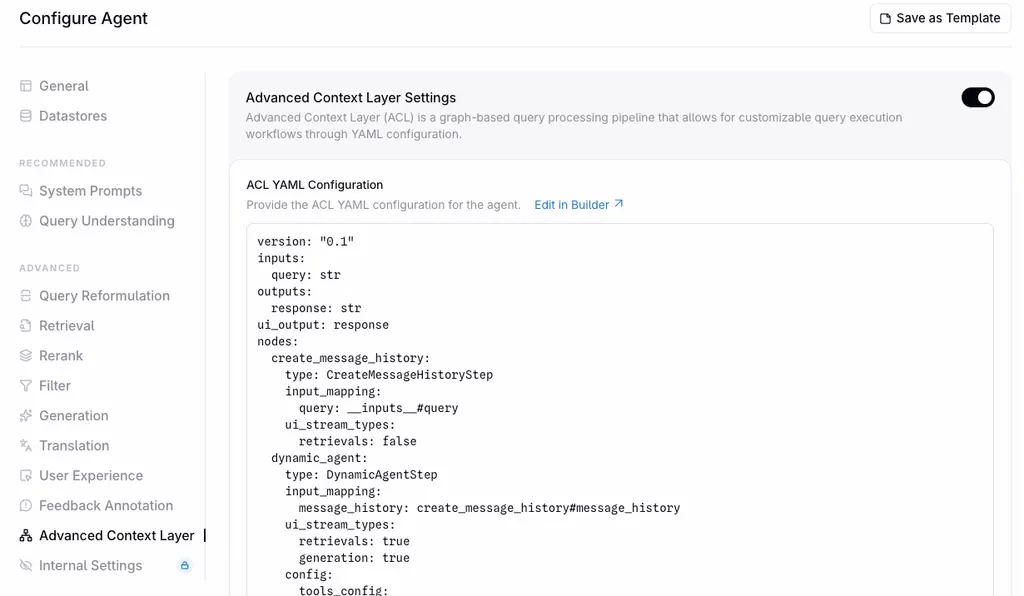
3. Navigate to the **Advanced Context** section to review your generated YAML
4. Click **Create** to finalize your agent
## Editing an Agent
Once in chat you should also be able to go back to the builder view by clicking **Edit in Workflow Builder** from the agent’s action menu. Or when editing an agent, click **Edit in Builder** from the **Advanced Context** section.
When the workflow is complete, save your progress, optionally export the graph as YAML, and create or update an agent. This allows you to iterate and refine the workflow over time.
***
## Nodes
Agent Composer workflows are built from a set of node types, each designed to serve a specific role within an agent’s execution graph. Some nodes perform straightforward processing, while others introduce configuration, branching logic, or dynamic behavior at runtime.
### Adding Nodes
Nodes can be added from the right-side drawer by dragging and dropping them onto the canvas.
### Removing Nodes
Remove a node by clicking to select it, then either press `BACKSPACE` or click the trash bin icon in the node's toolbar.
### Duplicating Nodes
Any node can be duplicated for reusability. This will include configuration, connections.
* **Single node:** Select the node and click the **Duplicate** button in the top-left corner of the canvas.
* **Multiple nodes:** Hold `SHIFT`, click and drag on the canvas to create a selection box around the nodes you want to duplicate, then click the **Duplicate** button.
***
## Node Types
By understanding the different node types, you can assemble workflows more intentionally, reuse logic where it makes sense, and build agentic systems that remain flexible and easy to maintain over time.
| Node Type | Description | Configuration | Dynamic Connections | Special Behavior |
| ----------------------- | --------------------------------------------------------------------------- | -------------------- | ------------------- | --------------------------------------------------------- |
| Standard Node | Basic workflow node | Optional | ❌ | Fixed inputs and outputs |
| Configurable Node | Node with required or optional settings | Required or optional | ❌ | Shows validation warnings |
| Dynamic Connection Node | Node with user-defined inputs and outputs | Optional | ✅ | Inputs and outputs are editable |
| Conditional Node | Branching logic node | Optional | ❌ | Executes subgraphs based on evaluated conditions |
| Agentic Research Node | Executes an internal agent loop with tool access for planning and retrieval | Required | ✅ (tools) | Plans and invokes tools to gather information iteratively |
| Subgraph | Grouped nodes representing reusable workflows | Optional | Depends | Reusable and can be embedded or exposed as a tool |
### Nodes with Dynamic Connections
Some nodes allow their connections to be dynamically configured by the user. These nodes are marked with a **Wire Icon**. Depending on the node type, you can add/remove/edit:
* **Inputs** (left handle)
* **Outputs** (right handle)
* **Tools** (top handle for nodes / bottom handle for DynamicAgent)
* **Configuration Overrides** (left handle with diamond icon)
Each input and output must include a **key** and a **type**. The type determines which connections can be attached—connections are only valid if their types match.
### Configurable Nodes
Some nodes require configuration, indicated by a **Sliders Icon**. Nodes with required configuration fields will display an orange message. Other nodes may have optional configuration available. Clicking the **Sliders Icon** in the node’s toolbar will open a dialog to fill out the configuration form.
### Special Nodes
#### Conditional Nodes
Conditional nodes allow you to execute different subgraphs based on runtime conditions.
#### Agentic Research Nodes
Agentic Research nodes execute a structured agent loop that plans, retrieves information using explicitly defined tools, and iteratively gathers the context needed to answer a query.
***
## Grouping Nodes with Subgraphs
Subgraphs allow you to group multiple nodes into a single, reusable unit within a workflow. By encapsulating related logic behind a named boundary, subgraphs make complex workflows easier to understand, maintain, and reuse.
A subgraph can be configured with its own name and key, resized or ungrouped as needed, and even attached as a tool to a DynamicAgent node, enabling modular and composable agent designs.
### Creating a Subgraph
Multiple nodes can be grouped into a subgraph:
1. Hold `SHIFT`, click and drag to create a selection box around the nodes you want to group
2. Click the "Group" button in the top-left corner of the canvas
3. The subgraph can be resized by clicking and dragging its edges or corners
4. A subgraph can be ungrouped by selecting the blue box of the group, and clicking “Ungroup” from the node toolbar
### Configuring a Subgraph
To give your subgraph a custom name and key:
1. Select the blue box of the group
2. Click the **Gear Icon** (Configure)
3. Enter a name and key for the subgraph
4. Click **Submit**
***
## Connections
Connections define how data and behavior flow through an Agent Composer workflow. They determine how outputs from one node are passed to inputs on another, how configuration is overridden at runtime, and how tools are exposed to dynamic agents.
| Connection Type | Where Used | Description |
| ---------------------- | ------------- | ----------------------------------- |
| Input / Output | All nodes | Type-checked data flow |
| Tool Connection | DynamicAgent | Attaches node or subgraph as a tool |
| Configuration Override | Dynamic nodes | Overrides runtime configuration |
Because connections are type-checked and validated by the builder, they help ensure workflows are both correct at design time and reliable during execution.
### Adding Connections
Nodes can be connected via their connection handles. Connections must have matching types to successfully connect. To check a connection's type, simply hover over the handle to see its tooltip.
### Removing Connections
Remove a connection by clicking to select its edge (connection line), then press `BACKSPACE`.
### Tool Connections
Tools can be attached to an Agentic Research node to give the agent access to retrieval, processing, or other capabilities during its research loop.
1. Select your **Agentic Research** node and click the **Tool** icon labeled **Tools**.
2. Choose either an individual node or an existing subgraph from the list of available options.
3. Click **Done** to confirm the selection.
4. Provide a key name for the tool connection, which becomes the identifier the agent uses when invoking the tool.
5. The selected node or subgraph is automatically created (if needed) and connected to the Agentic Research node.
***
## Importing
Full YAML graphs can be imported into the builder. The provided YAML string will be converted into visual nodes and connections that you can edit in the interface.
## Exporting
Once you've built your graph, you can export it as a YAML file. This converts the visual graph into a YAML string that can be copied or downloaded.
***
## Saving Progress
Click the **Save** button in the top-right bar above the canvas to save your current progress. This preserves:
* Node positions
* Connections (edges)
* Viewport state
Your progress is saved to browser storage, so you can safely refresh the page or navigate away without losing your work.
***
## Creating an Agent
Once your graph is complete:
1. Click **Save & Continue** to save your progress and proceed to the Agent Creation flow
2. Enter an agent name and attach a datastore
3. Navigate to the **Advanced Context** section to review your generated YAML
4. Click **Create** to finalize your agent
## Editing an Agent
Once in chat you should also be able to go back to the builder view by clicking **Edit in Workflow Builder** from the agent’s action menu. Or when editing an agent, click **Edit in Builder** from the **Advanced Context** section.
 ## Additional Resources
* [Agent Composer Quickstart Guide](/quickstarts/agent-composer)
* [Agent Composer YAML How-to Guide](/how-to-guides/agent-composer-yaml)
## Additional Resources
* [Agent Composer Quickstart Guide](/quickstarts/agent-composer)
* [Agent Composer YAML How-to Guide](/how-to-guides/agent-composer-yaml)