> ## Documentation Index
> Fetch the complete documentation index at: https://docs.contextual.ai/llms.txt
> Use this file to discover all available pages before exploring further.
# Google Drive
> Connect your Google Drive documents to Contextual AI
## Connecting Google Drive
Log in through the Contextual AI UI and follow these steps to configure Google Drive as a data source.
### 1. Set Data Source Name & Type
* Click **Datastores** in the left-hand pane, followed by the **Create** button in the top right.
* Give your datastore a unique name, then select **Third-Party Connection** as the method for adding content to your datastore. Click the **Next** button.
* On the **Connection Setup** page, you can **set up auto top-off** to automatically add credits when low, or click **Skip for now** to bypass this step.
**Note:** Auto top-off is recommended in [On Demand mode](https://docs.contextual.ai/user-guides/billing) to prevent ingestions from failing halfway if you use up your balance.
 ### 2. Review Access Levels & Set Account Type
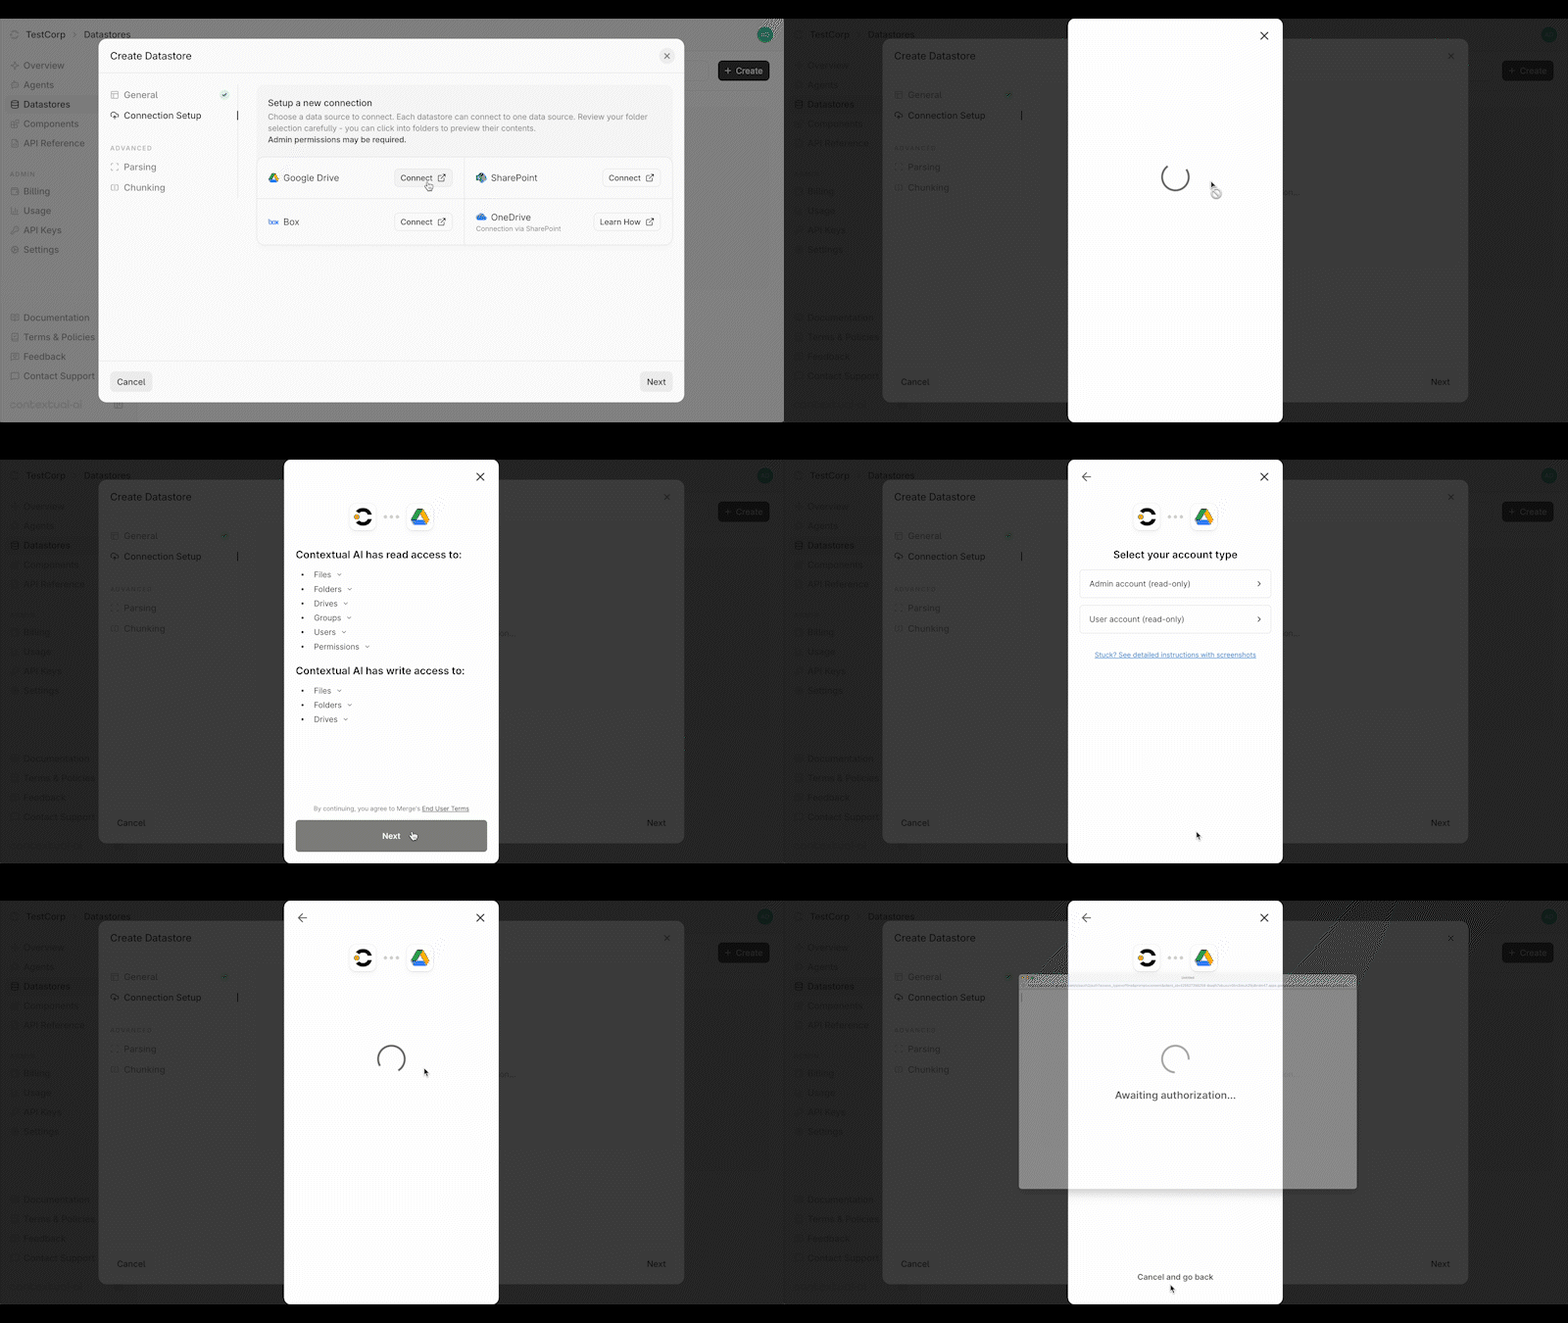
* Click the **Connect** button next to **Google Drive**.
* Confirm Contextual AI's read/write access levels and review the end user terms. Click **Next** to continue.
* Select your **Account Type**:
**Admin account (read-only)** - You are setting up a connection for your organization and have admin access to your data source.
**User account (read-only)** - You are setting up a personal connection or do not have admin access to your data source.
Please [refer to this link](https://help.merge.dev/articles/9280406-why-are-specific-scopes-needed-for-file-storage-integrations) for a full list of permissions you need for admin authorization.
* Click **Open window** to authorize your account.
### 2. Review Access Levels & Set Account Type
* Click the **Connect** button next to **Google Drive**.
* Confirm Contextual AI's read/write access levels and review the end user terms. Click **Next** to continue.
* Select your **Account Type**:
**Admin account (read-only)** - You are setting up a connection for your organization and have admin access to your data source.
**User account (read-only)** - You are setting up a personal connection or do not have admin access to your data source.
Please [refer to this link](https://help.merge.dev/articles/9280406-why-are-specific-scopes-needed-for-file-storage-integrations) for a full list of permissions you need for admin authorization.
* Click **Open window** to authorize your account.
 ### 3. Authorize Connection & Sync Settings
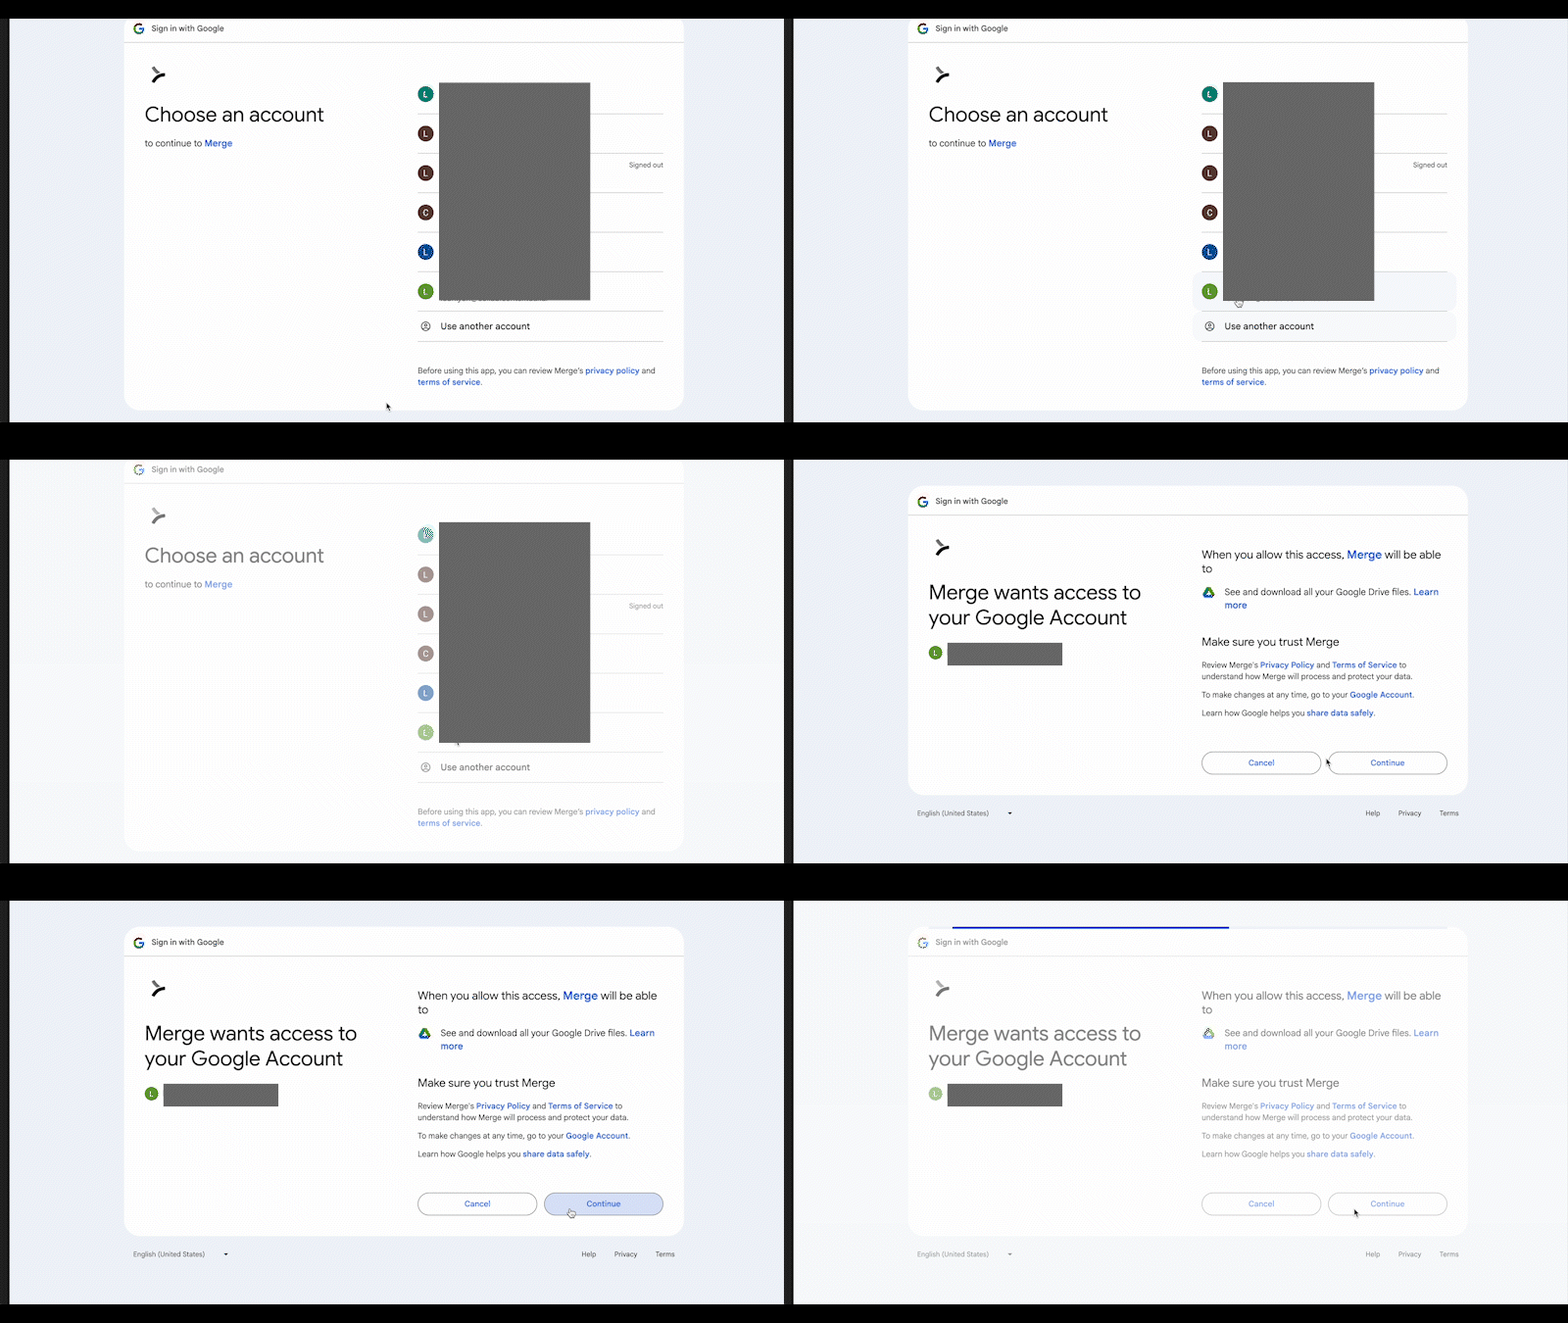
* In the pop-up window, select the account for authorizing the connection.
* Click **Continue** to authorize the connection.
### 3. Authorize Connection & Sync Settings
* In the pop-up window, select the account for authorizing the connection.
* Click **Continue** to authorize the connection.
 ### 4. Configure Sync Settings
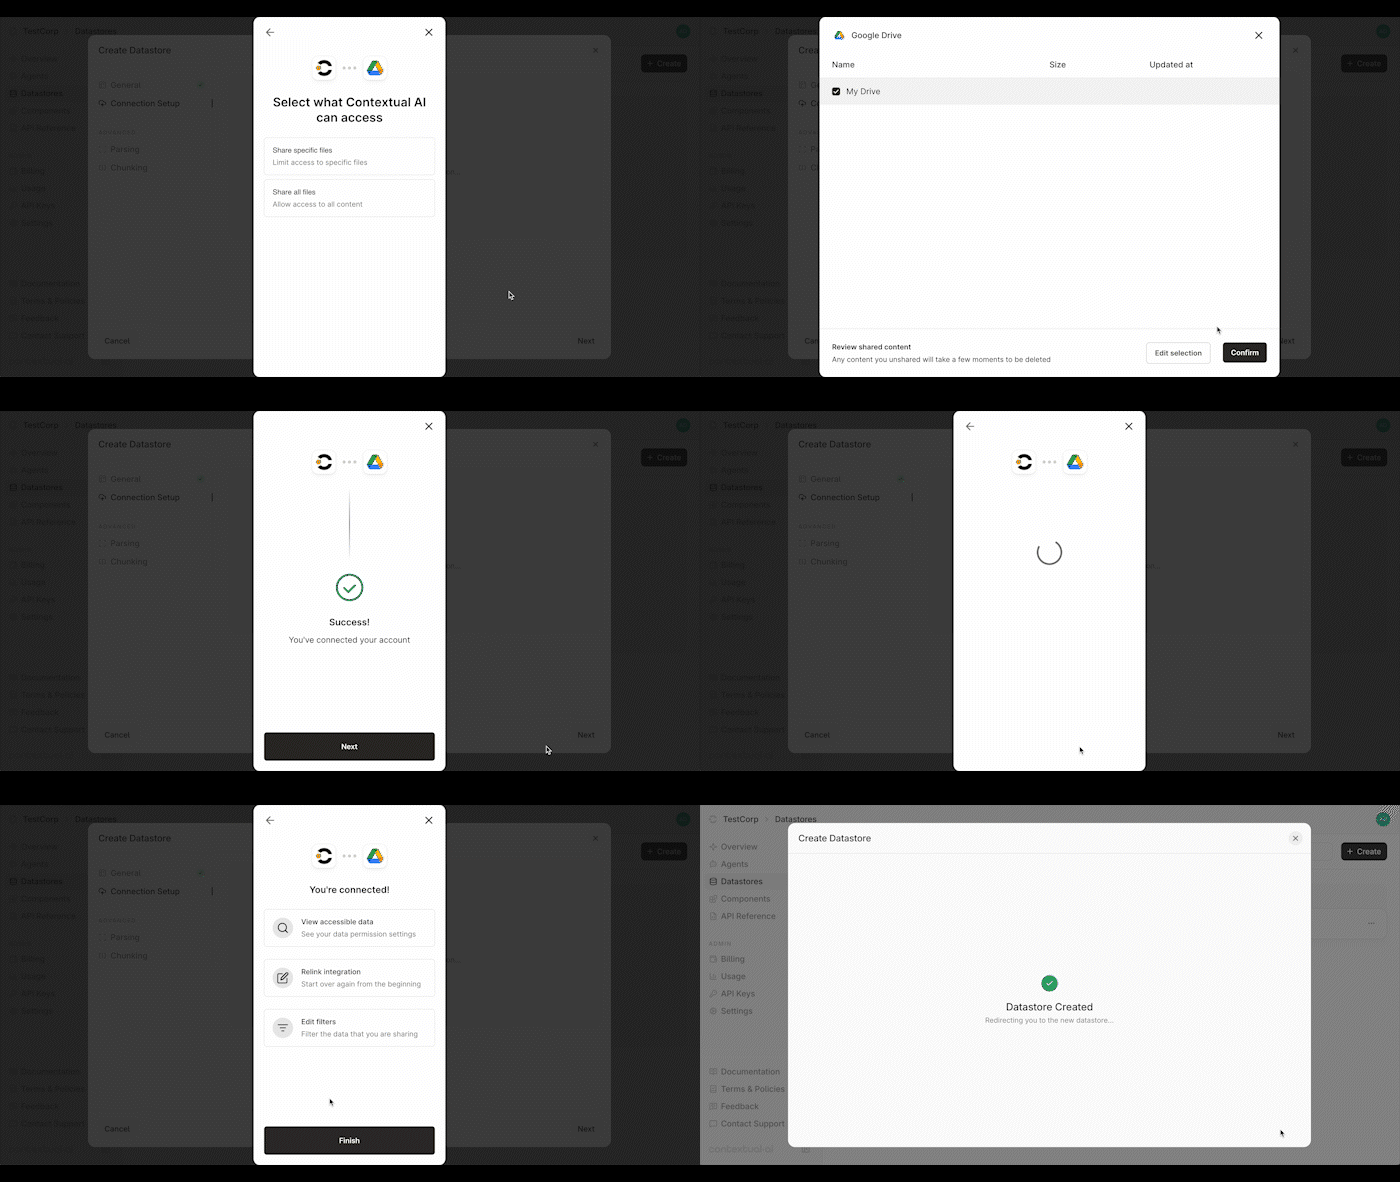
Contextual AI offers two ways to sync your data. You can choose to sync all your files or only specific folders in Google Drive.
#### Sync Options
* **Share all files** - Grants access to all content in your Google Drive.
* **Share specific folders** - Restricts access to only the folders you select.
To share specific folders:
* Hover over the folder and check the box to select it.
* You can click into a folder to view its contents, but note that **only folders**—not individual files—can be selected.
* Select one or multiple folders as needed.
* Click **Confirm** to finalize your selections, then click **Next** once setup is complete.
You can review or edit your connection (for example, to choose a different folder) on the confirmation page. Click **Finish** to continue.
### 4. Configure Sync Settings
Contextual AI offers two ways to sync your data. You can choose to sync all your files or only specific folders in Google Drive.
#### Sync Options
* **Share all files** - Grants access to all content in your Google Drive.
* **Share specific folders** - Restricts access to only the folders you select.
To share specific folders:
* Hover over the folder and check the box to select it.
* You can click into a folder to view its contents, but note that **only folders**—not individual files—can be selected.
* Select one or multiple folders as needed.
* Click **Confirm** to finalize your selections, then click **Next** once setup is complete.
You can review or edit your connection (for example, to choose a different folder) on the confirmation page. Click **Finish** to continue.
 ### 5. Create Datastore & Start Sync
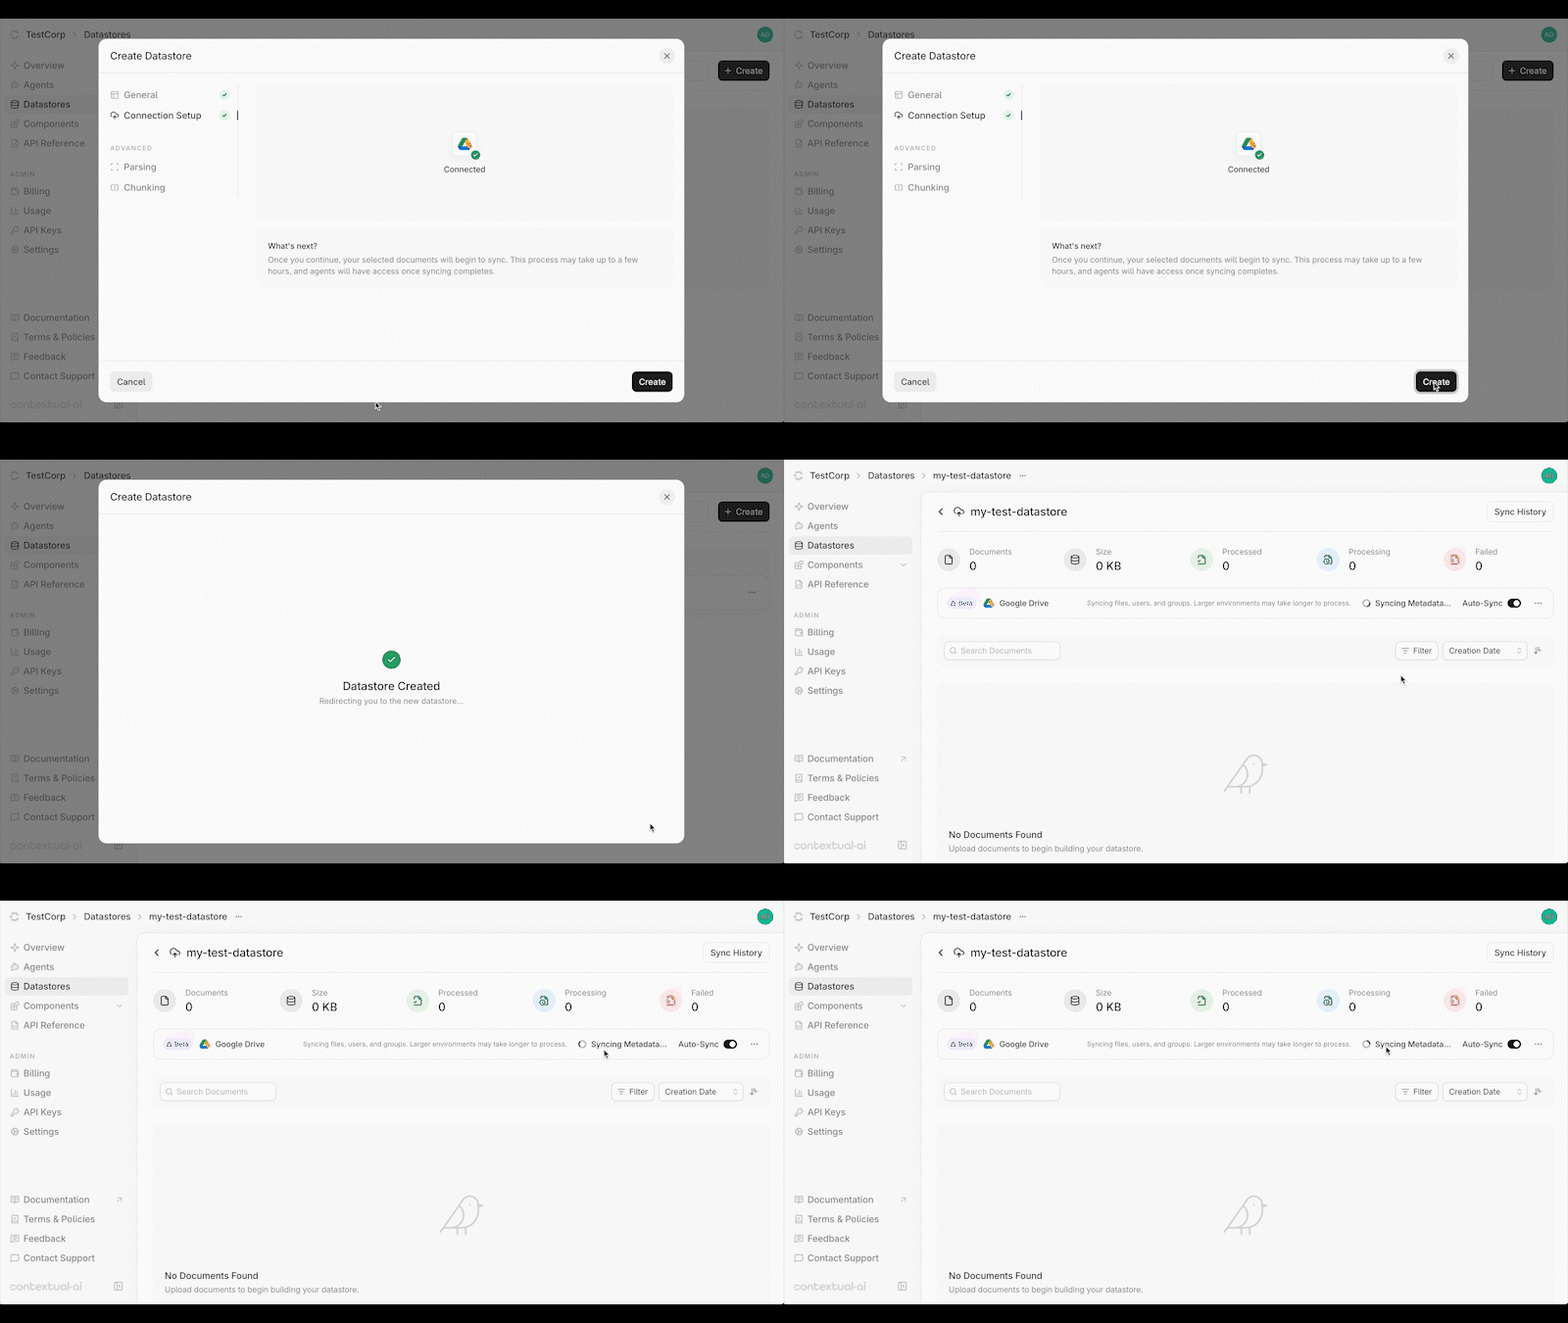
You’re now ready to start syncing your data. Click **Create** to initialize your connection and create your datastore.
You’ll be redirected to your **Datastore** page, where the **Syncing Metadata** status will appear. During this stage, Contextual AI syncs your file metadata, users, and groups.
Once metadata syncing is complete, ingestion will begin automatically and the status will update to **Processing**.
**Note:** The syncing process is typically quick, but may take a few hours if you have a large number of files, users, or groups.
### 5. Create Datastore & Start Sync
You’re now ready to start syncing your data. Click **Create** to initialize your connection and create your datastore.
You’ll be redirected to your **Datastore** page, where the **Syncing Metadata** status will appear. During this stage, Contextual AI syncs your file metadata, users, and groups.
Once metadata syncing is complete, ingestion will begin automatically and the status will update to **Processing**.
**Note:** The syncing process is typically quick, but may take a few hours if you have a large number of files, users, or groups.
You can begin using your datastore while syncing continues, but you’ll only have access to the documents that have already been ingested.
 You can check the progress bar to track how many documents remain to be processed.
Once all documents finish ingesting, you’ll see a **green checkmark** indicating that your datastore is ready to use.
You can check the progress bar to track how many documents remain to be processed.
Once all documents finish ingesting, you’ll see a **green checkmark** indicating that your datastore is ready to use.